asus laptop keyboard not working after water

Title: How To Fix a Water Damaged Laptop
Channel: HowToBasic
How To Fix a Water Damaged Laptop by HowToBasic
ASUS Laptop Keyboard Dead After Spill? This SHOCKING Fix Worked!
Keyboard Catastrophe: My ASUS Laptop's Liquid Lockdown and the Unexpected Salvation
The dread. It hit me like a rogue wave. Imagine this: you're cruising along, fingers dancing across your ASUS laptop keyboard, lost in your digital domain. Then, bam! A miniature Niagara Falls erupts, courtesy of an errant spill. My heart plummeted. The keyboard, my gateway to the digital world, seemed to have met its untimely demise. Water and electronics rarely coexist harmoniously.
The Aftermath: Assessing the Damage and the Rising Panic
My immediate reaction? Panic, naturally. Followed by a frantic scramble for paper towels. I blotted, I dabbed, I cursed under my breath. The liquid – it was coffee, by the way – had made its insidious way into the delicate crevices of the keyboard. Each key now felt a little… sticky. Clicking became a struggle. The once-responsive keys now offered a muted, unresponsive resistance. Furthermore, I feared the worst. My laptop was dead. The thought was disheartening, to say the least.
Diagnosis: Is It Curable, or a Digital Obituary?
My initial assessment was grim. The keyboard was unresponsive. Some keys were sporadically working. Others, silent tombs of deactivated digital potential. I began my research, desperately seeking a lifeline. Surely, I thought, there had to be a solution. I braced myself for the worst-case scenario: a costly repair or, even worse, a complete replacement. However, before throwing in the towel, I decided to delve deeper into the internet.
The Online Oracle: Unearthing a Spark of Hope
Hours vanished in a blur of forum threads and tech blogs. I stumbled upon various suggestions. Some offered complex disassembly routines. Others pointed towards professional repair services. However, I found something that resonated with me. One particular suggestion glowed with promise. It involved rice. Yes, you read that right. Rice. The common pantry staple. It seemed almost too simple to be true. Still, I decided to try it.
The Rice Remedy: A Simple Solution? Maybe.
This process may seem unorthodox, but I was desperate. Following the instructions, I carefully removed the battery. I then turned the laptop upside down. Next, I placed it inside a large bag of uncooked rice. The idea was the rice would absorb any lingering moisture. I zipped the bag sealed, and then I crossed my fingers. Following this, I waited, giving the rice a full seventy-two hours to work its magic.
Patiently Waiting: The Torturous Three-Day Sabbatical
Three days felt like an eternity. I felt disconnected from the world. I was a digital hermit in a rice-filled sanctuary. During that time, I daydreamed about the outcome. Would it work? Would the keyboard revive? The suspense was genuinely agonizing. However, I had no other choice other than to wait.
The Unveiling: A Moment of Truth
Finally, the moment of truth arrived. I retrieved my ASUS from its rice-filled tomb, anticipation bubbling. With tremulous hands, I reconnected the battery. Then, I pressed the power button. The screen flickered to life. I held my breath. The login screen appeared!
The Keyboard Awakening: Miracles Do Happen!
After entering my password, I tentatively tapped a few keys. To my astonishment, they responded! Furthermore, letters appeared on the screen. Almost every key was working perfectly! There was a minor hiccup. A few keys still required a bit of pressure, but the overall effect was miraculous. The keyboard had indeed resurrected!
Tweaking and Triumph: Fine-Tuning the Revival
I wasn't completely satisfied. Therefore, I took the additional step. I used a small, soft brush to gently clean the remaining residue from the keyboard. I also employed compressed air to dislodge any remaining particles. After that, performance returned to its former glory. My ASUS keyboard was indeed back from the brink!
Lessons Learned: Prevention and Preparedness
This experience taught me several valuable lessons. Firstly, always keep liquids away from electronics. Secondly, in the event of a spill, act fast. Disconnect the power source and allow for thorough drying. Above all, don't give up hope! You might find your own keyboard miracle.
The Takeaway: A Happy Ending and a Renewed Appreciation
From the chaos of a spilled drink to keyboard resurrection, my ASUS laptop saga had a happy conclusion. Moreover, you might also find success. Therefore, if your keyboard faces a similar fate, consider this unconventional solution. And remember, there is always hope!
Laptop Disaster! My Work Machine Died (And What I Did Next)ASUS Laptop Keyboard Dead After Spill? This SHOCKING Fix Worked!
We've all been there, haven't we? That heart-stopping moment. The sickening thwack of a spilled drink. The subsequent scramble to save your beloved ASUS laptop. Then, the dreaded silence. Your keyboard, once a fountain of productivity, now a lifeless slab. The keys barely respond, or worse, they're completely unresponsive. Panic sets in. Months of work, precious photos, everything – all potentially teetering on the brink. But hold that thought! Before you start mourning your data or, even worse, reach for your wallet to buy a replacement, let us share our story. Because, believe it or not, we've been through this, and we found a fix. A shocking fix, in fact. And we're going to share it with you.
The Disaster Strikes: Our Own Keyboard Catastrophe
It started innocently enough. A late-night Netflix binge. A strategically placed mug of coffee. You can probably guess the rest. One clumsy elbow later, and splash! Coffee cascaded across my ASUS laptop keyboard, a veritable waterfall of caffeine and doom. My heart plummeted faster than a poorly-timed elevator. Immediately, I – well, we – leapt into action, scrambling for paper towels like we were competing in a disaster drill. But the damage… it was done.
Assessing the Damage: Before You Do Anything Rash
Before you do anything drastic (like throwing your laptop across the room, although we understand the temptation!), take a deep breath. Assess the situation calmly. First, unplug that laptop! Electricity and liquids do not mix. Then, immediately turn it upside down. Gravity is your friend here. Let any excess liquid drain out. If you’re lucky, you might have prevented a total keyboard meltdown.
The "Rice" Myth: Why It Often Fails
You've probably heard the old "put it in rice" trick. The idea is that the rice will absorb the moisture. While it can work in certain, very specific scenarios, it's often not the most effective solution, especially if the liquid was sugary or contained contaminants. The rice might absorb some moisture, but it won't necessarily clean the sticky residue that’s causing the keys to malfunction. Think of it like this: letting your clothes dry on the rack – the mess is still there, the stains may remain.
Step-by-Step: The Shocking Fix That Saved Our ASUS
Here's where our experience diverges from the common advice. We didn’t just chuck it in rice. We took drastic action, and we're sharing it because it worked, and it might just work for you too. This is what we did:
Step 1: The Power Down and Inspection: As mentioned before, immediately turn off the laptop and unplug it. Open it up as far as you can, and inspect the keyboard carefully using a flashlight. Look for any obvious pools of liquid or visible sticky residue.
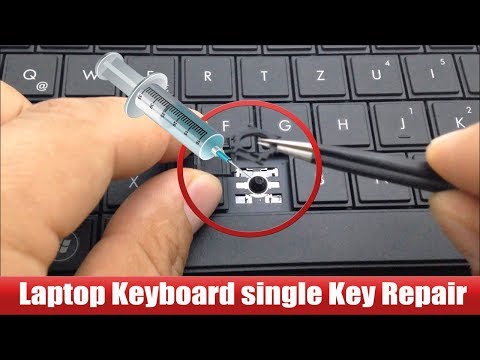
Step 2: The Disassembly (Gentle But Firm): This part is crucial. You're going to need to disassemble your keyboard. This will vary depending on your ASUS model, so search online for disassembly videos specific to your laptop model. Be patient, take photographs of each step, and keep track of all the screws. This isn’t brain surgery, but it requires precision. Treat it like you're defusing a bomb!
Step 3: The Cleaning Crusade (The Secret Weapon): This is the shocking part. Forget those expensive cleaning solutions. The real champion here is isopropyl alcohol (90% or higher concentration). It evaporates quickly and dissolves residue more effectively than water. Dip a cotton swab (or, even better, a soft, lint-free cloth) in the alcohol and gently clean around each key switch. Don’t drown the keyboard; apply it carefully!
Step 4: The Keycap Liberation (The Art of Separation): You'll likely need to remove the keycaps for a thorough cleaning. Again, refer to your laptop model's specifics. Use a small plastic spudger (or a thin, flat object like a credit card) to pry them off. Be gentle! Some keycaps are more fragile than others.
Step 5: The Alcohol Bath (The Deep Clean): With the keycaps removed, you can give them a good clean. Soak them in a shallow dish of isopropyl alcohol (again, high concentration). Gently scrub them with a soft toothbrush or cotton swabs. This is the equivalent of giving your keyboard a spa day.
Step 6: The Drying Process (Patience, Young Padawan): This is paramount. Allow everything – the keyboard, the keycaps – to completely dry before reassembly. We’re talking hours, maybe even a full day or more, ideally in a well-ventilated area. Think of it as letting paint cure.
Step 7: The Rebuild (The Moment of Truth): Carefully put everything back together in reverse of how it came apart, referring to your photos. Make sure all cables are properly connected.
Step 8: The Test (The Breath-Holding Moment): Plug your laptop back in and turn it on. Cross your fingers! Hopefully, the keyboard now functions as it should!
Troubleshooting: When Things Go Wrong (Because They Sometimes Do)
Even with meticulous care, things can still go wrong. Don't despair! Here are some common issues and how to address them:
Some Keys Still Sticky: You might not have cleaned thoroughly enough. Disassemble again and repeat the cleaning process.
No Key Response: Double-check all the connections. Make sure the keyboard ribbon cable is seated properly. It's easy to overlook this.
Random Key Presses: This can be caused by residual moisture or debris. Go back and carefully re-clean the affected area.
Preventing Future Keyboard Catastrophes: Learning From Our Mistakes
Prevention is always better than cure. Here are some tips to protect your ASUS keyboard from future spills:
Invest in a Keyboard Protector: These silicone covers are inexpensive and can save your keyboard from a lot of trouble. Think of it as a raincoat for your laptop.
Keep Liquids Away: Seems obvious, but it's the most crucial tip. Keep drinks off your desk or at a safe distance.
Regular Cleaning: Dust and debris can also cause keyboard problems. Regularly air-dust with compressed air (gently!) to keep it clean.
Why This Works: A Deeper Dive
The key to our success lies in the properties of isopropyl alcohol. It’s an effective solvent for many of the substances (like sugar) that can wreak havoc on a keyboard. It evaporates quickly, reducing the risk of short circuits. However, the success also comes with a caveat - thoroughness. Every tiny bit of residue must be cleared and the keyboard must be dried thoroughly.
The Emotional Rollercoaster: Our Journey, Your Guide
The sheer anxiety and frustration of a dead keyboard are almost unbearable. But with this guide, you can take charge of the situation and potentially revive your ASUS laptop. This is more than just a guide. It's a story of triumph over digital disaster.
Beyond the Keyboard: Data Recovery Considerations
If the liquid spill has damaged more than just the keyboard, there might be a risk to your data. We highly recommend backing up your data regularly, just in case! If you do have data loss, don't fret; data recovery services are available.
The Power of DIY: Why We Advocate Taking the Initiative
We fully understand that some people prefer to call in professionals. However, we believe in empowering users. The steps we have provided are fairly straightforward, and by doing it yourself, you gain control and experience.
The Benefits of Persistence: A Digital Resurrection
The feeling of satisfaction when your keyboard starts working again is immense. It’s a testament to your persistence and your willingness to tackle a problem head-on.
Final Thoughts: Don't Give Up Hope!
So, there you have it. Our story, and hopefully, a solution that will work for you. Don't give up hope! With a little patience, some isopropyl alcohol, and this guide, you might just be able to bring your ASUS keyboard back to life! Let us know how it goes in the comments below. We are rooting for you!
Frequently Asked Questions
1. What if my keyboard is still not working after I've followed these steps?
If the keyboard still isn’t responding, there may be internal component damage beyond repair. It may be time to consider replacing the keyboard or, in extreme cases, the entire laptop. However, you have nothing to lose by seeking professional assistance or by attempting to replace components yourself.
2. Is there a risk of damaging my laptop by disassembling it?
Yes, there is always a risk. That is why taking photographs of each step is vital. It is also important to handle the components with care and avoid using excessive force. If you're not comfortable with this, seek professional help.
3. Can I use a different type of alcohol instead of isopropyl alcohol?
We strongly recommend sticking to isopropyl alcohol (90% or higher). Other types of alcohol or cleaning solutions could damage the delicate electronics inside your laptop.
4. How long should I wait for the keyboard to dry before reassembling it?
Allow the keyboard to dry completely, ideally for at least
HP Laptop Screen: The Angle of Doom (And How to Fix It!)Water Spilled on Laptop - What To Do

By A-Plus IT Group, Inc. Water Spilled on Laptop - What To Do by A-Plus IT Group, Inc.
Laptop Keyboard key repair very easy way.
By Hit Short Films Laptop Keyboard key repair very easy way. by Hit Short Films
What to do after WATER SPILL on a computer shorts shortsyt ytshorts

By Bob Johnson's Computer Stuff Inc. What to do after WATER SPILL on a computer shorts shortsyt ytshorts by Bob Johnson's Computer Stuff Inc.

Title: How to repair the keyboard of a laptop after a water spillageflood
Channel: Val
How to repair the keyboard of a laptop after a water spillageflood by Val
Wifi On Laptop
The Ultimate Guide to Choosing the Perfect Diamond Engagement Ring
Purchasing an engagement ring is a monumental decision, a symbol of enduring love and commitment. It’s a treasure meant to be cherished for a lifetime. The process of selecting the right ring, however, can seem overwhelming. Fear not, for we’ve crafted this comprehensive guide to illuminate every facet of this important journey, ensuring you make an informed and utterly inspired choice.
Understanding the Four Cs: The Cornerstone of Diamond Selection
The “Four Cs”—Cut, Clarity, Carat, and Color—serve as the foundational pillars upon which diamond quality is assessed. Understanding these characteristics empowers you to navigate the complexities of diamond grading with confidence.
Cut: The Key to Brilliance, Fire, and Scintillation
The cut of a diamond is not merely its shape; it encompasses the proportions, symmetry, and polish that determine how light interacts with the stone. It is arguably the most critical of the Four Cs, as it directly influences brilliance, fire, and scintillation:
- Brilliance: This refers to the overall brightness of the diamond, the white light reflected back to the eye. A well-cut diamond maximizes brilliance.
- Fire: This describes the flashes of color, the dispersion of light into the spectral hues seen when a diamond is moved under a light source. Excellent cut grading enhances fire.
- Scintillation: This refers to the sparkle, the flashes of light and dark patterns within the diamond as it moves. The quality of the cut significantly affects scintillation.
Cut Grades:
- Excellent: This grade represents the highest degree of precision and light performance. Diamonds in this category maximize brilliance, fire, and scintillation.
- Very good: These diamonds offer excellent light performance with minor compromises in cut. They represent a great value without sacrificing beauty.
- Good: These diamonds display pleasing brilliance and sparkle, but the light performance may be slightly diminished.
- Fair: These diamonds exhibit noticeable compromises in cut, affecting their brilliance and overall visual appeal.
- Poor: These diamonds display significant cut defects, drastically reducing their brilliance and sparkle.
When selecting a diamond, we strongly advise prioritizing the cut grade. An "Excellent" or "Very Good" cut will undoubtedly enhance the diamond's beauty and visual impact.
Clarity: Navigating the Inclusions and Blemishes
Diamond clarity refers to the absence of inclusions (internal flaws) and blemishes (external imperfections). These imperfections are natural characteristics formed during the diamond's creation process.
Clarity Grades:
- Flawless (FL): No inclusions or blemishes are visible under 10x magnification. This is the rarest and most valuable clarity grade.
- Internally Flawless (IF): No inclusions are visible under 10x magnification. Minor blemishes may be present.
- Very, Very Slightly Included (VVS1, VVS2): Very difficult to see inclusions under 10x magnification.
- Very Slightly Included (VS1, VS2): Difficult to see inclusions under 10x magnification.
- Slightly Included (SI1, SI2): Inclusions are noticeable under 10x magnification. They may be visible to the naked eye.
- Included (I1, I2, I3): Inclusions are obvious and can significantly impact the diamond's brilliance and durability.
While flawless diamonds command the highest prices, choosing a diamond with a clarity grade of VS1 or VS2 offers a fantastic balance of beauty and value. The inclusions in these grades are typically invisible to the naked eye, allowing the diamond's brilliance to shine.
Carat Weight: Measuring the Diamond's Size
Carat weight measures the diamond's mass. One carat equals 200 milligrams. The carat weight is significantly correlated with the overall price.
Understanding Carat and Perceived Size:
While carat weight is a factor, the perceived size of a diamond is also influenced by its cut grade and shape. A diamond with an "Excellent" cut will appear larger than a diamond with a "Poor" cut of the same carat weight because it reflects light more effectively. Certain shapes, like round brilliant cuts, typically appear larger than others of the same carat weight.
Color: Appreciating the Spectrum of Hues
Diamond color refers to the presence of yellow or brown tints. The Gemological Institute of America (GIA) color grading scale ranges from D (colorless) to Z (light yellow or brown).
Color Grades:
- D, E, F: These are colorless grades. Diamonds in this range are highly prized for their lack of color.
- G, H, I, J: These are near-colorless grades. Slight color may be visible, but often not noticeable unless compared to a diamond of a higher color grade.
- K, L, M, N: These are faint yellow/brown grades. Color is visible.
- O-Z: These diamonds have visible yellow or brown color.
Selecting diamond color depends on personal preferences and budget. While D-F diamonds are the most expensive, G-H diamonds often provide an excellent value, and the color is often imperceptible to the naked eye. The color of the ring's metal, particularly the setting, can also impact the perceived color of the diamond. For instance, a diamond with a slight yellow tint may appear whiter when set in yellow gold.
Choosing the Diamond Shape: Finding the Perfect Silhouette
Diamond shape refers to the overall outline of the diamond. The shape is a matter of personal taste, and each offers unique characteristics and visual appeal.
Popular Diamond Shapes:
- Round Brilliant: The most popular diamond shape, renowned for its brilliance and sparkle.
- Princess: A square or rectangular shape with sharp corners, known for its brilliance and contemporary look.
- Oval: An elongated shape that can appear larger than other shapes of the same carat weight.
- Pear: A teardrop shape, combining elegance and brilliance.
- Emerald: A rectangular shape with step cuts, known for its clarity and elegance.
- Asscher: A square shape with step cuts, similar to the emerald cut but square.
- Marquise: An elongated shape, also sometimes called a navette, with pointed ends.
- Radiant: A square or rectangular shape with brilliant faceting, offering high brilliance.
- Cushion: A square or rectangular shape with rounded corners, offering a romantic appeal.
- Heart: A romantic shape, symbolizing love.
When exploring different shapes, consider the couple's style and preferences. Consider the size you want and how different shapes might visually impact it.
Selecting the Ring Setting: Complementing the Diamond's Beauty
The ring setting holds the diamond and significantly influences the overall aesthetic. The setting should complement the diamond's shape and style, enhancing its beauty.
Popular Ring Settings:
- Solitaire: The most classic setting, featuring a single diamond. This setting allows the diamond to be the center of attention.
- Halo: A setting where the center diamond is surrounded by smaller diamonds, creating a dazzling effect that makes the center stone appear larger.
- Pavé: A setting where small diamonds are set closely together, creating a glittering surface.
- Three-Stone: A setting featuring three diamonds, representing the past, present, and future.
- Channel: A setting where diamonds are set within a channel of metal.
- Bezel: A setting where the diamond is held in place by a metal rim, providing secure protection.
- Side-Stone: the center stone is flanked by additional diamond or gemstones
- Cathedral: A setting where the band of the ring arches up to meet the diamond.
Consider the couple's lifestyle when choosing a setting. Settings like bezel and channel provide more protection for the diamond, making them suitable for active lifestyles.
Metal Choices: Framing the Eternal Sparkle
The metal of the ring also contributes to its aesthetic and durability. Different metals offer various colors, properties, and price points.
Popular Metal Choices:
- Platinum: A durable, precious metal that is resistant to tarnish and offers a bright white color.
- White Gold: A popular and affordable alternative to platinum, usually rhodium-plated for its bright white color.
- Yellow Gold: A classic choice, offering a warm and timeless appeal.
- Rose Gold: A romantic metal with a pinkish hue, trending in popularity.
Consider the metal's durability, especially if the ring will be worn daily.
Budgeting for the Perfect Ring: A Practical Approach
Setting a budget is one of the most important steps. Decide on a budget before browsing rings to narrow down your choices and stay on track.
Factors Influencing Price:
- The Four Cs: Primarily, the cut, clarity, carat, and color drive the cost of a diamond.
- Shape and Setting: The shape and setting style will influence the overall price.
- Metal Selection: The metal chosen for the ring band will impact the final cost.
- Brand and Retailer: Prices can vary between different brands and retailers.
Shopping Tips for Finding the Best Value:
- Be Flexible with the "Cs": You may be able to find a larger diamond by compromising slightly on clarity or color, without sacrificing the visual appeal.
- **Compare
