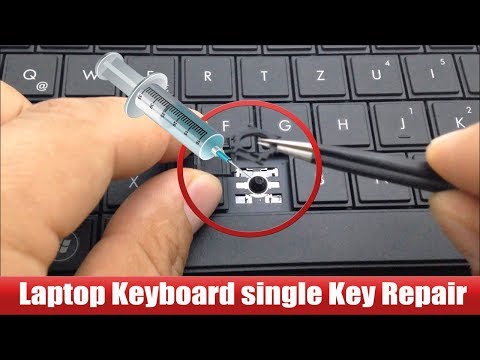
if one key of laptop is not working

Title: Fix Some keys on Laptop Keyboard Not Working in Windows 10 Solve keyboard keys Won't typing
Channel: Victor Explains
Fix Some keys on Laptop Keyboard Not Working in Windows 10 Solve keyboard keys Won't typing by Victor Explains
if one key of laptop is not working, what to do if one key of laptop is not working
Laptop Key Stuck? This SHOCKING Fix Will BLOW Your Mind!
Stuck Laptop Key? Prepare to Be Amazed: The Unexpected Solution You Need!
Imagine this: You're in the middle of a crucial project. Suddenly, a single, stubborn key on your laptop refuses to cooperate. It's stuck, unresponsive, and throws your workflow completely off-kilter. Frustration mounts. Panic sets in. Before you consider a frantic trip to the repair shop, or worse, a complete laptop replacement, there's a solution. This isn't just a fix; it’s a revelation. And it may just surprise you.
The Unseen Culprit: Unveiling the Sticky Situation
Let’s face it, laptop keyboards endure a lot. They're bombarded with dust particles, crumbs, and the occasional rogue drop of spilled liquid. These invaders are the usual suspects. They sneak beneath the keys, creating a sticky situation. Over time, these interlopers accumulate. Consequently, your keys become sluggish. They might even get completely stuck. But don't despair! The answer is often simpler than you think.
Diagnosis: Identifying the Key's Predicament
Before you leap into action, performing a simple diagnostic is key. Which key is the offender? Is it consistently stuck, or does it only misbehave intermittently? Try gently wiggling the key. Does it feel truly jammed, or is there some give? Examining the key's immediate surroundings offers vital clues. Is there visible debris? Also, is the key noticeably sunken compared to its neighbors? These observations guide your next course of action.
The Power of Prevention: Guarding Against Key Calamities
Preventing this problem in the first place is always best. Several simple habits can significantly extend your keyboard's lifespan. Regularly cleaning your keyboard is crucial. Utilize a can of compressed air to dislodge loose particles. Consider a keyboard cover for extra protection. Avoid eating or drinking directly above your laptop! These measures create a strong defense. As a result, you'll minimize the chance of a sticky key scenario.
The Secret Weapon: The Surprisingly Effective Fix
Now, for the moment you've been waiting for. The fix that will blow your mind? It likely relies on something you have at home. Seriously! Prepare a small bottle of isopropyl alcohol. Get some cotton swabs, too. You’ll also need a thin, non-abrasive object, like a credit card or a guitar pick.
Step-by-Step Guide: Resurrecting Your Stuck Key
First, power down your laptop and unplug it. This is a safety precaution. Next, hold the laptop at a slight angle. This prevents liquid from seeping further into the device. Carefully apply a small amount of the isopropyl alcohol to the cotton swab. Gently dab the swab around the edges of the stuck key. Avoid saturating the keyboard! Use the credit card or guitar pick to gently work around the edges of the key itself. Try to loosen any debris. Then gently push the key from different angles. Continue this process, reapplying alcohol as needed.
The Unveiling: The Magic of Isopropyl Alcohol
Isopropyl alcohol is your secret weapon. It's excellent at dissolving sticky residue. The alcohol evaporates quickly. As a result, it leaves behind no harmful residue. The gentle scrubbing action dislodges the trapped particles. Finally, the key should begin to loosen its grip. Persistence is important; you may need to repeat the process several times. Don't rush through this.
Advanced Techniques: Refining the Repair Strategy
If the key remains stubbornly stuck, consider a more targeted approach. Try gently prying the key off with a small, non-metallic tool. Be incredibly cautious here. Laptop keys are delicate. Once removed, clean the key and the key switch beneath it thoroughly. Ensure all debris is gone. Then, carefully replace the key. However, this method carries the risk of key damage if you are careless. You may need to consult the user manual or seek professional help.
Testing and Tweaking: Finalizing the Restoration
After completing the cleaning, test the key. Power on your laptop. Open a text editor. Test the key. It should respond normally. If the key still sticks, repeat the cleaning process. Sometimes, multiple applications are required. Be patient. If the problem persists, consider professional assistance. Professionals possess tools and skills.
When to Seek Professional Help: Knowing Your Limits
While the isopropyl alcohol and cotton swab method often works, not every situation has a simple fix. If the key is severely damaged, or if liquid has penetrated deep within the keyboard, professional repair may be necessary. Furthermore, if you’re uncomfortable with the process or worried about damaging your laptop, don’t hesitate to seek expert guidance. Repair experts possess specialized knowledge and tools.
The Takeaway: Embracing the Power of DIY
A stuck key can be frustrating. But it doesn't have to be a catastrophic event. Armed with a little knowledge and a few simple tools, you can often resolve this issue yourself. The journey to a functional keyboard might require patience. In the end, the satisfaction of successfully fixing your laptop is immense. Consider this a triumph for your DIY skills! Remember, proper care and maintenance are essential. Don't allow your devices to limit your creativity. With the correct methods, you can overcome the challenge.
Laptop Dying? Unplug It—The SHOCKING Fix That Works!Laptop Key Stuck? This SHOCKING Fix Will BLOW Your Mind!
We’ve all been there. That frustrating moment when a key on your laptop decides to stage a permanent vacation, refusing to bounce back to its former glory. It's like a tiny, digital rebel, holding your typing hostage! Trust me, as a fellow keyboard warrior, I understand the sheer panic. But before you start pricing out a new laptop (or getting ready to chuck the current one out the window!), take a deep breath. Because guess what? We've got some seriously effective, and dare I say, shocking fixes that just might save the day. Let's dive in, shall we?
1. The Dreaded Sticky Key: Why Does This Happen?
Before we unleash the cavalry of solutions, let's understand the enemy. Why do our laptop keys betray us? The answer, my friends, is usually a cocktail of culprits. Crumbs, dust bunnies, and even the occasional rogue pet hair can infiltrate the delicate mechanisms beneath your keys, creating a sticky situation. Think of it as a tiny, keyboard-sized party where the guests refuse to leave. But also, liquid spills? Oh boy, those are a keyboard’s worst nightmare. A sugary soda? Game over, or at least, a lengthy battle to get things back to normal.
2. First Responder: Immediate Actions to Take (Before You Panic!)
Okay, so your key is stubbornly refusing to cooperate. Don't freak out! The first few minutes are crucial. Here’s what you must do immediately:
- Turn off the Laptop: Seriously, do it now! This prevents any accidental keystrokes from causing more chaos and gives you a safe environment to troubleshoot.
- Unplug the Power Adapter: Just in case. Safety first!
- Assess the Situation: Which key(s) are stuck? What might have caused it? Did you spill anything? A quick visual inspection is your friend here.
3. The Gentle Cleanse: Air Duster Savior!
This is often the first line of defense, and it's incredibly simple. Grab a can of compressed air (the kind you use for cleaning electronics – think of it as a digital vacuum). Aim the nozzle around the stuck key and give it a few short bursts. Focus on the areas where the key meets the laptop chassis. Sometimes, a little blast of air is all it takes to dislodge the offending debris. It’s like a digital Exorcist, banishing the gunk from your keyboard.
4. The Keycap Removal: A Delicate Undertaking (Proceed with Caution!)
Now, this part requires a bit more finesse. Taking off the keycap is like a mini-surgery, and you want to avoid any collateral damage. First, consult your laptop's manual (if you still have it!). It might have specific instructions for removing keycaps. If not, here's the general approach:
- Gather Your Tools: You’ll need a small, flat-head screwdriver or a keycap puller (these are inexpensive and readily available online).
- Slip the Keycap Puller or Screwdriver Under the Keycap: Gently pry upwards. Be extremely careful not to force it; this could break the key or damage the delicate clips underneath.
- Once Removed: Inspect the area underneath for debris. Clean with a soft brush or cotton swab dipped in isopropyl alcohol (let it dry completely before reassembly!).
- Reattach the Keycap: Align it with the clips and press down until it clicks back into place. It should feel springy and responsive.
5. The Alcohol Gambit: Unleashing the Power of Isopropyl Alcohol
Isopropyl alcohol (rubbing alcohol) is a miracle worker when it comes to cleaning electronics. It evaporates quickly and won't damage your laptop's sensitive components (as long as you use it sparingly and let it dry completely). Here’s how to use it:
- Disconnect the Power: Again, safety first!
- Apply Alcohol: Dampen a cotton swab with isopropyl alcohol (70% or higher).
- Carefully Clean: Gently swab around the edges of the key – where it meets the keyboard base. Also, try getting a bit of the alcohol around the base of the stem of the key, after you have removed the keycap.
- Air Dry: Allow the alcohol to evaporate completely before reassembling the keycap. This may take some time, so be patient. The goal is to get everything dry before you put this back onto the laptop.
Important Note: Never apply alcohol directly into the keyboard; always use a swab or a very slightly dampened cloth.
6. The Vacuum Maneuver: A Last-Ditch Effort (But Sometimes Effective!)
Sometimes, a vacuum cleaner (with a brush attachment, please!) can help suck out any stubborn debris. Hold the vacuum nozzle a few inches from the key and gently move it around. Be careful, though: you don’t want to suck up the keycap itself!
7. Key Lubrication: When a Little Oil Goes a Long Way (Use Sparingly!)
If the key feels sticky but isn't necessarily physically jammed, a tiny amount of a specialized lubricant (designed for electronics) might help. Apply a tiny, tiny drop to the sides of the key stem after removing the keycap. Again, let it dry/settle before replacing the keycap. Too much lubricant can attract more debris and make things worse.
8. The Software Solution: Check Your Keyboard Settings
Before declaring total keyboard defeat, let’s consider the software side of things. Sometimes, a stuck key can be a result of a quirky software glitch. Here’s what to do:
- Restart Your Laptop: A simple restart can often work wonders. It's like a digital reset button.
- Check for Driver Updates: Outdated keyboard drivers can cause problems. Go to your device manager and check for updates.
- Run a Virus Scan: Malware can sometimes interfere with keyboard functionality.
- Try an External Keyboard: If the problem persists, try plugging in an external keyboard to see if the issue is limited to your laptop's built-in keyboard. This will at least let you know the scope of the problem.
9. The Liquid Spill Scenario: Immediate Action is Crucial!
If you’ve spilled liquid, time is of the essence! Here’s a more urgent response:
- Unplug It! Turn off the laptop immediately and unplug it.
- Invert the Laptop: Flip the laptop upside down to allow any liquid to drain out.
- Remove the Battery if this is an option. (Consult your laptop’s manual for instructions.)
- Thorough Cleaning: If possible, remove the keycaps and clean the affected area with isopropyl alcohol (as described in section 5). Consider professional servicing.
10. When to Throw in the Towel: Knowing Your Limits
Sometimes, the issue is beyond our DIY capabilities. Here are the signs that it's time to consult a professional:
- Extensive Damage: The liquid spill was severe.
- Persistent Problems: Despite all our efforts, the key remains stuck.
- Multiple Keys Affected: Several keys are malfunctioning.
- You're Not Comfortable: If you're not comfortable taking apart your laptop, don't force it! You could make things worse.
11. The Professional Touch: Repair Shops to the Rescue!
If you’ve exhausted all your DIY options, it’s time to seek professional help. A qualified laptop repair technician has the tools and expertise to diagnose and fix more complex keyboard problems.
12. The Cost Factor: Repair vs. Replacement
Before you commit to a repair, ask about the cost. Keyboard replacements can sometimes be surprisingly affordable, but if the repair cost is close to the price of a new laptop keyboard or a used laptop, it might be time to weigh your options.
13. The Future-Proofing: Preventing Sticky Keys in the First Place
Prevention is always better than cure. Here’s how to keep your keyboard in tip-top shape:
- Regular Cleaning: Wipe down your keyboard frequently.
- Eat Away from Your Keyboard: Avoid eating and drinking near your laptop (I know, it’s tough!).
- Use a Keyboard Cover: A keyboard cover is a great way to protect your keys from dust, spills, and debris.
14. The Emotional Toll: Dealing with Keyboard Frustration
Let's be honest: a stuck key is annoying. Don't let it ruin your day! Take a deep breath, remember these tips, and approach the situation with a calm, problem-solving mindset. It’s just a keyboard, after all!
15. The Grand Finale: You've Got This!
So, there you have it – a comprehensive guide to troubleshooting a stuck laptop key. From the gentle air duster to the more complex keycap removal, you’ve got a toolbox of solutions at your disposal. Remember, patience and a bit of methodical troubleshooting are your best friends. And hey, if all else fails, at least you know you tried! Now go forth and conquer that stuck key!
And now for the quick-fire FAQs:
FAQ 1: Can I use a hairdryer to dry my keyboard?
No! Heat from a hairdryer can damage your laptop's internal components. Stick with air drying or
DVD Player Nightmare? Fix Your Laptop's DVD Woes NOW!Laptop Keyboard key repair very easy way.
By Hit Short Films Laptop Keyboard key repair very easy way. by Hit Short Films
How to Fix Some Keys Not Working on Laptop Keyboard Keyboard Not Working on Windows 10 & 11

By Real Insight How to Fix Some Keys Not Working on Laptop Keyboard Keyboard Not Working on Windows 10 & 11 by Real Insight
If Function keys do not work on the Laptop F1 - F12

By Simple Tech If Function keys do not work on the Laptop F1 - F12 by Simple Tech

Title: SOLUTION Some Keys Not Working on Laptop Keyboard
Channel: Tech Express
SOLUTION Some Keys Not Working on Laptop Keyboard by Tech Express
Wifi On Laptop
Here's the title for your article: "The Ultimate Guide to Crafting Delicious Homemade Sourdough Bread"
The Ultimate Guide to Crafting Delicious Homemade Sourdough Bread
The aroma. The crackle. The tang. Sourdough bread, a testament to the transformative power of flour, water, and time, holds a special place in the pantheon of baked goods. It's more than just bread; it's an experience, a ritual, a connection to centuries of baking tradition. This guide isn't just about making sourdough; it's about mastering it. We'll delve deep into the nuances, the secrets, and the joy of creating truly exceptional sourdough, from the humble starter to the golden-crusted loaf. Prepare to embark on a baking adventure that will transform your kitchen and your appreciation for the simple, yet profound, art of breadmaking.
Understanding the Cornerstone: The Sourdough Starter
The heart and soul of sourdough is its starter, a living culture of wild yeasts and beneficial bacteria. This complex ecosystem is what gives sourdough its characteristic flavor and texture. Cultivating a thriving starter is the essential first step.
Building Your Starter from Scratch: A Step-by-Step Approach
The process begins with equal parts of unbleached, all-purpose flour and non-chlorinated water. We recommend filtered water, as chlorine can inhibit the growth of beneficial microorganisms.
Day 1: The Genesis. Combine 50 grams of flour and 50 grams of water in a clean glass jar or container. Mix well until a shaggy dough forms. Cover loosely with a lid or plastic wrap and allow it to rest at room temperature (ideally around 70-75°F/21-24°C).
Days 2-7: The Awakening. Each day, discard about half of the starter and feed the remaining mixture with 50 grams of fresh flour and 50 grams of fresh water. Stir vigorously to incorporate the new flour and water. You might not see much activity in the first few days, but don't be discouraged. Tiny bubbles will start appearing, hinting at the fermentation process beginning. Observe the mixture for changes in volume, texture, and aroma. A healthy starter will smell slightly tangy or yeasty, a sign of the formation of lactic acid.
The Maturation. Around day 7, your starter should be doubling (or even tripling) in size within 4-8 hours after feeding. It should have well-defined bubbles throughout, and its aroma will be noticeably more pronounced. This is a good indication that your starter is ready to bake with.
Maintaining a Thriving Starter: The Key to Consistent Success
Once your starter is established, regular maintenance is crucial. Here’s how to keep it happy:
Feeding Schedule: The frequency of feedings depends on your baking schedule. If you bake frequently (once or twice a week), you can keep your starter at room temperature and feed it daily. For less frequent baking, refrigerate your starter and feed it once a week.
Feeding Ratios: A common feeding ratio is 1:1:1 (starter:flour:water). For example, discard 50 grams of starter, add 50 grams of flour, and 50 grams of water. Adjust the flour and water amounts based on your needs.
Water Quality: Always use filtered or non-chlorinated water.
Storage: Store your starter in a clean glass jar with a loosely fitting lid. This allows for some air circulation, preventing pressure buildup from the fermentation.
Troubleshooting: If your starter shows any signs of mold, discard it and start over. If it develops a dark alcoholic liquid on top (hooch), pour it off and feed the starter. If the starter smells overwhelmingly of acetone (nail polish remover), it may be starving. Feed it more frequently.
The Sourdough Bread Recipe: A Symphony of Ingredients
With your starter ready, it's time to bake. This recipe provides a foundation; feel free to experiment and adjust it to your preferences.
Ingredients:
- 400 grams bread flour (high-protein content for good gluten development)
- 100 grams whole wheat flour (adds flavor and texture)
- 350 grams lukewarm water (around 80°F/27°C)
- 100 grams active sourdough starter (fed and bubbly)
- 10 grams salt
The Baking Process: A Detailed Guide
This process takes time and patience, but the reward is worth the effort.
Autolyse (Optional, but Recommended): In a large bowl, combine the flours and water. Mix until just combined, then cover and let rest for 30-60 minutes. This allows the flour to fully hydrate, improving gluten development and overall texture.
Mixing: Add the active starter to the hydrated flour mixture. Use your hands or a stand mixer to incorporate the starter thoroughly. Then, add the salt and mix until the dough comes together. It will likely be shaggy and slightly rough at this stage.
Bulk Fermentation (The First Rise): This is where the magic of fermentation happens.
Stretch and Folds: Over the next few hours (typically 4-6 hours at room temperature), perform a series of stretch and folds. To do this, wet your hands and gently stretch out a portion of the dough, then fold it over onto itself. Rotate the bowl and repeat this process until you've folded the entire dough. Do this every 30-60 minutes for the first 2-3 hours of bulk fermentation. This strengthens the gluten and helps develop the structure of the dough.
Monitoring the Dough: The dough should increase in volume by about 50-75%. It should also develop bubbles throughout. The time it takes for bulk fermentation varies depending on the temperature of your kitchen and the activity of your starter.
Shaping: Lightly flour your work surface. Gently turn the dough out of the bowl. Shape the dough into a round (boule) or an oval (batard) by folding the edges towards the center and then shaping them.
Proofing (The Second Rise): Place the shaped dough in a well-floured banneton basket (or a bowl lined with a floured cloth) seam-side up. The banneton basket is essential for holding the shape. Cover the dough and refrigerate it for 12-24 hours. This slow, cold proofing enhances the flavor and develops the crust.
Baking:
Preheating: Preheat your oven to 450-500°F (232-260°C) with your Dutch oven inside. This will simulate a professional bread oven.
Scoring: Carefully remove the hot Dutch oven from the oven. Gently place the proofed dough into the Dutch oven. Score the top of the loaf with a sharp knife or lame. Scoring allows steam to escape during baking, preventing the loaf from splitting uncontrollably and providing decorative patterns.
Baking with Lid: Cover the Dutch oven and bake for 20-25 minutes. The trapped steam creates a perfect environment for oven spring (the rapid expansion of the loaf in the oven).
Baking Without Lid: Remove the lid and continue baking for another 25-30 minutes, or until the crust is deeply golden brown and the internal temperature reaches 200-210°F (93-99°C).
Cooling: Transfer the finished loaf to a wire rack and let it cool completely before slicing. This is crucial; slicing too early can result in a gummy texture. The wait is worth it!
Troubleshooting Common Sourdough Issues
Even the most experienced bakers encounter challenges. Here's how to address some common problems:
Flat Loaf: This often indicates under-proofing. Ensure your dough has proofed sufficiently (increased in volume, with a nice, bubbly texture). Also, an inactive starter can cause a flat loaf. Make sure your starter is active and doubling in size after feeding.
Dense Crumb: This may result from insufficient gluten development. Autolysing (allowing the flour and water to rest), and performing enough stretch and folds can help. Also, over-proofing can also cause a dense crumb, because the dough structure will collapse when it is baked.
Sour Taste Too Strong/Too Mild: The sourness of your bread depends on the activity of your starter, the length of fermentation, and the proofing time. Experiment with these variables to achieve your desired level of tang. A shorter bulk fermentation will decrease the sourness, and a longer one will increase it.
Crust Too Pale/Burnt: Adjust the baking time and temperature in your oven or Dutch oven. A lower temperature or shorter baking time will produce a less dark crust. A higher temperature may burn the crust. Monitor your bread while it's baking.
Variations: Expanding Your Sourdough Horizons
Once you've mastered the basic sourdough loaf, the creative possibilities are endless:
- Flavored Sourdough: Incorporate herbs (rosemary, thyme), cheeses (cheddar, Gruyère), nuts, olives, seeds (sunflower, pumpkin), or dried fruits (cranberries, raisins) into your dough.
