half screen on laptop not working

Title: Troubleshooting Tips Weird Monitor Error Half Black Screen Linus Tech Tips
Channel: Linus Tech Tips
Troubleshooting Tips Weird Monitor Error Half Black Screen Linus Tech Tips by Linus Tech Tips
half screen not working laptop, why is only half of my laptop screen working, why is half of my screen not working
Laptop Screen Half Dead? This SHOCKING Fix Works Every Time!
Laptop Screen Half Dead? The Unexpected Savior You NEED to Know!
Have you ever stared at your laptop screen, heart sinking with each flickering line? One moment everything is perfect, and the next, a horrifying half-dead display greets you. This is a technological nightmare, but don't despair! You’re in the right place. You don’t need a replacement immediately. This article presents a solution that might just resurrect your screen.
The Dreaded Half-Screen: What’s the Deal?
Let’s be honest, a laptop’s screen issues can be a real headache. You’re working, playing games, or watching a movie, when suddenly, it appears. Vertical lines, distorted images, or a completely black side. The culprit? Several things, actually. Damage to the display itself is a frequent cause. Loose connections, also, play a major role. Furthermore, sometimes, it’s a driver issue. In other cases, internal components could be failing. Whatever the root, a half-dead screen screams for attention. It demands immediate action.
Before You Panic: A Checklist of Basic Checks
Before you start tearing your hair out, let’s first perform several simple checks. These preliminary steps could save you money and time. First, give your laptop a good old-fashioned restart. It might seem basic, but it works surprisingly well. Next, check the display’s brightness. Maybe it’s simply dimmed. Secondly, inspect your display cable. Ensure it’s securely connected. Also, examine the connections inside your laptop if you can. Perhaps, a driver update is all you require. In that case, update your graphics card drivers. However, if you’ve done all this, then it's time for a more in-depth inspection.
The Unexpected Fix: Magic with Pressure!
Here comes the surprising part! Often the issue lies with loose connections inside the screen assembly. These connections affect data transmission. Consequently, applying gentle pressure can be the key. Find the edge of your screen where the dead zone begins. Gently press along that edge. Apply light pressure. Move your fingers along the entire edge. Observe the screen carefully. Do you see any changes? Any flickering or the image returning? If you do, then congratulations! Maybe, you’ve found the fix.
Pressure Points: Finding the Sweet Spot
The pressure point might vary. Locate the specific area where the image improves. You can also move your finger slightly. Vary the pressure, too. You want to apply enough pressure to make contact, but not damage the screen. If the image returns, that’s a crucial clue. It strongly indicates a connection problem. If the screen improves even slightly, document the area. Furthermore, you could try this maneuver on other areas. Therefore, you should systematically explore the screen’s edges. You are, in essence, trying to temporarily reestablish the connection.
Permanent Solutions and Next Steps
So, you found the magic spot! The screen comes back to life with a little pressure. What now? Well, this is not a permanent fix. It indicates a more significant problem. The next step involves opening the laptop. You will need to tighten or reseat the display cable. Before doing this, ensure you have correct tools. You need to unplug your laptop. Then, also remove the battery. You should consult your laptop’s manual. It will provide specific instructions. If you’re not comfortable opening your laptop, seek professional help. A qualified technician can diagnose and fix the issue.
Preventative Measures: Keeping Your Screen Healthy
Preventing this problem is key. Treat your laptop gently. Avoid dropping it or placing heavy objects on it. Furthermore, avoid excessive temperature fluctuations. These things can damage internal components. Also, keep your laptop screen clean. Dust and debris can cause problems. Finally, consider investing in a laptop bag. A good bag offers protection from impacts. Simple steps can significantly extend your laptop’s life.
When to Call in the Professionals
Sometimes, the problem goes beyond a quick fix. If the issue persistently returns, it's time to seek help. If you've tried everything. And the screen remains unresponsive, call a professional. A technician can diagnose the exact cause. They also have the expertise and tools. It is also important to know your limits. Don’t attempt repairs beyond your skillset. A professional will ensure a proper fix.
Conclusion: Reclaim Your Screen!
A half-dead laptop screen can be stressful. However, you have a few options. You don't have to buy a new laptop. You can try a few simple solutions. Applying pressure might be your solution. Proper diagnostics and preventative measures are very important. You can fix this issue. So don’t give up hope. With a little effort, you can reclaim your screen. You deserve a fully functional laptop.
Laptop Touchpad Driving You Crazy? This FIX Works Every Time!Laptop Screen Half Dead? This SHOCKING Fix Works Every Time!
Hey there, fellow tech travelers! Ever stared at your laptop screen, heart sinking faster than a lead balloon, only to see half of it looking like a digital ghost? That dreaded "half-dead screen" scenario? We’ve all been there. Remember that time my (now ancient, trusty) laptop decided to stage a pixelated protest right before my big presentation? Talk about a panic attack! But fear not, because we're diving deep into this common tech woe with a surprisingly effective fix that might just bring your screen back from the brink. Forget those complicated tech manuals; we're keeping things real and straightforward, just like a good afternoon chat with a friend.
The Silent Scream: Recognizing the Half-Dead Screen
Before we unleash the magic, let’s make sure we're all on the same page. What exactly is a half-dead screen? Think of it as a screen that's had a serious personality crisis. It could manifest in a bunch of different ways:
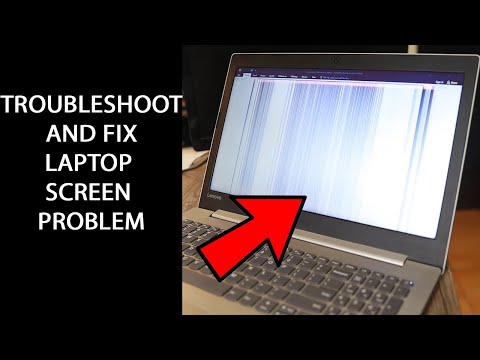
- Vertical Lines: These are the most common culprits, usually running from top to bottom, like digital bars keeping your vibrant visuals imprisoned.
- Horizontal Lines: Less frequent, but equally annoying, these lines cut across your screen horizontally, like a digital ruler mocking your productivity.
- Distorted Display: Colors might be off, images stretched or squished, or everything might look like it’s been through a funhouse mirror.
- Complete Blackout (on one side): The screen might be fully or partially black, as if someone just flipped a giant light switch.
- Flickering or Blinking: This is often a sign of a loose connection or an impending screen death.
If you're seeing any of these symptoms, then you’re in the right place. We're here to resurrect that screen!
Diagnosing the Digital Demise: What's Causing the Chaos?
Understanding why your screen is playing up is half the battle. Sometimes, it's something simple; other times, it could be a deeper, more entangled issue. Here are some potential culprits:
- Loose Connections: This is often the easiest fix. The cable connecting your screen to your motherboard might have simply wiggled loose. Think of it like a plug that’s not quite seated correctly.
- Damaged Cable: This is a tougher nut to crack. The cable transmitting the display signal might be physically damaged, perhaps from being bent or pinched.
- Faulty Screen: The screen itself might have reached its end of life, or suffered physical damage (like a nasty spill or drop). This is akin to any hardware issue.
- Driver Issues: Sometimes, your display drivers (the software that tells your screen how to work) have a glitch.
- Software Glitches: In rare cases, a software conflict or bug might be causing the issue.
Don't worry; we'll cover how to troubleshoot each of these.
The SHOCKING Fix: A Technique That Often Works! (And It's Easier Than You Think)
Okay, buckle up, buttercups! Here’s the secret weapon, the fix that has revived countless screen casualties:
- The Pressure Test: This is where things get interesting. We're going to gently apply pressure to different areas of your screen. Why? Often, a loose connection is the culprit, and applying gentle pressure can sometimes temporarily re-establish that connection.
- Locate the Problem Area: Observe which side of the screen is "dead."
- Apply Gentle Pressure: Starting from the affected area, use your thumb or finger to gently press on different parts of the screen (the bezel, the frame, etc.). Be GENTLE! Don't press hard enough to damage the screen. It is not necessary.
- Watch for Life: As you apply pressure, does the display flicker, change, or come back to life at all? If it does, you're onto something!
- Isolate the "Magic Spot": If a specific area seems to trigger a temporary fix, concentrate the pressure there. It might be a connector that needs reseating.
Important Note: This is not a permanent fix. It's a troubleshooting step and a potential temporary solution. If it works, it can buy you time to back up your data, order a new screen, or seek professional help.
Reseating the Display Cable: A Deeper Dive
If the pressure test gives you a positive response, you could consider physically reseating the flex cable. However, this is where things can get tricky. Unless you have experience disassembling electronics, this step entails a risk. If you're comfortable with this, proceed at your own risk.
- Power Down and Disconnect: Completely shut down your laptop and unplug the power adapter.
- Open Her Up: Carefully remove the screws on the back of your laptop.
- Examine the Connection: You will need to locate the LCD cable. Check your service manual. Be very careful not to damage anything else.
- Unplug, Replug: Gently unplug the cable from the connector on the motherboard (marked by a white bar, indicating cable). Carefully reconnect and double-check.
Driver Troubles? Updating and Troubleshooting Display Drivers
Sometimes, it's not the hardware but the software that's the problem.
- Access Device Manager: Right-click the Start button and select "Device Manager."
- Expand Display Adapters: Locate "Display adapters" and click the arrow to expand.
- Update Driver: Right-click your graphics card and choose "Update driver." Follow the prompts.
- Restart: Once the update is complete, restart your laptop.
External Display Test: Proving the Point
Let’s be honest, a problem that can be solved is better than a problem that cannot be solved. Connecting an external monitor to your laptop can really let you know what's happening.
- Connect the Monitor: Use an HDMI or VGA cable to connect your laptop to an external monitor.
- Power Up: Turn on both devices.
- Monitor the Results: If the external monitor displays the image correctly, the problem is most likely with your laptop's screen or cable. It might be time for a replacement screen.
- Troubleshoot: If the issue persists, it is likely not your screen but possible the display drivers.
When to Throw in the Towel (and Call for Backup)
Sometimes, the fix isn't a quick trick; professional help might be the only option. We’re not saying you're technically inept, but it all boils down to safety and ensuring you don't make things worse. Consider these situations:
- Persistent Problems: If the pressure test or driver updates don't work, and the external monitor test is also a failure, a hardware issue is likely.
- Physical Damage: If the screen has cracks, liquid damage, or other physical damage, a replacement is almost certainly needed.
- Lack of Confidence: If you're uncomfortable disassembling your laptop, it's best to seek professional help.
In these cases, call a trusted technician or visit a qualified repair shop. They have the tools, experience, and spare parts needed to get your laptop running smoothly again. It might cost, but it's better than frying your components.
Protecting Your Screen: Prevention is Better Than Cure
Once you've fixed the problem (or had it fixed), you want to keep that screen alive and kicking. Here are some pro tips:
- Close the lid gently: Slams and forceful closures are a no-no.
- Avoid extreme temperatures: Don't leave your laptop in direct sunlight or freezing temperatures.
- Clean carefully: Use a soft, lint-free cloth and a screen-cleaning solution. Avoid harsh chemicals.
- Back up your data regularly: Just in case the worst happens.
- Consider a laptop sleeve or bag: Protect your laptop from bumps and drops.
Beyond the Screen: Other Potential Culprits and Solutions
Though it seems focused, it's important to note that the screen is connected to all the pieces of your laptop. Problems could stem from other parts, too.
- Graphics Card Issues: Problems with the graphics card can also cause display issues. Try updating your drivers or, if necessary, consider a new graphics card.
- Motherboard Troubles: In rare cases, the motherboard might be the issue.
The Long Game: Choosing the Best Solution for Your Needs
Ultimately, the best solution depends on your individual situation:
- The Quick Fix: The easiest path is always the one that you can work with.
- The Long-Lasting Solution: Permanent and costly, but will guarantee smooth running.
- The Preventative Action: Be sure to protect your laptop from further damage.
The Cost of Fixing a Dead Screen: Budgeting for the Unexpected
Be sure to consider the cost of repairing or replacing your laptop screen.
- DIY Costs: Consider the costs of parts and tools.
- Professional Repair Costs: Compare costs and find someone you trust.
The Bottom Line: You've Got This!
Laptop screen issues can be daunting, but with a little knowledge and patience, you can often troubleshoot the problem and find
Dell Laptop IP Stack Nightmare: Solved!Laptop Display Screen Problem How to troubleshoot and repair it yourself
By Torogi Pro Laptop Display Screen Problem How to troubleshoot and repair it yourself by Torogi Pro
Half Screen Tv Problem Tv Screen Split In Half Troubleshoot Only Possible Temporary Repair Fix

By HealMyTech Half Screen Tv Problem Tv Screen Split In Half Troubleshoot Only Possible Temporary Repair Fix by HealMyTech
How to resolve partial red or pink screen problem in laptops
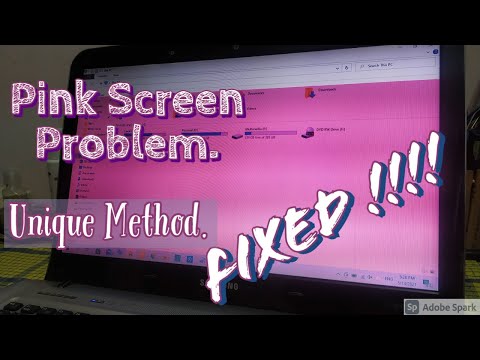
By Subhankar Pandit How to resolve partial red or pink screen problem in laptops by Subhankar Pandit

Title: How To Split Laptop Screen With Keyboard Shortcut Keys how to split laptop screen into two
Channel: Tonich
How To Split Laptop Screen With Keyboard Shortcut Keys how to split laptop screen into two by Tonich
Laptop Working
Unlocking the Secrets of Optimal Sleep: A Comprehensive Guide to Restorative Rest
We all understand the profound impact of sleep. It's a sanctuary, a reset button, a vital component of our overall well-being. But in a world that often glorifies productivity and constant activity, quality sleep frequently takes a backseat. This is a mistake. We are writing today to guide you through the nuanced world of sleep, providing you with actionable insights and a deeper understanding of how to achieve truly restorative rest.
The Imperative of Sleep: Beyond Just Feeling Tired
Sleep isn't merely a period of inactivity; it's a complex biological process essential for everything from cognitive function to physical repair. During sleep, our brains consolidate memories, clear out waste products, and regulate hormones crucial for growth, metabolism, and emotional stability. Chronic sleep deprivation, on the other hand, can lead to a cascade of negative consequences, including impaired concentration, weakened immunity, increased risk of chronic diseases, and a diminished sense of overall happiness. This is a serious issue.
Establishing a Consistent Sleep Schedule: The Cornerstone of Rest
The human body thrives on rhythm and predictability. One of the most effective strategies for improving sleep quality is establishing a consistent sleep schedule. This means going to bed and waking up at the same time each day, even on weekends, as consistently as possible. This consistency helps regulate our internal clock, or circadian rhythm, optimizing the timing of sleep and wakefulness. A regular sleep schedule supports consistent hormonal release, allowing for more predictable sleep patterns and helps to feel more alert.
Creating a Relaxing Bedtime Routine: Preparing the Mind and Body
Preparing your body for sleep is a critical element to the process. Just as an athlete warms up before a competition, we must prepare our minds and bodies for the transition to sleep. A relaxing bedtime routine signals to the brain that it's time to wind down. Consider incorporating activities like a warm bath or shower, reading a physical book (avoiding screens!), gentle stretching, or listening to soothing music. The key is to find activities that calm your mind and promote relaxation. These activities, done consistently, can help your body feel ready to sleep.
Optimizing Your Sleep Environment: The Sanctuary of Slumber
Your bedroom should be a sanctuary, a place of peace and tranquility. Several factors contribute to creating the ideal sleep environment. Start by ensuring the room is cool, ideally between 60-67 degrees Fahrenheit (15-19 degrees Celsius). Darkness is also paramount – consider using blackout curtains or an eye mask to block out any intrusive light. Minimize noise by using earplugs or a white noise machine. Choose a comfortable mattress, pillows, and bedding that suit your personal preferences and provide adequate support. The goal is to create a space that is conducive to relaxation and allows for a deep and restful sleep.
Dietary Considerations: Fueling Restorative Sleep
What we consume throughout the day significantly impacts our sleep at night. Certain foods and beverages can either promote or hinder sleep.
- Caffeine and Alcohol: These substances can disrupt sleep patterns. Avoid them several hours before bedtime. Caffeine is a stimulant that can keep you awake, while alcohol, initially, can induce drowsiness, but it often leads to fragmented sleep later in the night.
- Heavy Meals: Eating large meals close to bedtime can make it difficult to fall asleep. Your digestive system is working hard at the same time your body is preparing to rest. Try to have your evening meal at least two to three hours before you plan to go to bed.
- Sleep-Promoting Foods: Some foods contain nutrients that may promote sleep. These include foods rich in tryptophan (e.g., turkey, nuts), magnesium (e.g., spinach, almonds), and melatonin (e.g., tart cherries).
Exercise and Sleep: A Symbiotic Relationship
Regular physical activity is a powerful ally in the pursuit of good sleep. Exercise can improve sleep quality, increase sleep duration, and reduce the symptoms of insomnia. However, the timing of your workouts is important. Vigorous exercise close to bedtime can be counterproductive, as it can raise your body temperature and make it harder to fall asleep. Aim to complete your workouts at least three to four hours before you go to bed. Activities like yoga, stretching, or a leisurely walk in the evening may be particularly beneficial.
Managing Stress and Anxiety: Calming the Mind Before Sleep
Stress and anxiety are common culprits when it comes to sleep disturbances. When we are stressed, our bodies release cortisol, a hormone that can interfere with sleep cycles. Effective stress management techniques are, therefore, crucial for promoting restorative rest. Consider incorporating relaxation techniques like deep breathing exercises, meditation, or mindfulness practices into your daily routine. Journaling before bed can also be helpful in processing thoughts and worries, allowing for a more peaceful transition to sleep.
Understanding Common Sleep Disorders: Recognizing the Signs
While lifestyle adjustments can resolve many sleep issues, it's important to be aware of potential underlying medical conditions. Insomnia, sleep apnea, restless legs syndrome, and narcolepsy are among the most common sleep disorders. If you experience persistent sleep problems, such as difficulty falling asleep, staying asleep, or excessive daytime sleepiness, it's crucial to consult a healthcare professional. They can properly diagnose the issue and recommend appropriate treatments. Early intervention is key to mitigating the long-term health consequences of sleep disorders.
The Power of Napping: Strategic Rest for Enhanced Performance
Napping can be a beneficial tool for boosting alertness and cognitive function. However, strategic napping is essential. Daytime naps should ideally be short, typically lasting between 20 and 30 minutes, to avoid entering deep sleep, which can lead to grogginess upon waking. Avoid napping too close to bedtime, as it can make it harder to fall asleep at night. Consider napping as a tool to enhance performance, not a substitute for adequate nighttime sleep.
Technology Use and Sleep: Navigating the Digital Age's Challenges
In the age of smartphones, tablets, and laptops, managing our technology use is crucial for promoting sleep. The blue light emitted from electronic devices can suppress the production of melatonin, the sleep hormone, making it more difficult to fall asleep. Avoid using electronic devices for at least an hour before bedtime. Instead, engage in activities that promote relaxation, such as reading a physical book or listening to calming music.
Consistency is Key: Developing Sustainable Sleep Habits
Achieving optimal sleep is not a quick fix. It requires patience, consistency, and a commitment to developing healthy sleep habits. The strategies outlined in this guide are most effective when implemented as part of a holistic approach. Experiment with different techniques, find what works best for you, and remain consistent in your efforts. Over time, these small changes can lead to a significant improvement in your overall sleep quality and well-being.
Beyond the Basics: Further Exploring Sleep Science
The scientific understanding of sleep continues to evolve. Keep abreast of advancements. If you are interested in this topic, consider exploring reputable sources such as academic journals, scientific publications, or books written by sleep experts. Understanding these intricacies can further deepen your knowledge and empower you to make informed decisions about your sleep health.
The Takeaway: Prioritizing Sleep for a Healthier, More Vibrant Life
Prioritizing sleep is an investment in your overall health and well-being. By incorporating the recommendations into your daily life, you can unlock the transformative power of truly restorative rest. Remember, good sleep is within your reach. By making small, consistent changes, you can pave the way for a healthier, more vibrant, and more fulfilling life.
