access bios hp laptop f10 not working after bios update
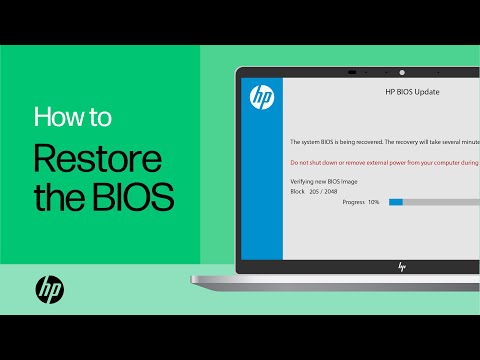
Title: Restore the BIOS on HP Computers with a Key Press Combination HP Computers HP Support
Channel: HP Support
Restore the BIOS on HP Computers with a Key Press Combination HP Computers HP Support by HP Support
HP BIOS F10 Nightmare Solved! (Access BIOS After Update)
Here is your article:
HP BIOS F10: Your Boot Problem is Over!
Dealing with an HP BIOS update debacle? You're not alone. Many users face this frustrating reality. It can feel like your computer has been hijacked. Fear not, though! You can often overcome the F10 BIOS access problem. We'll explore solutions so you can breathe easy again.
The Black Screen Blues: Understanding the F10 Riddle
So, what exactly triggers this particular issue? The F10 key is your gateway. It’s your ticket to accessing the BIOS settings. However, updates can sometimes throw a wrench into the works. Consequently, the F10 key fails to respond. Your machine seems trapped. This is a common issue, so try not to panic. In fact, numerous factors can contribute to this. Let's delve into the most likely culprits.
Troubleshooting Steps: Your BIOS Revival Toolkit
First, grab a moment to center yourself. Before diving in, ensure your PC is completely off. Then, unplug the power cord. Next, let's troubleshoot.
Step 1: The Cold Boot Ritual
Start with a full power cycle. This is a simple but often-overlooked fix. For this, disconnect everything. That includes peripherals, such as the mouse and keyboard. Wait patiently for a few minutes. After a short pause, reconnect the power cable. Turn your computer back on. Immediately and repeatedly tap the F10 key. Doing this increases your chances of success.
Step 2: The USB Savior
Sometimes, the issue revolves around the BIOS update itself. Check for any USB devices connected. They might interfere with the startup process. Therefore, disconnect any external devices. Again, hold down the F10 key.
Step 3: The CMOS Reset Strategy
Still no luck? Consider a CMOS reset. This resets the BIOS to its default settings. However, this is a slightly more involved process. You’ll need to open your computer case. You can locate the CMOS battery on the motherboard. Carefully remove the battery for about 15 minutes. Afterwards, replace the battery. Then, power on your PC, tapping F10 promptly. Since the BIOS settings have been reset, this often works.
Step 4: Boot Menu Revelation
If F10 remains unresponsive, consider other options. Accessing the boot menu might offer an alternative. Usually, the Esc or F12 keys will work. If successful, navigate to the BIOS setup from there.
Post-Update BIOS Access: Key Considerations
Alright, you’ve regained BIOS access. Nonetheless, several precautions can prevent this from recurring. After all, prevention is always better than cure.
- Keep Drivers Updated: Regularly updating drivers can help. This ensures compatibility with the BIOS.
- Review BIOS Settings: After an update, review your BIOS settings. You may need to reconfigure them.
- Backups are Vital: Always back up your critical data. This is just in case of any issues.
- Seek Professional Help: Don't hesitate to contact HP support. Furthermore, consider consulting a professional.
Beyond the F10: Future-Proofing Your BIOS Experience
You've fixed the problem. You are now back on track. What steps can you take now? Consider updating the BIOS manually. Moreover, always download updates from the official HP support website. Avoid downloading updates from unofficial sources. They are unreliable and potentially dangerous.
Conclusion: Restart Your Digital Life
The HP BIOS F10 issue is no match for your determination. You've successfully navigated the hurdle and restored access to your BIOS. Therefore, take these steps to ensure smooth sailing in the future. Embrace these troubleshooting tips. Remember the key takeaways. By embracing best practices, you’ll avoid similar headaches. You now have the power to control your machine. Enjoy your improved computing experience!
1080p GPU Fail? Laptop Screen BLACKOUT! (Easy Fix Inside!)HP BIOS F10 Nightmare Solved! (Access BIOS After Update)
Alright, folks, let's talk about something that's caused more than a few headaches: the HP BIOS F10 setup screen, especially after a BIOS update. Remember that feeling? The sweaty palms, the frantic clicking, the desperate hope you wouldn't brick your perfectly good (and probably expensive) HP laptop? Yeah, we've all been there. We're here to tell you that the HP BIOS F10 nightmare is over! We're going to unpack the mystery of accessing your BIOS after an update, and you’ll be back in control of your machine faster than you can say "advanced boot options."
1. The BIOS Beast: Why Is Accessing It So Crucial?
Think of your BIOS (Basic Input/Output System) as the operating system of your hardware. Without it, your computer is just a collection of inert components. Accessing the BIOS lets you tweak important settings: boot order, security features, power management, and sometimes even overclocking, if you're feeling adventurous! It's the cockpit of your digital spaceship, and knowing how to get in is vital. Imagine trying to drive a car without being able to adjust the seat or see the dashboard – you wouldn't get very far!
2. The F10 Frustration: Why Is It So Hard to Access?
The problem often arises after a BIOS update. Sometimes, these updates change the timing or method for accessing the BIOS. It used to be a simple tap of the F10 key, right? But what if that doesn’t work anymore? It can cause confusion, frustration, and a general sense of panic. We've seen it firsthand! One minute you're happily updating your BIOS, the next, you're staring at a black screen, wondering if your machine is now a fancy (and expensive) paperweight.
3. Prep Work: Before You Even Think About Hitting F10
Before we dive into the solutions, let’s set the stage. First, make sure you have a stable power source. Laptops should be plugged into their charger. Power fluctuations during a BIOS update or boot can be catastrophic. Secondly, take a moment to gather yourself (and maybe a calming beverage). BIOS access can sometimes require multiple attempts, and a clear head is your best tool. Finally, have your HP model number handy. Knowing your specific model will help you find model-specific instructions if needed.
4. The Classic F10 Dance: Trying the Obvious First
Okay, let’s start with the tried and true: repeatedly tap the F10 key immediately after you power on or restart your HP. This is the standard method and, surprisingly, still works more often than you might think. Time is of the essence. Start tapping the moment you press the power button. Don't wait for any logos or screens to appear. Think of it like trying to catch a falling ball; you have to anticipate.
5. The Power Button Power-Up Trick (And Why It Works)
Sometimes, the F10 key is too slow. Here's a sneaky trick: turn off your HP completely. Then, press and hold the power button and the F10 key simultaneously. Keep holding them. Release the power button when the screen comes to life; keep holding F10. This method bypasses the standard boot process and often forces the BIOS to appear. Think of it as a secret handshake.
6. Decoding the Boot Menu: Navigating the Options
Some HP laptops use a different method. Instead of F10, they use a "boot menu" key, usually F2, F12, or, in some cases, the ESC key. This menu lets you select the boot device (like a USB drive or your hard drive) and, more importantly, access the BIOS setup. Experiment! If F10 isn’t working, quickly try these alternatives right after you power on.
7. BIOS Recovery Mode: A Lifesaver After a Failed Update
If an update goes sideways, don’t panic! HP often includes a "BIOS recovery" mode. This is a safety net that allows you to revert to a previous, working BIOS version. Check your HP’s documentation for instructions. This process usually involves a specific key combination at startup (similar to accessing the BIOS in the normal way, but often requiring specific keys like the Windows key + B, or the Windows key + V). It's like having a parachute when you've jumped out of the plane.
8. The BIOS Reset: When All Else Fails
Sometimes, your BIOS settings can get corrupted. A BIOS reset can often clear this up. The easiest way to reset your BIOS is often through the BIOS setup itself (once you gain access). However, you can also physically reset the BIOS. This usually involves removing the CMOS battery from your motherboard (it looks like a small coin). Important Note: Be extremely cautious when doing this, as it involves opening your laptop. First, disconnect from the power outlet. Then, consult your HP's service manual.
9. The UEFI vs. Legacy BIOS Debate: Understanding the Difference
Modern laptops use UEFI (Unified Extensible Firmware Interface) instead of the older Legacy BIOS. UEFI has a graphical interface and more advanced features. The key access method might differ. If you know you have a UEFI-based system, look for options to access the setup through the Windows settings. We will cover that in the next point.
10. Accessing the BIOS from Windows: A Backdoor Entry
We mentioned UEFI systems. If you can boot into Windows, there's a way to access the BIOS:
- Go to Settings (the gear icon in the Start menu).
- Click on "Update & Security," then "Recovery."
- Under "Advanced startup," click "Restart now."
- After your computer restarts, select "Troubleshoot," then "Advanced options," then "UEFI Firmware Settings."
This method bypasses the F10 key altogether! It's like using a back door to get into the party.
11. Investigating External Devices: The Peripheral Problem
Sometimes, external devices (like a USB hub or a dodgy external hard drive) can interfere with the boot process, preventing access to the BIOS. Disconnect all unnecessary devices and try again. Simplify your setup to the essential components: power adapter, and maybe a mouse and keyboard.
12. Official HP Resources: The Ultimate Source
HP provides excellent support resources. Check their website for model-specific instructions. Search for your laptop model and "access BIOS" or "BIOS setup." They often have detailed guides and videos. They are the definitive authority – use them!
13. Driver Updates (Yes, They Can Matter Here)
While it seems counterintuitive, outdated drivers can sometimes cause boot issues. Update your drivers after you get into the BIOS, especially those related to your chipset and graphics card. This is like putting fresh tires on a car after you fix the engine.
14. Patience and Persistence: The Key to Success
Accessing the BIOS can be tricky. Don't give up after a few tries. Experiment with different methods. Sometimes, it takes multiple attempts. Each laptop, even within the HP family, is slightly different.
15. Troubleshooting Tips: If You're Still Stuck
If you're still struggling:
- Consult HP Support: They are experts. Use their official channels.
- Check the HP Manual: It often contains specific instructions for your model.
- Search Online Forums: Other HP users may have encountered the same problem and found solutions.
Closing Thoughts
So, there you have it! We've armed you with the knowledge to conquer the HP BIOS F10 challenge. Remember, accessing the BIOS is essential to your computer's health. With a little patience, perseverance, and these tips, you'll regain control of your HP laptop and its inner workings. This is not a battle, but a puzzle. The key is knowing where to look and what to push. Now go forth and conquer that BIOS!
FAQs
1. What if pressing F10 does nothing?
Don't panic! Try the power button trick (power button + F10), the boot menu keys (F2, F12, ESC), and accessing the BIOS through Windows settings. The problem is not you; it is the boot sequence, just a simple variation.
2. Can I damage my computer by accessing the BIOS?
You can potentially cause problems by changing settings you don't understand, especially if you overclock your computer. Before making changes, familiarize yourself with each setting and consult HP's documentation. Think before you click!
3. How do I know if my laptop uses Legacy BIOS or UEFI?
In Windows, search for "System Information," then look for "BIOS Mode." It will say either "Legacy" or "UEFI."
4. What if my BIOS update failed?
Try using the BIOS recovery mode; it can roll back to the previous version. Consult the HP support website for your particular model or follow the recovery steps that HP provides in the official manual. Never give up!
5. Why is accessing the BIOS after an update different?
BIOS updates can change the settings for accessing the setup interface and can affect how the boot sequence is executed. It is a trade-off between added security, faster boot times, and sometimes, more difficult access control. Always be prepared.
- Principal Keywords:
How to restore the BIOS on HP computers with a key press combination HP computers HP Support
By HP Support How to restore the BIOS on HP computers with a key press combination HP computers HP Support by HP Support
Hp Laptop No Display Caps Lock Blinking FIXED BIOS Recovery Reinstall with USB
By thecollegepicker Hp Laptop No Display Caps Lock Blinking FIXED BIOS Recovery Reinstall with USB by thecollegepicker
How to enter BIOS HP 250 G6 laptop, F10 key

By furulevi How to enter BIOS HP 250 G6 laptop, F10 key by furulevi

Title: How to Enable virtualization if F10 button is not working for save and exit.mp4
Channel: Tech Art Gaming 3
How to Enable virtualization if F10 button is not working for save and exit.mp4 by Tech Art Gaming 3
Laptop Wifi Connect
HP BIOS F10 Nightmare Solved! (Access BIOS After Update)
Have you recently navigated the treacherous waters of an HP BIOS update, only to find yourself stranded, locked out of the BIOS settings? The dreaded F10 key, once a familiar gateway to system configuration, now seems to mock your attempts. Fear not, fellow tech enthusiast, for we've charted a course through this frustrating labyrinth and emerged victorious. This guide is your compass, leading you directly to the solutions you need. We will dissect the issues, offer practical solutions, and equip you with the knowledge to regain control of your HP BIOS. Prepare to reclaim your system!
Understanding the HP BIOS F10 Conundrum
The HP BIOS, an essential piece of firmware, is the bedrock of your computer's operational integrity. The BIOS (Basic Input/Output System) handles the crucial initial boot sequence, managing hardware components and allowing for adjustments to system-level configurations. Accessing the BIOS, primarily through the F10 key during startup, is critical for various tasks, including:
- Boot Order Modification: Prioritizing boot devices, such as a USB drive or a different hard drive.
- Hardware Configuration: Adjusting settings related to CPU, memory, and other hardware.
- Security Settings: Enabling or disabling features like Secure Boot, password management, and TPM (Trusted Platform Module).
- Troubleshooting: Diagnosing hardware issues and accessing specific troubleshooting tools.
The “F10 Nightmare” typically manifests as an inability to enter the BIOS after a system update. Various factors can contribute to this, including:
- Update Corruption: An interrupted or corrupted BIOS update can lead to system instability, preventing the F10 key from functioning correctly.
- Fast Startup Interference: Windows’ Fast Startup feature might bypass the BIOS initialization process, making it difficult to intercept the boot sequence with the F10 key.
- Hardware Conflicts: Conflicts with newly installed hardware components can disrupt the boot process and prevent BIOS access.
- Driver Issues: Outdated or incompatible drivers could interfere with the keyboard input necessary to initiate the BIOS routine.
- Firmware Bugs: Rarely, flaws within the updated HP BIOS firmware could render the F10 key unresponsive.
Troubleshooting Tactics to Access Your HP BIOS
When the F10 key fails to respond, methodical troubleshooting is paramount. Let’s embark on a series of actions to regain entry.
Method 1: The Power Cycle and Persistent Tapping
This is the foundational troubleshooting step. It may seem elementary, but it often proves effective. Properly shutting down the system is essential before any attempted BIOS interaction.
- Full Shutdown: Completely shut down your HP computer. Do not simply restart. This is crucial for a clean slate.
- Disconnect Power: Unplug the power cord from your computer (or the wall outlet for laptops). This drains any residual power.
- Wait Thirty Seconds: Allow a minimum of thirty seconds, preferably a full minute, for any remaining power to dissipate. This clears the system memory.
- Reconnect Power: Plug the power cord back into your computer.
- Rapid F10 Tapping: Immediately after powering on the computer, begin repeatedly tapping the F10 key. Tap rhythmically and consistently, without pausing, until the BIOS setup utility appears. If the computer boots into Windows, you were not early enough. Repeat this process.
This method is highly effective in overcoming system delays and potential boot errors. Repetition and precision are key.
Method 2: Disable Fast Startup in Windows
The Fast Startup feature in Windows can significantly shorten the boot time, however, it can also interfere with accessing the BIOS. Disabling this feature is often a critical step.
- Access Power Options: Open the Control Panel and navigate to "Hardware and Sound" and then “Power Options”. Alternatively, right-click the Start button and select “Power Options”.
- Choose Power Button Action: In the left-hand pane, click on "Choose what the power buttons do."
- Change Settings That Are Currently Unavailable: Click on "Change settings that are currently unavailable." You may need to provide administrator credentials.
- Disable Fast Startup: Scroll down and uncheck the box next to "Turn on Fast Startup (recommended)."
- Save Changes: Click on "Save changes."
After disabling Fast Startup, repeat Method 1. The absence of Fast Startup will give the system more time to recognize your F10 key presses.
Method 3: Force BIOS Access through the Windows Recovery Environment
If the F10 key remains unresponsive, Windows itself often provides an alternative entry point to the BIOS, particularly after a failed boot attempt.
- Initiate the Recovery Environment: Repeatedly interrupt the boot process. This is typically achieved by repeatedly restarting your computer during the startup sequence. Force a shutdown by holding the power button for a few seconds when you see the Windows logo or your PC's manufacturer's logo. Repeat this process at least three times. Windows should detect the failed boot and launch the Recovery Environment.
- Navigate to Troubleshoot: In the Recovery Environment, select "Troubleshoot."
- Advanced Options: Choose "Advanced options."
- UEFI Firmware Settings: Select "UEFI Firmware Settings." This option is only available on systems with UEFI BIOS. If this option is unavailable, proceed to Method 4.
- Restart to BIOS: Click "Restart" to access the BIOS setup.
This method provides a direct pathway into the BIOS, circumventing the need for the F10 key altogether.
Method 4: Utilizing the HP Support Assistant
HP Support Assistant is a pre-installed software utility that can sometimes guide you through BIOS access, especially if you are experiencing issues.
- Access HP Support Assistant: Search for and launch "HP Support Assistant" from the Start menu.
- Check for Updates: Ensure that HP Support Assistant is up-to-date. This ensures you are using the most current resources.
- System Information: Navigate to the "My Devices" or "Support" section, depending on the version of HP Support Assistant you are using, then look for "BIOS" or "System Information".
- BIOS Access Option: Within the system information, there may be an option to access the BIOS setup. If available, follow the on-screen prompts.
Although this method is not a guaranteed solution, it can be helpful, especially if you are unfamiliar with BIOS access procedures.
Method 5: Clear the CMOS (Complementary Metal-Oxide Semiconductor)
Clearing the Complementary Metal-Oxide Semiconductor (CMOS) can resolve many BIOS-related issues, including access problems. The CMOS stores the BIOS settings. Clearing the CMOS resets these settings to their default values, and sometimes removes any conflicting configurations that could be preventing BIOS access. However, this is a more advanced step, so be cautious.
- Locate the CMOS Battery: Identify the CMOS battery on your motherboard. This is typically a small, circular, silver battery (CR2032) on the motherboard. Refer to your HP computer's manual for specific details.
- Power Down and Unplug: Completely shut down your computer and disconnect the power cord.
- Access the Motherboard: If you are comfortable, open your computer's case to access the motherboard or consult a professional. For laptops, opening the case requires extreme caution and may void your device's warranty.
- Remove the CMOS Battery: Carefully remove the CMOS battery from its socket.
- Wait and Replace: Wait for several minutes (5–10 minutes is usually sufficient) to allow the CMOS settings to clear. Then, reinstall the CMOS battery.
- Power On and Access BIOS: Reconnect the power cord and attempt to access the BIOS using the F10 key.
- Caution: Improperly manipulating the CMOS battery risks damaging your motherboard. If you are not comfortable with this procedure, seek professional assistance.
Method 6: External Keyboard Connection
In rare cases, the onboard keyboard might be the issue. Try connecting an external USB keyboard during the boot process.
- Connect External Keyboard: Plug a USB keyboard into a USB port on your HP computer.
- Power On and Test: Power on your computer and immediately tap the F10 key on the external keyboard.
- Check BIOS Access: Determine if you can now access the BIOS. This will help you isolate if it is an onboard keyboard issue.
Advanced Troubleshooting and Further Steps
If the initial troubleshooting steps prove unsuccessful, more advanced methods might be required.
Reinstall the BIOS
If a recent BIOS update caused the issue, reinstalling the BIOS might resolve the problem.
- Download Correct BIOS Version: Download the appropriate BIOS version from the HP support website, corresponding exactly with your computer's model number.
- Create a Bootable USB: Create a bootable USB drive using a tool like Rufus (available for free online). Format the USB drive to FAT32.
- Copy the BIOS File: Copy the downloaded BIOS file onto the bootable USB drive.
- Boot from USB: Plug the USB drive into your computer and enter the BIOS (if possible) to change the boot order. Set the USB drive as the first boot device. Alternatively, repeatedly tap the appropriate boot selection key at startup (often F12, F9, or Esc).
- **BIOS Update
