hp laptop keyboard some letters not working

Title: SOLUTION Some Keys Not Working on Laptop Keyboard
Channel: Tech Express
SOLUTION Some Keys Not Working on Laptop Keyboard by Tech Express
hp laptop keyboard some letters not working, hp laptop keyboard some keys not working windows 11, hp envy laptop keyboard some keys not working, hp laptop keyboard letters not working, hp laptop keyboard keys not working windows 11, hp laptop keyboard one letter not working, hp laptop keyboard function keys not working, hp laptop keyboard arrow keys not working, hp laptop keypad keys not working, why are some letters on my laptop keyboard not working
HP Laptop Keyboard Nightmare: THIS Fixes Those Stuck Keys!
HP Laptop Keyboard Troubles? Unstick Those Keys!
Ever felt the frustrating poke of a sticky key on your HP laptop? Trust me; you're not alone. It's a common headache, and believe it or not, there’s a simple solution. It's the kind of issue that can disrupt your workflow. Thus, let's get those keys unstuck and your HP back to peak performance.
The Sticky Situation: What Causes the Keys to Cling?
First, let's acknowledge the enemy. What exactly is causing these keys to misbehave? Dust, crumbs, and other debris love to find their way under your keys. Consequently, this buildup interferes with the key's mechanism. Spills, though infrequent, are another major culprit. Then, there is the general wear and tear that can happen over time. This will lead to keys failing to fully return to their original place. Therefore, understanding these foes helps defeat them. You'll see that maintenance is critical.
Don't Panic! Simple Solutions to the Rescue
Before you envision replacing that entire keyboard, relax. Luckily, in most cases, the fix requires minimal effort. The most common remedy involves compressed air. It’s generally considered the first line of defense. Direct short bursts around the troublesome key(s). Next, try gently wiggling the key while you spray. This should dislodge the offending particles and improve functionality. This is usually a highly effective and easy method.
Deep Cleaning: When Compressed Air Isn't Enough
If compressed air doesn’t fully solve the trouble, a more thorough cleaning is in order. Next, power down your laptop and unplug it. This ensures your safety, of course. You can find a few key removal tools and techniques online. Use a small, non-abrasive brush to gently clean around the key. Then, you can remove the keycap. This will allow for a more detailed cleaning. Be sure to be delicate to prevent damage.
Liquid Spill? Act Fast!
Accidents happen, especially with liquid spills. If you happen to experience a spill, time is of the essence. Firstly, immediately shut down and unplug your laptop. Next, flip the laptop over immediately. It's very important to allow the liquid to drain. Then, use a soft, absorbent cloth to blot up the liquid. After that, allow the laptop to dry completely, which may take several days. In this situation, patience is key. If it's a sugary liquid, consider professional service.
Key Removal: A Step-by-Step Guide
So, how do you actually remove a key? It varies by laptop model, but the basics are similar. Locate a key puller tool. Insert it beneath the keycap. Gently lever up the key. Be gentle. Never force anything. If you lack such a tool, a thin, non-metallic item may suffice. Keep this in mind. Before reattaching the key, clean the underlying mechanism. Then, simply align and press the keycap into place. It snaps in.
Prevention is Key: Keep Your Keyboard Pristine
An ounce of prevention is worth a pound of cure, as they say. Therefore, incorporate some preventative measures. Regularly wipe down your keyboard with a microfiber cloth. Avoid eating or drinking directly over your laptop. You'll also want to consider using a keyboard cover. These are easily found and provide an added layer of protection. As well, you can gently shake the laptop to remove any loose debris.
When to Call in the Pros
Sometimes, the issue is more complex, and self-repair is not the best option. If none of the above steps work, it may be time to seek professional help. When dealing with electrical components, it’s wise to get expert support. Moreover, extensive liquid damage might require professional servicing. It’s important to recognize your limits. Don't hesitate to call in the experts. This ensures you don’t cause further damage.
Final Thoughts: Get Back to Typing!
A sticky HP laptop keyboard can be irritating. But, with these tips, you can usually overcome the difficulties. Remember, prevention is very important. Then, understand the methods for cleaning and repair. It enables you to maintain your keyboard's performance. With a little care, you can ensure a smooth typing experience. So, get those keys unstuck, and get back to doing what matters!
Headphone Mystery Solved! Why Your Dell Laptop Won't Play NiceHP Laptop Keyboard Nightmare: THIS Fixes Those Stuck Keys!
We’ve all been there. That sinking feeling when you hit a key on your HP laptop, and…nothing. Or worse, it’s stuck, spewing the same letter (or symbol) across your screen like a rogue digital sprinkler. It’s a frustrating moment, the kind that makes you want to hurl your laptop across the room (or at least seriously consider it). But before you resort to drastic measures, take a deep breath. Because dealing with a stuck or unresponsive HP laptop keyboard doesn't have to be a complete nightmare. We're going to dive deep, explore the common culprits, and arm you with some killer fixes that actually work. Trust me, I've been there. I've spent hours battling my own sticky keys, and I’m here to share the wisdom (and the battle scars).
1. The Keyboard Calamity: Why Your HP Laptop Is Acting Up
Let's face it, a malfunctioning keyboard is like a grumpy gremlin living inside your laptop. Before we start flinging fixes, we need to understand the gremlin. What things can even cause this keyboard chaos? The answer, as always, is multi-faceted. It could be something simple, like a rogue crumb lodged under a key. Or, it could be something more complex, like a driver issue or a hardware failure. The key to conquering this issue is to systematically eliminate the possibilities. Think of it like detective work – we’re going to follow the clues to the solution.
2. The Usual Suspects: Common Culprits Behind Sticky Keys
Here are a few of the usual suspects responsible for keyboard woes:
- Dust and Debris: A keyboard, after all, is just a series of small crevices that love to hoard dust, pet hair, and the occasional errant snack crumb.
- Spills and Moisture: Oops! That coffee spill wasn't a good idea, was it? Liquids can wreak havoc on electronics, causing keys to stick or malfunction.
- Software Glitches: Sometimes, the problem isn’t physical. A corrupted driver or a software conflict can also lead to keyboard issues.
- Driver Problems: This is the software that allows your keyboard to communicate with your computer. A bad driver can cause everything from unresponsive keys to bizarre behavior.
- Hardware Failure: Sadly, sometimes it is a hardware problem. This can include worn-out key switches or damage to internal circuitry.
3. First-Aid: Quick Fixes to Try Before Panicking
Before you start dismantling your laptop, try these simple, quick fixes:
- The Reboot Ritual: Restarting your laptop is like hitting the reset button for your entire system. It clears out temporary files and often solves minor software glitches.
- The Keyboard Cleaning Blitz: Hold your laptop upside down and gently shake it to dislodge any loose debris. You might be surprised what comes out!
- The External Keyboard Test: If you have an external keyboard, plug it in and see if it works. This helps you determine whether the problem lies with your internal keyboard’s hardware or with your laptop’s software.
- Check the Caps Lock/Num Lock Keys: Sometimes, an inadvertently pressed Caps Lock or Num Lock key can mess with your typing.
4. The Gentle Breeze: How to Clean Your Keyboard Safely
Got a lot of grime in there? Time to clean it, people.
- The Compressed Air Strategy: This is your secret weapon. Use a can of compressed air to blast away dust and debris from under the keycaps. Aim the nozzle at an angle and move it across the keyboard in short bursts.
- The Soft Brush Approach: Use a soft-bristled brush (like a paintbrush with soft bristles) to gently sweep away loosened debris.
- Isopropyl Alcohol (Carefully): If you have sticky residue, it’s time for a bit of alcohol. Dab a cotton swab with isopropyl alcohol (70% or higher) and gently clean around the keys. Avoid soaking the keyboard.
5. Software Solutions: Troubleshooting Driver Conflicts
If the problem persists, then software may have contributed to the problem.
- Driver Updates: Outdated drivers can cause problems. Navigate to the Device Manager (search for it in the Windows search bar), expand the "Keyboards" section, right-click on your keyboard, and select "Update driver."
- Driver Rollback: If you recently updated your drivers, and the problem started after the update, try rolling back to a previous version. In Device Manager, right-click on your keyboard, select "Properties," go to the "Driver" tab, and click "Roll Back Driver."
6. The Sticky Key Situation: Cleaning Under the Keycaps
For sticky keys, a deeper clean is needed. This can be a little more involved, but often worth it.
- Keycap Removal (Carefully): Some HP laptops have removable keycaps. If yours do, use a small, flat tool (like a thin spudger or a credit card) to gently pry the keycap off. Be very careful not to break the plastic clips.
- Keycap Cleaning: Once the keycap is removed, clean it thoroughly with soap and water. Let it dry completely before reattaching.
- Cleaning the Key Switch: Use a cotton swab dipped in isopropyl alcohol to clean the key switch underneath the keycap. Try to remove any visible debris.
7. Battling Liquid Damage: What to Do If You Spilled Something
Uh oh, spillage! Here’s a plan.
- Immediate Action: Shut down your laptop immediately and unplug it. The faster you act, the better your chances of survival.
- Dry It Out: Turn the laptop upside down to let any liquid drain out. Leave it to dry completely, ideally for a day or two.
- The Rice Myth (Sort Of): While the rice trick isn't a miracle cure, it can help absorb moisture. Place the laptop in a bag of dry rice, but don't solely rely on this.
- Professional Help: If the damage is extensive, it’s best to take your laptop to a repair shop.
8. Hardware Assessment: Assessing Hardware Issues
If all else fails, and if you are tech-savvy, move straight to this step.
- Visual Inspection: Look closely at the keyboard for any obvious damage. Broken keys, cracked keycaps, or visible damage to the keyboard’s surface are telltale signs of hardware issues.
- Professional Repair: A replacement keyboard is normally required.
9. Accessibility Features: Adjust Keyboard Settings
Is it working, but not working like you want it to work?
- Filter Keys: Windows includes a "Filter Keys" feature. This feature can be useful for those who have difficulty with key presses, but it can sometimes cause unintended behavior if you're not familiar with it.
- Sticky Keys: This feature is designed for people who have difficulty pressing key combinations. If you have "Sticky Keys" enabled, it might cause unexpected issues, or cause single keys to act as if they are being pressed.
10. Keyboard Replacement 101: When It's Time For a New Keyboard
Sometimes, the damage is beyond repair.
- DIY Replacement (For the Brave): Replacing a laptop keyboard can range from easy to difficult, depending on your laptop model. Research your specific model and find a video tutorial before you start.
- Professional Installation: If you're not comfortable with DIY repairs, take your laptop to a professional. It's often worth it for peace of mind, and to ensure the job is done right.
11. Preventative Measures: Keeping Your Keyboard Healthy
Prevention is always the best medicine.
- Regular Cleaning: Vacuum or use compressed air on your keyboard regularly to prevent the buildup of dust and debris.
- Protective Covers: Consider using a keyboard cover, especially if you eat or drink near your laptop.
- Gentle Handling: Type gently and avoid slamming your keys.
12. Troubleshooting Tips: What to do if the problem still persists
If all else fails, don't despair!
- Check the HP Support Website: HP's website has a wealth of information, including troubleshooting guides specific to your laptop model.
- Contact HP Support: Their support team can provide further assistance or, if needed, guide you to a repair center.
- Take it to a Specialist: A local laptop repair shop can usually handle tricky keyboard issues.
13. The Art of a Digital Detox: When To Walk Away
Sometimes, it’s not about fixing the keyboard; it’s about fixing you.
- Take Breaks: Step away from your laptop at regular intervals. This can prevent strain and wear and tear.
- External Keyboard: Consider an external keyboard for home use. This allows for a more ergonomic setup.
14. Warranty Wisdom: Knowing Your Coverage
Does your HP laptop have a warranty?
- Check Your Warranty: Find the warranty information, and see what it covers and how long it lasts.
- Warranty Claims: If the keyboard issue occurred during the warranty period, you might be eligible for a free repair or replacement.
15. The Final Frontier: Knowing When To Say Goodbye
The hard truth: Sometimes, a laptop keyboard issue is beyond repair.
*
Acer Laptop Charger Dying? 5 Seconds & Done! (FIX INSIDE)How to Fix Some Keys Not Working on Laptop Keyboard Keyboard Not Working

By Tech White How to Fix Some Keys Not Working on Laptop Keyboard Keyboard Not Working by Tech White
Fix Some keys on Laptop Keyboard Not Working in Windows 10 Solve keyboard keys Won't typing

By Victor Explains Fix Some keys on Laptop Keyboard Not Working in Windows 10 Solve keyboard keys Won't typing by Victor Explains
HP LAPTOP KEYBOARD KEY REPAIR GUIDE 450 455 470 G5 G6 745 846 840 How to Install Fix keys DIY
By Laptopkey.eu HP LAPTOP KEYBOARD KEY REPAIR GUIDE 450 455 470 G5 G6 745 846 840 How to Install Fix keys DIY by Laptopkey.eu

Title: How To Fix HP Laptop Keyboard Keys Not Working Simple Solutions You Can Try So Resolve The Issue
Channel: Helpful Solutions
How To Fix HP Laptop Keyboard Keys Not Working Simple Solutions You Can Try So Resolve The Issue by Helpful Solutions
My Laptop Work
HP Laptop Keyboard Nightmare: THIS Fixes Those Stuck Keys!
We understand the frustration. The click-clack symphony of typing abruptly cuts short. A single key, stubbornly refusing to cooperate, holds the entire workflow hostage. And if you're an HP laptop user experiencing this, you're in good company. Keyboard problems are a frequent occurrence, but the good news is, more often than not, the solution is within reach. Below, we'll walk through the most common culprits behind those sticky keys and, more importantly, how to restore your HP laptop keyboard to its former glory.
Identifying the Culprit: Pinpointing the Cause of Stuck Keys
Before we dive into fixes, a little detective work is essential. Knowing why your keys are sticking will ultimately dictate the most effective course of action. Let's consider the usual suspects:
Dust, Debris, and Crumbs: This is, hands down, the most prevalent cause. Tiny particles of dust, food crumbs (that sneaky midnight snack!), pet hair, and other microscopic invaders can work their way beneath the keycaps, interfering with the key's delicate mechanical movement. Over time, these accumulations can create enough friction to seize the key entirely, or make it feel sluggish and unresponsive.
Liquid Damage: A spilled coffee, a rogue drop of soda, or even a close encounter with water can be a keyboard's worst nightmare. Liquids, particularly those containing sugar or other sticky substances, can seep into the keyboard's internal mechanisms, causing keys to become permanently bound or to malfunction erratically. The degree of damage depends on the type and quantity of the fluid involved.
Physical Damage and Wear: Keyboards, like any frequently used device, are subject to wear and tear. Over time, the plastic hinges that connect the keycaps to the keyboard base can weaken or break. Additionally, physical impacts – a hard tap, an accidental drop – can damage the keyboard's internal components, leading to stuck or non-functional keys. Certain keyboard designs, particularly those with low-profile keys, may be more susceptible to these problems.
Software Conflicts and Driver Issues: While less common, software glitches and outdated drivers can sometimes manifest as keyboard problems. In rare cases, a corrupt driver file or a conflict between the keyboard and other installed software can cause the keys to behave erratically, including appearing as "stuck" or entering the wrong characters.
The Arsenal of Solutions: Step-by-Step Fixes for Your HP Laptop Keyboard
Now that we've identified the usual suspects, let's arm ourselves with a toolkit of solutions. Don't be intimidated; most of these fixes are straightforward and require minimal technical expertise.
1. The Gentle Cleanse: A Vacuum and Compressed Air Approach
This is usually the first line of defense. Grab your laptop and prepare for some light maintenance:
Power Down and Unplug: Always shut down your HP laptop completely and unplug it from the power source before any cleaning or repair attempts. This minimizes the risk of electrical shocks and prevents accidental data loss.
Invert and Tap: Turn your laptop upside down, holding it at a 45-degree angle. Gently tap the keyboard area to dislodge loose debris. This can be surprisingly effective at removing crumbs and larger particles.
The Vacuum Technique: Use a handheld vacuum cleaner or a vacuum attachment with a brush nozzle. Gently hold the vacuum around the affected keys, sweeping away any visible debris. Avoid using excessive suction, as this could potentially dislodge the keycaps.
Compressed Air Attack: This is the gold standard. Obtain a can of compressed air. Aim the nozzle at the base of the stuck keys, and release short bursts of air. This will help to blow out any remaining dust or debris trapped underneath the keycaps. Work systematically, moving from one key to the next. Be mindful to hold the can upright to prevent expelling propellant, which can cause damage to the keyboard's internal components.
Repeat and Inspect: After each cleaning round, try pressing the problematic keys to check if the problem persists. Repeat the vacuuming and compressed air steps as needed until the keys function correctly.
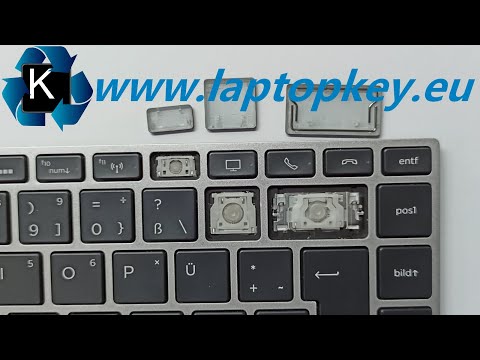
2. The Keycap Removal and Deeper Clean: Tackling Stubborn Residue
If the gentle cleanse doesn't do the trick, it's time to get a little more hands-on. This involves carefully removing the keycaps to access the underlying mechanisms.
Gather Your Tools: You'll need a small, flathead screwdriver, a keycap puller (if you have one; otherwise, a thin piece of plastic, like a credit card or guitar pick, can work in a pinch), a soft cloth, and isopropyl alcohol (at least 70%).
The Keycap Extraction: Gently insert the screwdriver or keycap puller under the edge of the stuck keycap. Apply gentle upward pressure until the keycap pops free from its hinges. If using a screwdriver, be very careful not to apply too much force, as you could damage the plastic hinges. If using a keycap puller, clip the puller onto the keycap and apply even pressure.
Inspect and Clean the Keycap: Once the keycap is removed, examine it for accumulated debris or sticky residue. Clean the keycap thoroughly with the soft cloth and isopropyl alcohol. Allow it to dry completely before reassembling.
Clean the Keyboard Base: Carefully inspect the keyboard base for any visible debris or residue. Use the compressed air to blow out any large particles. For sticky residue, lightly dampen the soft cloth with isopropyl alcohol and carefully wipe the area around the key's internal mechanisms. Be very cautious not to drip any fluid onto the electronics.
Reassembly: Once the keyboard base and keycap are clean and dry, carefully snap the keycap back onto the hinges. Press down gently until you feel a satisfying click. Test the key to ensure it functions correctly.
3. The Liquid Spill Emergency: Immediate Action is Crucial If your HP laptop keyboard has encountered liquid, fast response is critical.
Immediate Shutdown and Disconnection: Unplug the laptop from the power source immediately. Turn the laptop upside down (or at an angle) to prevent liquid from entering the internal components.
Keycap Removal and Drying: As quickly as possible, remove all keycaps and gently wipe them with a soft cloth. Use the flathead screwdriver to remove the keycaps and clean them with isopropyl alcohol. Ensure they are completely dry before re-installing. With appropriate patience, you can allow the keys to dry completely.
Base Inspection and Cleaning: If the liquid has reached the keyboard's interior, use the isopropyl alcohol and a clean cloth to wipe the spill areas. A cotton swab can be used in hard-to-reach areas.
Air Drying: Allow the entire keyboard to air-dry completely for a minimum of 24 hours--longer is better. A warm, well-ventilated spot is the best location. Do not use a hairdryer or other heat sources, which could cause damage.
Testing and Assessment: After sufficient drying time, reassemble the keyboard and re-test. If the keys are still stuck, consider professional repair as internal damage may have occurred.
4. Software Troubleshooting: Addressing Potential Driver Issues
While less common, software problems can sometimes contribute to keyboard misbehavior. We recommend the following steps.
Update Keyboard Drivers: Search for "Device Manager" in your Windows search bar and open it. Expand "Keyboards" and right-click on your HP laptop keyboard. Select "Update driver" and follow the prompts to search for and install the latest driver.
Uninstall and Reinstall Keyboard Drivers: If updating doesn't resolve the issue, try uninstalling the keyboard driver and then restarting your laptop. Windows should automatically reinstall the driver upon boot-up.
System Restore: If the keyboard issues arose after a recent software installation or update, you can try using the System Restore feature to revert your system to a previous state.
5. Hardware Replacement: When All Else Fails
If you've exhausted all troubleshooting steps and your HP laptop keyboard continues to suffer, it might be time to consider hardware replacement.
Internal Keyboard Replacement: Replacement entails replacing the entire keyboard. This is a moderately complex procedure that may require disassembling parts of your laptop. The keyboard is usually held in place with screws and sometimes clips. You can find instructions, including videos, about how to replace the keyboard by searching on Google. If you are uncomfortable performing this procedure, consult a professional repair service. Note that the cost of an internal keyboard replacement can vary depending on the specific model of your HP laptop.
External Keyboard Solution: If you require functionality immediately, or if you are uncomfortable replacing the keyboard, consider using an external USB keyboard. This is a simple, often inexpensive solution that will restore your typing ability.
Preventative Measures: Protecting Your HP Laptop's Keyboard
Once you've restored your keyboard to its former glory, take steps to prevent future problems:
Regular Cleaning: Make it a habit to clean your keyboard regularly. Use compressed air to blow out dust and debris, and wipe down the keycaps with a soft cloth. Consider cleaning weekly or even daily.
Protective Covers: A keyboard cover is an excellent investment. It provides a barrier against spills, dust, and other debris. Make sure the cover is specifically designed for your HP laptop model to ensure a snug and secure fit. If using a keyboard cover, be sure to clean it occasionally.
Food and Drink Precautions: Be mindful of eating and drinking around
