dell laptop keyboard keys not working properly

Title: Dell laptop keyboard not working Why is my Dell keyboard not typing
Channel: Suraj Computers
Dell laptop keyboard not working Why is my Dell keyboard not typing by Suraj Computers
dell laptop keyboard keys not working properly, why my dell laptop keyboard is not working properly, dell laptop keys not working properly, dell laptop keyboard keys not working, dell laptop keyboard problems keys, dell laptop keys not working
Dell Laptop Keyboard: FIX THOSE STUBBORN KEYS NOW!
Dell Laptop Keyboard Troubles? Conquer Those Pesky Keys!
Ah, the digital age! We depend on our laptops for everything. Yet, there's a common foe we often face: the sticky Dell laptop keyboard. It can grind productivity to a halt. Are you wrestling with unresponsive keys? Frustration can quickly mount. Don't despair! Read on.
Identifying the Culprits: Unmasking the Keyboard's Demons
First, let's understand the enemy. What causes Dell laptop keyboard problems? Dust, debris, and crumbs are the usual suspects. They infiltrate those tiny crevices. Furthermore, they obstruct key movement. Spilled liquids can also wreak havoc. Consider those rogue coffee spills. They can corrode internal components. Moreover, a failing keyboard is always a possibility. It is usually due to age or heavy use. In fact, the keyboard is a sensitive component. So, recognizing the cause is key.
Troubleshooting 101: Your Keyboard's Savior
Now, let's turn to solutions. Start with the simplest methods. First, power down your Dell laptop. Next, carefully examine the keyboard. Use compressed air to dislodge debris. Aim the air nozzle directly at the keys. Pay close attention to the trouble keys. Alternatively, you can invert the laptop. Give it a gentle shake. Consequently, see if anything falls out. Also, consider a soft brush for stubborn particles. This method can prevent further damage.
Deeper Dive: When Basic Fixes Fail
If the basics don't work, delve deeper. Consider the keycap removal method. The process is usually straightforward. Before doing it, make sure you have a keycap removal tool. These are cheap and readily available. Carefully pry off the affected keycap. Be gentle. Then, clean under the keycap with a cotton swab. Dip it in isopropyl alcohol. Allow it to dry completely before replacing the keycap. Ensure everything is dry. Otherwise, you risk shorts.
Liquid Damage? Act Fast!
Liquid spills demand swift action. Immediately shut down your Dell laptop. Disconnect the power adapter. Attempt to dry the keyboard thoroughly. Use a soft cloth. Then, disassemble the laptop. This approach may be necessary. If liquid reached internal components, professional help is imperative. Contact a qualified technician. Don't delay. Time is of the essence.
Software Shenanigans: Ruling Out Digital Issues
Sometimes, the problem isn't hardware. It's software. Update your keyboard drivers. Go to Device Manager. Then, uninstall and reinstall your keyboard drivers. Restart your Dell laptop. Check for system updates. These updates often include bug fixes. Additionally, check for any conflicting software. It might interfere with keyboard performance.
Keyboard Replacement: The Final Frontier?
Sometimes, repairs aren't enough. The keyboard might be beyond saving. If you've exhausted all other options, replacement is the next step. Fortunately, Dell laptop keyboards are often replaceable. Research your Dell laptop model. Find the correct replacement keyboard. Then, follow online tutorials. These tutorials can help you with the replacement process. Otherwise, seek professional assistance.
Preventative Measures: Keeping Your Keyboard Pristine
Preventative care is crucial. Regularly clean your keyboard. Aim for every week or two. Avoid eating or drinking near your laptop. Invest in a keyboard cover. It helps protect it from spills. Keep your hands clean. In addition, be mindful of dust. Your keyboard will thank you.
Professional Help: When to Call in the Experts
Knowing your limits is important. If you're uncomfortable with any repair step, stop. Take your laptop to a professional. Avoid causing more damage. A technician has specialized tools. They possess the expertise to diagnose and repair complex issues. Moreover, they can provide valuable advice.
Conclusion: Back to Typing Bliss!
Struggling with a Dell laptop keyboard is annoying. Yet, with the right approach, you can usually solve these issues. From simple cleaning to more complex repairs, you can restore your keyboard. Remember to prioritize your laptop's health. Happy typing!
Laptop WhatsApp: Ditch Your Phone, Chat Now!Dell Laptop Keyboard: FIX THOSE STUBBORN KEYS NOW!
Hey everyone! Let's face it, we've all been there. You're in the middle of a crucial project, a heated online debate, or maybe just crafting the perfect email, and BAM! A key on your Dell laptop keyboard decides to stage a rebellion. It sticks, it repeats, or it just plain refuses to cooperate. It's enough to make you want to chuck the whole laptop across the room (though, we strongly advise against that!). But before you resort to drastic measures, breathe easy, because we're here to help. We're going to dive deep into the world of Dell laptop keyboard woes and equip you with the knowledge and techniques to get those stubborn keys back in line. Think of this as your personal keyboard rescue mission, and we're your seasoned guides.
1. The Keyboard Crisis: Why Dell Keys Go Rogue
So, what's causing this keyboard chaos? It’s like a symphony of tiny factors coming together to create a frustrating experience. Dust, debris, and crumbs are the usual suspects. Imagine a tiny warrior army, each little particle infiltrating the space beneath your keys, wreaking havoc on the delicate mechanisms. Then, there's the oily residue from our hands (we love our snacks and our laptops!), acting like glue, trapping the key. And let’s not forget the accidental spills - a rogue coffee splash or a sneaky drop of juice can quickly turn a keyboard into a sticky mess.
Beyond the obvious, the quality of the keyboard itself plays a part. Cheaper components are, well, cheaper. And sometimes, let's be honest, the manufacturing process isn't perfect. The keycaps might be slightly misaligned or the underlying membrane might have a flaw. Essentially, various elements coalesce, leading to a keyboard rebellion.
2. Prepping for Battle: Gather Your Arsenal
Before we charge in, we need to gather our tools. Think of this as your keyboard repair kit. You'll need a few essentials:
- Canned Air: This is your primary weapon. The air blasts away debris without you having to disassemble your keyboard.
- Microfiber Cloth: This is your cleaning ally, perfect for gently wiping surfaces.
- Isopropyl Alcohol (70% or higher): This is your degreasing agent, just be careful to apply it to a cloth, not directly onto the keyboard.
- Cotton Swabs: These are your precision tools for reaching tight spots.
- Small, Flat-Head Screwdriver (Optional): May be useful for removing keycaps if necessary.
- A Clean, Well-Lit Workspace: Preferably one with ample space to work without the risk of further spills or accidents.
3. The First Line of Defense: The Quick Clean
Let’s start with the simplest solution: a quick clean. It's like giving your keyboard a quick shower.
- Turn Off and Unplug: Safety first! Prevent unexpected electrical jolts.
- Invert and Shake: Hold your laptop upside down and give it a gentle shake. This helps dislodge larger debris.
- Blast with Canned Air: Aim the nozzle between the keys and give it a good blast. Move the nozzle systematically across the keyboard. Think of it as a mini-hurricane for crumbs and dust.
- Wipe Down: Gently wipe down the keyboard surface and keys with a microfiber cloth.
4. Deep Dive: Cleaning Under the Keycaps (Proceed with Caution)
If the quick clean doesn't do the trick, it's time to go deeper. This is where things get a little more involved. While this procedure is generally safe, it's vital to be cautious and take your time.
- Identify the Problematic Keys: Pinpoint which keys are sticking or malfunctioning.
- Remove the Keycaps (If Necessary and If Comfortable): This is optional! Some keyboards are easier to disassemble than others. Use the screwdriver (if needed) to gently pry the keycap off. Many keys just pop straight up. You can also use a credit card (avoid sharp objects!) to gently pry them up from a corner. If you have a mechanical keyboard, this is generally easier. For chiclet-style keyboards, it may be trickier.
- Clean Underneath: Use canned air to blast any debris. If there is sticky residue, lightly moisten a cotton swab with isopropyl alcohol and carefully clean the area. Be extremely careful not to saturate the keyboard.
- Replace Keycaps: Once everything is dry, carefully snap the keycaps back into place. Make sure they are properly aligned.
5. Isopropyl Alcohol: Your Secret Weapon (Use Sparingly!)
Isopropyl alcohol is a powerful cleaning agent that can banish stubborn sticky residue. However, remember the following:
- 70% or Higher Concentration: Make sure it's at least 70% isopropyl alcohol.
- Apply to a Cloth, Not Directly: Never spray it directly onto the keyboard! This can potentially seep into the internal electronics.
- Damp, Not Soaked: The cloth should be just damp, not dripping.
- Test First: Try cleaning a small, inconspicuous area first to make sure it doesn’t damage the keyboard.
6. Common Keyboard Problems: Diagnosis and Solutions
Let’s address some of the most common keyboard problems and how to fix them:
- Sticking Keys: Usually caused by debris or sticky residue. Cleaning with canned air and isopropyl alcohol usually resolves this.
- Repeating Keys: Sometimes, the key’s internal contacts might be malfunctioning. Try the cleaning methods described above. If the issue persists, it could indicate a hardware problem.
- Non-Responsive Keys: This could be a software or hardware issue:
- Software: Ensure the keyboard drivers are updated. You can do this through Device Manager in Windows.
- Hardware: Try an external keyboard to verify whether it's a keyboard problem or a more generalized problem. If the external keyboard functions correctly, there’s a high chance the problem is within the built-in keyboard.
- Check for Liquid Damage: If a spill has occurred, the problem might be internal damage, necessitating professional repair.
7. Dell Keyboard Troubleshooting: Beyond the Basics
- Driver Updates: Go to Dell's support website and download the latest drivers for your laptop model.
- BIOS Update: Sometimes, a BIOS update can resolve keyboard issues. Be careful, though, and follow Dell’s instructions carefully before starting the process.
- Run Diagnostic Tests: Dell provides diagnostic tools that can help pinpoint hardware problems.
8. External Keyboard: The Temporary Lifesaver
In a pinch, an external USB keyboard can be your best friend, especially if your Dell laptop keyboard is consistently malfunctioning. It's like having a spare tire in your car. It's not a lasting solution, but it provides you with functional use while you sort out the problem.
9. When to Call in the Professionals
While we've covered a range of DIY solutions, there are situations when seeking professional help is the best course of action.
- Extensive Liquid Damage: If your laptop has been exposed to significant liquid spills, it is best to let a professional take a look.
- Persistent Hardware Problems: No matter what you try, if some keys continue to malfunction, it might suggest underlying hardware issues.
- Complex Repairs: If you are not comfortable with disassembling your laptop, or are worried about damaging it, a professional repair service could be your best bet.
10. Keycap Replacement: A Keyboard Facelift
If your keycaps are damaged, faded, or missing, you can buy replacements. There are plenty of vendors online that sell keycaps specifically made for Dell laptops. Just ensure that the keycaps are the correct type and size for your model. Replacing keycaps is like giving your keyboard a fresh start.
11. Preventing Future Keyboard Headaches
Once you've fixed your Dell laptop keyboard, taking steps to prevent future issues is important. You don't want to go through all this trouble again, right?
- Regular Cleaning: Make regular cleaning a habit. A quick blast with canned air every few weeks or a quick wipe with a microfiber cloth can go a long way.
- Avoid Eating/Drinking Over Your Keyboard: This seems obvious, but it’s one of the biggest contributors to keyboard problems.
- Use a Keyboard Cover (Optional): Keyboard covers can protect your keyboard from dust, debris, and spills. They're a bit like a protective shield for your laptop.
- Handle with Care: Avoid placing heavy objects on your laptop keyboard.
12. Dell Laptop Keyboard Models: A Quick Overview
Different Dell laptop models feature distinct keyboard layouts and designs. However, the general principles of cleaning and repair apply across the board. Always check your laptop model documentation or online resources for detailed instructions. Some models may require more or less care than others.
13. The Software Angle: Keyboard Settings and Configuration
Sometimes, the problem isn't a physical keyboard issue but a software setting.
- Sticky Keys, Filter Keys and Toggle Keys: Make sure these options are turned off, unless you specifically want to use them.
- Keyboard Language and Layout Settings: Verify that your input language and layout are set up properly.
- Drivers: Ensure your keyboard drivers are up
FIX Dell Keyboard Not Working Windows 10 Dell Inspiron 15 3501

By Cap Trong Nam - How To FIX Dell Keyboard Not Working Windows 10 Dell Inspiron 15 3501 by Cap Trong Nam - How To
SOLUTION Some Keys Not Working on Laptop Keyboard

By Tech Express SOLUTION Some Keys Not Working on Laptop Keyboard by Tech Express
Laptop Keyboard key repair very easy way.
By Hit Short Films Laptop Keyboard key repair very easy way. by Hit Short Films

Title: Fix Some keys on Laptop Keyboard Not Working in Windows 10 Solve keyboard keys Won't typing
Channel: Victor Explains
Fix Some keys on Laptop Keyboard Not Working in Windows 10 Solve keyboard keys Won't typing by Victor Explains
Laptop Wifi Connect
Dell Laptop Keyboard: Reclaim Your Typing Flow – Resolve Sticky Keys Today!
Is your Dell laptop keyboard suddenly rebelling? Are keys sticking, repeating characters, or simply refusing to respond to your commands? Don’t despair! We understand the frustration of a dysfunctional keyboard, a crucial component of your laptop experience. This guide provides a comprehensive diagnostic and repair roadmap, empowering you to tackle common Dell keyboard issues with confidence and precision. We will equip you with the knowledge to get back to effortless typing and reclaim your productivity.
Diagnosing the Culprit: Pinpointing Your Dell Keyboard Problem
Before diving into solutions, accurate assessment is essential. This step allows us to identify the root cause of the keyboard malfunction and tailor the repair approach. Isolate the specific problems to determine the most effective repair path.
Recognizing the Symptoms: What's Going Wrong?
Begin by carefully observing the keyboard behavior. Several common issues plague Dell laptop keyboards. Understanding the specific symptoms is the first step to effective troubleshooting.
- Sticky Keys: These keys may feel resistant to pressing down, taking longer to return to their original position, or even remaining depressed.
- Unresponsive Keys: A key fails to register a keystroke, demanding frequent re-taps or entirely skipping input.
- Repeating Characters: A single key press causes an involuntary cascade of the same character, generating unwanted text repetition.
- Erratic Behavior: Keys may type the wrong characters, act as function keys unexpectedly, or exhibit unpredictable behavior patterns.
- Liquid Damage: Spills can cause a range of problems, from sticky keys to complete keyboard failure.
- Physical Damage: Cracks, loose keys, or other visible damage can directly affect keyboard functionality.
Testing Your Keyboard: Isolating the Problem
Once you’ve recognized the symptoms, perform some basic tests to isolate the source of the problem.
- External Keyboard Test: Connect an external USB keyboard to your Dell laptop. This allows you to determine if the issue lies within the laptop’s integrated keyboard or another system component. If the external keyboard works flawlessly, it strongly suggests a problem with the laptop’s built-in keyboard.
- BIOS/UEFI Test: Restart your Dell laptop and enter the BIOS or UEFI setup (usually by pressing F2, Del, or Esc during startup). Once in this interface, use the keyboard to navigate and see whether it functions correctly. If the keyboard fails here, it is probable that hardware faults are present, which confirms that a keyboard must be replaced, or that other components are damaged. If it works, the operating system or software may be the problem.
- Operating System Test: Open a basic text editor, such as Notepad or WordPad, and systematically test each key. Pay attention to how the keys respond. Take note of which keys exhibit the problematic behavior (sticky, unresponsive, repeating, etc.).
Troubleshooting and Solutions: Practical Steps to Fix Your Keyboard
Having identified the symptoms and tested the keyboard, we can now implement practical solutions. The goal here is to address the identified issue effectively.
Cleaning Your Keyboard: The First Line of Defense
Often, the problem is accumulated debris. Dust, crumbs, and other particles can work their way beneath the keys, causing friction and hindering the key's movement. Thorough cleaning is frequently the solution.
- Turn off and Unplug the Laptop: Safety first! Before any cleaning, shut down your Dell laptop and disconnect it from any power source.
- Air Duster: Use compressed air to blow out debris from around the keys. Direct the nozzle at a slight angle down towards the keyboard, moving across the array methodically. This is an effective initial step for dislodging loose particles.
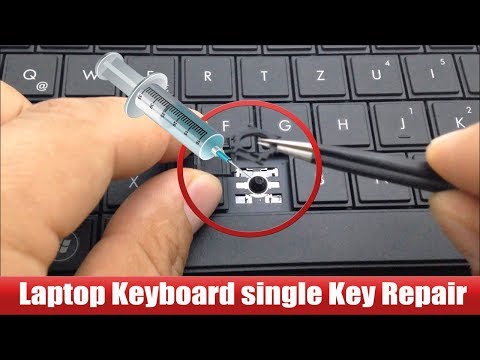
- Keycap Removal (Proceed with Caution!): For a deeper clean, you may need to remove keycaps. This is more technical. Obtain a keycap puller (often included with keyboard kits). If not available, use a thin, flat tool like a spudger or a small screwdriver. Gently insert the tool under the edge of the keycap and carefully pry it upwards. Be extremely careful not to break the plastic clips. Keycaps often have tiny plastic clips that lock them into the keyboard body.
- Cleaning under the Keycaps: Once a keycap has been removed, use the compressed air to remove any dust or debris. Avoid applying excess pressure. A cotton swab dipped in isopropyl alcohol (70% or higher) can be used gently to clean the key switch and the surrounding area. Allow the area to dry completely before reassembling.
- Reattaching Keycaps: Align the keycap with the keyboard switch and press down firmly until it clicks back into place. Test the key to ensure it functions correctly.
Addressing Sticky or Sticking Keys
If cleaning alone doesn’t resolve the problem, other factors may be at play.
- Check for Liquid Damage: Even a seemingly small spill can cause significant problems. If you suspect liquid damage, immediately disconnect the laptop from power and turn it upside down to help prevent liquid from spreading. Allow the laptop to dry for several days before attempting any further steps. Professionals may have to assess more significant damage.
- Isopropyl Alcohol: If a key sticks after cleaning, a small amount of isopropyl alcohol (70% or higher) can be used to dissolve any sticky residue. Apply a TINY amount to a cotton swab or soft cloth, and carefully wipe around the affected key’s switch. Test functionality after this step.
- Key Re-Seating: Sometimes, a keycap may be slightly misaligned. Remove the keycap (as described above), examine the switch, and ensure the keycap is properly seated.
Software-Related Issues: Driver and System Checks
Software problems occasionally cause keyboard malfunctions. Confirm that the operation system drivers are properly installed, and that the key function is working as expected.
- Driver Updates: Outdated or corrupted keyboard drivers can create problems. To update, open Device Manager (search for it in the Windows search bar), expand "Keyboards," right-click on your Dell keyboard, and select "Update driver." Choose "Search automatically for drivers." If you have the latest drivers, consider uninstalling and reinstalling them.
- Sticky Keys and Filter Keys: Windows has built-in features (Sticky Keys and Filter Keys) that can affect keyboard behavior. Navigate to Settings > Ease of Access > Keyboard and make sure that these features are disabled unless they are intentionally supposed to be enabled.
- Virus and Malware Scan: Malware can sometimes interfere with system functions, including keyboard input. Run a thorough scan using your preferred antivirus software.
Advanced Troubleshooting: Delving Deeper
If the initial procedures don’t solve the problem, there may be more in-depth causes.
- Keyboard Cable Check: This requires more technical expertise. If you are comfortable working with electronics, open the laptop (consult your Dell laptop's service manual or search for your Dell model's teardown videos on YouTube). Locate the keyboard cable (usually a ribbon cable) that connects the keyboard to the motherboard. Inspect it. If it's not properly seated, carefully try and reconnect firmly.
- Keyboard Replacement: If the keyboard is severely damaged, beyond repair, or is experiencing persistent hardware glitches, it must probably be replaced. Various replacement Dell laptop keyboards are available online. Identify your Dell model to ensure compatibility. Follow a reliable teardown video on YouTube or a detailed service manual to safely replace the keyboard.
Professional Assistance
Don’t hesitate to seek professional assistance if you encounter problems beyond your comfort level. Consider the following when making your decision:
- Dell Support: Dell offers support for its laptops, and it might be helpful to reach out to them. Check your warranty status, as some keyboard issues may be covered.
- Local Computer Repair Shops: Reputable local repair shops often offer keyboard replacement services.
- Data Backup: Before any professional repair, back up all of your important data.
Preventing Future Keyboard Troubles: Proactive Measures
Preventative measures will help lengthen your keyboard's life and diminish the chance of problems.
Regular Maintenance
- Regular Cleaning: Establish a routine for cleaning your keyboard. Regularly use compressed air to remove dust and debris.
- Avoid Eating and Drinking near the Laptop: Food particles and liquid spills are major sources of keyboard problems.
Protecting the Keyboard
- Keyboard Cover: Consider using a keyboard cover to protect against spills and dust.
- Proper Storage: When not in use, store your laptop in a safe place to avoid accidental damage.
Conclusion: Restoring Your Dell Keyboard's Functionality
We hope this guide has empowered you with the knowledge and skills to address your Dell laptop keyboard problems. By systematically diagnosing the problem and following the repair steps outlined, you can often restore full keyboard functionality. Remember, prevention is key. With routine maintenance and proactive measures, you can protect your Dell keyboard and enjoy a smooth, productive typing experience for years to come.
