headset wont work on laptop

Title: FIXED windows 10 no sound from headphones 2025 windows 10 no sound headphones
Channel: Etechniz
FIXED windows 10 no sound from headphones 2025 windows 10 no sound headphones by Etechniz
headset won't work on laptop, headset doesn't work on laptop, earphones won't work on laptop, headset not working on laptop, headset not working on laptop windows 10, headset mic not working on laptop, wired headset not working on laptop, headset not working on dell laptop, headset jack not working on laptop, usb headset not working on laptop
Headset Nightmare? FIX Your Laptop Audio NOW!
Laptop Audio Apocalypse Averted: Your Ultimate Fix-It Guide
Ever felt like your laptop's audio is staging a full-blown rebellion? Perhaps your headset is the culprit. Or maybe silence screams from your speakers. You're not alone. Many users battle perplexing audio issues. Fear not, because we'll tackle this common tech woe. This guide is your survival kit. Prepare to restore sonic harmony to your digital life.
The Silent Treatment: Diagnosing the Audio Anomaly
First, let's become digital detectives. Before you hurl your laptop across the room, assess the situation. Is it only your headset that is malfunctioning? Or are your laptop speakers equally afflicted? Determine the source. This initial step saves time and frustration. Then, methodically eliminate potential causes. It's a process of elimination worthy of Sherlock Holmes.
Check the basic connections. Is the headset properly plugged into the correct port? Double-check your headphone jack. Sometimes, a loose connection can cause intermittent sound issues. Also, examine the volume control. Are you accidentally muted? It seems obvious, but it's a common oversight. Therefore, make sure the volume isn’t turned down to zero.
Software Snafus: Unmasking the Digital Demons
Now, let's delve into the realm of software. In truth, software often holds the key. Operating systems, like Windows and macOS, have their own audio settings. These settings can be a potential source of the problem. Therefore, explore your operating system’s sound settings.
Locate your sound control panel. Look for the output device configuration. Is your headset selected as the default device? If not, change it. Furthermore, check the individual volume levels for your headset. Make sure they aren’t set too low. Often, this simple adjustment solves the mystery.
Audio drivers also matter. These are software components. They allow your operating system to communicate with your sound hardware. Sometimes, these drivers become corrupted. Consequently, they can lead to audio malfunctions. Therefore, consider updating your audio drivers. Visit your laptop manufacturer's website. Download and install the latest driver version. The next step involves searching for the “Device Manager”. Inside, look for your audio device and update it.
Hardware Hijinks: Inspecting the Physical Realm
Sometimes, the problem is physical. Let's examine the physical aspect. Your headset itself might be faulty. So, test your headset on another device. If it doesn’t work elsewhere, the headset is likely the problem. Sadly, a replacement is sometimes needed.
Also, inspect the headphone jack on your laptop. Perhaps the jack is damaged. It could be bent or have loose connections. A damaged jack may require professional repair. It is time to consider the physical components.
Furthermore, check your laptop's speakers. Are they producing any sound at all? If not, inspect the speaker connections inside your laptop. This can be tricky. You may need to consult a technician. Consider this a last resort.
Troubleshooting Tactics: The Art of the Fix
Now, deploy some troubleshooting tactics. Restarting your laptop is often a good starting point. It's the digital equivalent of hitting the reset button. A simple restart can resolve temporary software glitches. So, try restarting your laptop and testing the audio again.
Moreover, consider system restore. This function allows you to revert your system to an earlier state. Choose a restore point before the audio issue began. However, it might fix driver problems.
Furthermore, review any recent software installations. Did the audio problem start after installing new software? If so, uninstall the recent software. This is worth trying. The new software may be clashing with your audio system. Removing it can restore audio functionality.
The Final Countdown: Preventing Future Meltdowns
Finally, after conquering the audio battle, consider prevention. Regularly update your operating system. These updates often include driver improvements. Plus, they can address security vulnerabilities. This is another important tip.
Also, be mindful of your headset's physical condition. Store it properly. Avoid putting unnecessary strain on the cables. Treat your audio equipment with care. In addition, consider investing in a good-quality headset. This can prevent many common audio issues.
Furthermore, routinely clean your headphone jack. Use compressed air. This removes dust and debris. Thus, it prevents potential connection problems. After all, prevention is better than cure.
In conclusion, conquering laptop audio issues is within your grasp. You have the tools and knowledge. You can troubleshoot effectively. You might require patience. Ultimately, sonic serenity awaits. Go forth and conquer the audio abyss!
Laptop Fan Dying? 😱 This Reddit Thread SAVED My PC!Headset Nightmare? FIX Your Laptop Audio NOW!
We've all been there. You're ready to jump into that online meeting, settle in for a movie night, or finally crank up your favorite tunes, only to be met with… audio silence. Or worse, a scratchy, distorted mess that sounds like a dying robot trying to communicate. That, my friends, is the dreaded headset nightmare. But don't despair! We're going to dissect this frustrating problem and equip you with the knowledge to conquer it, once and for all. So, grab a comfortable seat, maybe a cup of coffee (because solving tech problems always necessitates caffeine), and let's dive in!
1. The Silent Treatment: Identifying the Culprit Behind Your Audio Woes
Before we start wielding virtual screwdrivers, we need to figure out what is causing the problem. Is it your headset? Is it your laptop? Or is it something more sinister lurking in the digital shadows? The first step is detective work. Think of it like a modern-day Sherlock Holmes, but instead of a magnifying glass, you have your ears (and a whole lot of patience).
- Is it your headset? Try a different headset, if you have one. If the new headset works, your old one might be on its last legs. (Or maybe the cable's frayed? Check that, too!)
- Is it your laptop? Plug your headset into another device (your phone, a different computer). If it works there, the issue is definitely with your laptop.
- The software sabotage: Sometimes, it's not hardware, but a rogue setting or outdated driver that's the antagonist in this audio drama. We'll get to those later.
2. Check the Basics: The Undeniable First Steps
Okay, so you've established the problem is likely your laptop. Let's begin with the most fundamental checks, akin to making sure your car has gas before you hit the freeway. It sounds elementary, but trust me, these are often the culprits.
- Volume Levels: This seems silly, I know, but double-check those volume sliders! Make sure your system volume isn't muted, and that the application you’re using (Zoom, Spotify, etc.) isn’t muted either. Sometimes, the simplest solutions are the most effective.
- Physical Connections: Ensure the headset jack (if you're using one) is securely plugged into the correct port. (Headset jacks often have a specific color code – pink for the microphone, green for the headphones.) For USB headsets, make sure the USB plug is firmly inserted. For Bluetooth headsets, ensure Bluetooth is turned on, and that your headset is correctly paired with your laptop. And, most importantly, that your headset is turned on! (I’ve made this mistake far too many times to admit.)
3. Diving into the Windows Audio Settings: Your Sound Control Center
Windows has a built-in sound control panel that is the heart of your laptop’s audio system. Navigating it can feel like traversing a maze at first, but we're here to guide you.
- Access the Sound Settings: In Windows, type "Sound settings" in the search bar and press Enter. This will usually open the Sound control panel.
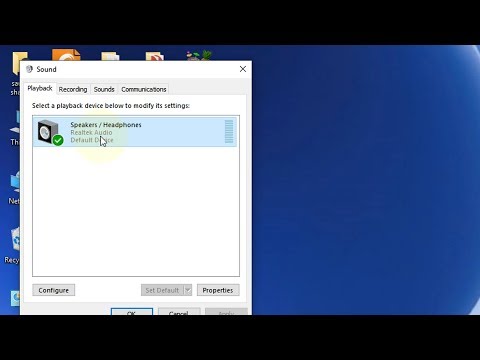
- Playback Tab: This tab displays all your connected audio devices. Make sure your headset is selected as the default playback device. Right-click on your headset and select "Set as default device."
- Recording Tab: This is where you manage your microphone settings. Ensure your headset microphone is selected as the default recording device. Again, right-click and “Set as default device” if necessary.
- Test Your Audio: Click on your headset in both the Playback and Recording tabs. In the Playback tab, you should be able to see the device's volume bar moving when you play audio. In the Recording tab, speak into your microphone; the microphone's volume bar should also move, indicating it's picking up your voice.
4. The Driver Dilemma: Getting Your Drivers in Order
Drivers are basically tiny software programs that allow your laptop to communicate with your hardware (including your headset). Outdated or corrupted drivers can wreak havoc on your audio. This is where things get slightly more technical, but don’t worry; we’ll break it down.
- Access Device Manager: Right-click the Start button (Windows logo) and select "Device Manager."
- Expand "Sound, video and game controllers": You’ll see your audio devices listed here.
- Update Your Drivers: Right-click on your headset, then select "Update driver." Windows will search for the best driver automatically. (You can also manually download the latest drivers from your headset manufacturer’s website, which is often the most sure-fire way to get the correct driver.)
- Reinstall Your Drivers (If Necessary): If updating doesn’t work, try uninstalling the driver (right-click, then "Uninstall device") and then restarting your computer. Windows will often automatically reinstall a generic driver. If that doesn't work, you can try reinstalling the aforementioned downloaded one.
5. Bluetooth Blues: Troubleshooting Wireless Audio Issues
For wireless headsets, Bluetooth can be a source of both joy and frustration. Let's address some common Bluetooth headaches.
- Pairing Problems: Ensure your headset is in pairing mode (refer to your headset’s manual for instructions). In Windows Bluetooth settings, select "Add Bluetooth or other device," then choose "Bluetooth." Select your headset from the list of available devices.
- Connection Dropouts: Bluetooth connections can be susceptible to interference. Move closer to your laptop, and minimize obstructions (walls, other wireless devices) between your headset and your laptop.
- Driver Conflicts: Again, check your drivers in Device Manager! If your Bluetooth adapter or Bluetooth headset drivers are outdated, update them.
6. Application Interference: Is Another Program the Evil Mastermind?
Sometimes, another program is the real culprit. Think of it like a rival vying for audio control.
- Check Individual App Settings: Some applications (like video conferencing software) have separate audio settings. Make sure the correct headset is selected as the audio input and output device within the application.
- Close Unnecessary Programs: Try closing any applications that might be using your audio, like music players or other communication apps, to see if they are interfering.
- Conflicts with Specialized Software: If you use audio editing software or virtual audio mixers, they could be causing issues. Consult the software's documentation for troubleshooting tips.
7. The Hardware Hustle: Examining Your Physical Headset
Sometimes, the problem is, well, the headset itself. It’s like a car with a flat tire; the issue is not the engine.
- Check the Cable (If Wired): Inspect the cable for any signs of damage, like kinks or exposed wires. Wiggle the cable near the connectors to see if the audio cuts in and out.
- Inspect the Connectors: Look closely at the connectors (the plugs that go into your laptop). Are any pins bent or damaged?
- Clean the Connectors: Use a cotton swab dipped in isopropyl alcohol (gently!) to clean the connectors. This can remove dust or debris that might be interfering with the connection.
8. Sound Enhancements and Equalizers: Tweaking Your Audio Experience (With Caution)
Windows offers various sound enhancement features that can, in theory, improve your audio. But they can also introduce problems.
- Disable Sound Enhancements: In the Sound Settings (Playback tab, select your headset, and then "Properties"), go to the "Enhancements" tab and uncheck any enabled enhancements.
- Experiment with the Equalizer: In the "Enhancements" tab, there might be an equalizer option. Reset it to the default settings if you've made any adjustments, or try disabling it altogether.
9. Resetting Your Audio Settings: A Fresh Start
Sometimes, the best solution is to "reset" your audio settings to their defaults. This is like hitting the reset button on your computer.
- Windows Audio Troubleshooter: Windows has a built-in audio troubleshooter. Type "Troubleshoot settings" in the search bar, select "Other troubleshooters," and then choose "Playing Audio." Follow the on-screen instructions.
- Resetting Windows: If all else fails, you can consider resetting Windows to its factory settings, but do so with caution because you will lose any files that are not saved elsewhere.
10. The Great Mic Muddle: Fixing Microphone Issues
If your microphone isn't working, we have a separate set of troubleshooting steps.
- Check Microphone Privacy Settings: In Windows Settings, go to "Privacy," select "Microphone," and make sure "Microphone access for this device" is turned on. Also, ensure the applications you want to use have permission to access your microphone.
- Microphone Input Level: In the Sound Settings (Recording tab), select your headset microphone, right-click, and choose "Properties." Go to the "Levels" tab and make sure the microphone volume is turned up and not muted.
- Test Your Microphone: In the Sound Settings (Recording tab), speak into your headset microphone and monitor the level meter. If the meter doesn't move, there's a problem.
11. The Internal Speaker Scenario: What If the Problem Isn
Does AllShare REALLY Work on Laptops? (Shocking Truth Inside!)Fix Earphones Headphone Not Working On Windows 11

By ITGuy360 Fix Earphones Headphone Not Working On Windows 11 by ITGuy360
Fix Headphone Connected But No Output Sound in Windows 1110

By MJ Tube Fix Headphone Connected But No Output Sound in Windows 1110 by MJ Tube
How to fix No Sound on Windows 10
By The Geek Page How to fix No Sound on Windows 10 by The Geek Page

Title: No audio output device installed windows 10, No sound problem windows 10, Fix No Sound windows 10
Channel: Smrity Computer
No audio output device installed windows 10, No sound problem windows 10, Fix No Sound windows 10 by Smrity Computer
Laptop Wifi Connect
Headset Nightmare? FIX Your Laptop Audio NOW!
Have you ever been plunged into a digital abyss, only to find yourself wrestling with a phantom menace: your laptop's audio? The tantalizing promise of crystal-clear sound, immersive gaming, or seamless video calls shatters, replaced by a cacophony of crackling, distorted whispers, or, worse, utter silence. We understand your frustration. It's a common plight, but one with remarkably simple solutions. Join us as we unravel the mysteries of laptop audio woes and guide you, step-by-step, toward a harmonious audio experience.
Diagnosing the Digital Demons: Pinpointing the Source of the Problem
Before we launch into repair maneuvers, let us first identify the battlefield. Is the problem inherent to your headphones, your laptop, or perhaps a mischievous setting lurking in the shadows? Think of troubleshooting as a detective mission: collecting clues, analyzing evidence, and eventually unmasking the culprit.
The Headset's Role: First, isolate the prime suspect: your headset. Test it on another device. Does the audio remain fragmented, distorted, or missing entirely? If so, the headset itself might be the issue. Check the physical connections, examine the cable for fraying or damage, and ensure the plug is securely seated in the port. Consider trying a different headset entirely. Even a simple pair of earbuds can provide a quick reality check
Laptop's Internal Investigation: If your headset checks out, the blame shifts to your laptop’s audio circuitry. To inspect, try another pair of headphones, or external speakers. Is the sound still muffled or absent when these are connected? Then the problem is most likely in your laptop itself.
The Software Labyrinth: Software glitches, driver conflicts, and incorrect settings are often the root cause of audio troubles. These issues can be elusive, but with the right tools and knowledge, easily solved.
Unmasking the Culprits: Software Fixes to Restore Audio Clarity
Let us delve into the software realm, where many audio problems take root. Here’s how we can uproot them.
Driver Dilemmas: Drivers are the digital interpreters, translating commands between your operating system and the hardware. Outdated or corrupted drivers are common sources of audio problems.
- Driver Updates: The most straightforward remedy is to update your audio drivers. Navigate to your laptop manufacturer's website (Dell, HP, Lenovo, etc.) and use their model number to find the drivers specific to your device. Download the latest version and install it. The installation process usually involves following on-screen prompts. Restart your laptop after installation.
- Device Manager Exploration: If the website route feels like a maze, access the Device Manager (search it in your Windows search bar). Find "Sound, video and game controllers," usually listed within the device categories. Right-click on your audio device (e.g., "Realtek High Definition Audio") and select "Update driver." Windows will try to find the latest drivers automatically. If that fails, you can manually browse to the downloaded driver files.
- Uninstall and Reinstall: Sometimes, a complete reinstall is necessary. In Device Manager, right-click on your audio device and select “Uninstall device.” Restart your laptop. Windows will usually reinstall the drivers automatically upon restart. If not, use the manufacturer's installation file again.
Sound Settings Scrutiny: Incorrect audio settings can also wreak havoc.
- Playback Device Selection: Right-click on the speaker icon in your system tray (bottom right corner of your screen). Ensure your chosen headset or external speakers are selected as the default playback device.
- Volume Mixer Checks: In the same context menu, click "Open Volume mixer." Make sure the volume sliders for individual applications are not muted or set too low.
- Enhancements Evaluation: Within the Sound settings (search for "Sound settings" from the Windows search bar), explore the "Enhancements" tab for your audio device. Experiment by disabling enhancements to check if any of them are causing distortion. You can also adjust the speaker's properties here.
Operating System Intricacies: Sometimes, the operating system itself can behave badly.
- Windows Troubleshooter: Let Windows do the work. Right-click on the speaker icon in your system tray and select "Troubleshoot sound problems." The troubleshooter will diagnose and attempt to fix any detected issues.
- Restart and Reboot: The oldest trick in the book – but often effective. A simple restart can resolve temporary software glitches. A full shutdown, followed by waiting a few minutes before restarting, can clear out more lingering issues.
- Update the Operating System: Ensure your operating system is up-to-date. Outdated systems are prone to software conflict.
Hardware Hazards and Their Remedies: Taming the Physical Components
While software is a common culprit, hardware issues are also within the realm of possibility. Don't panic! We'll guide you through the potential pitfalls.
Port Problems: The physical headphone jack is susceptible to wear and tear.
- Inspection: Inspect the headphone jack for any debris, dust, or physical damage. Use a toothpick to gently remove any obstructions.
- Testing Multiple Ports: In many laptops, if present, test different ports to figure out if one is faulty.
- Consider a USB Solution: USB audio adapters bypass the headphone jack entirely, providing a reliable alternative.
Speaker System Examination: Internal laptop speakers, if causing the problem, have a few fixes.
- Integrated Audio Test: Check the sound through built-in speakers. If the sound is fine through the speakers and bad through the headset, the problem is usually with the headset jack, otherwise, it is with the software.
- Physical Damage Inspection: If you suspect damage to your internal speakers, you may need to take your laptop to a repair professional.
External Device Integration: If your audio problems arise primarily when using external devices.
- External Audio Device Testing: When using external speakers or USB devices, ensure they are connected and powered correctly.
- Compatibility Concerns: Verify device compatibility with your laptop. Make sure you have the correct drivers installed (especially for USB devices).
Advanced Techniques: Diving Deeper into Audio Solutions
For those brave enough to tread further, here are some advanced solutions.
BIOS Investigation: Sometimes, audio settings are tucked deep in your computer's BIOS (Basic Input/Output System). Accessing the BIOS usually involves pressing a specific key (Del, F2, F12, or Esc) during the startup process. Consult your laptop's manual for the correct key. Within the BIOS, look for audio settings and confirm that the audio device is enabled. Be very careful with BIOS settings; incorrect adjustments can harm your machine.
Third-Party Software: Some software can modify audio settings.
- Equalizer Exploration: Consider using a third-party equalizer app to fine-tune the audio output. These apps give finer control over the frequency ranges.
- Audio Device Managers: There are specialized audio device manager software packages that can improve driver management and audio output quality.
Hardware Considerations: In extreme cases, hardware failure could be the cause.
- Professional Examination: If all else fails, consult a qualified computer repair technician. They can diagnose hardware problems, such as a failing sound card or a damaged audio jack.
Prevention is Key: Maintaining Peak Audio Performance
Following these habits can prevent future audio headaches.
- Regular Driver Maintenance: Create reminders to update your audio drivers periodically. Manufacturers often release updates that improve performance and fix bugs.
- Careful Handling: Handle your headset and laptop with care. Avoid yanking headphone cables, and protect the audio ports from dust and spills.
- System Cleanliness: Perform regular system maintenance, including removing temporary files and running a disk cleanup. A cluttered system can sometimes contribute to performance issues.
- Backup Precautions: Before making significant system changes or installing new hardware, back up your important files and settings. This can save you from an unexpected catastrophe.
We have provided a comprehensive guide to help you banish your laptop audio troubles. By carefully evaluating the situation, applying targeted fixes, and practicing preventative measures, you will reclaim crystal-clear sound and enjoy the immersive audio experience your laptop was designed to deliver.
