hp laptop n key not working
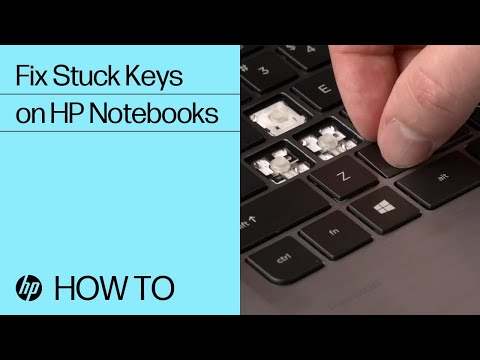
Title: Fix Stuck Keys on HP Notebooks HP Computers HP Support
Channel: HP Support
Fix Stuck Keys on HP Notebooks HP Computers HP Support by HP Support
hp laptop n key not working, hp laptop b and n key not working, hp laptop enter and backspace key not working, hp laptop 5 and 6 keys not working, hp laptop ctrl and shift keys not working, hp laptop g and h keys not working, hp laptop volume and brightness keys not working, hp laptop t and y keys not working, why are my keys not working on my hp laptop, hp laptop function keys not working
HP Laptop N Key DEAD? 😱 FIX IT NOW!
HP Laptop N Key Blues? Don't Panic! Here's How to Revive It
That sinking feeling. You're typing away, mind racing, deadlines looming, and then… silence. You hit the 'N' key on your HP laptop, and nothing happens. A wave of frustration washes over you. But, before you start mentally shopping for a new laptop, take a deep breath. More often than not, the issue is fixable. This isn't a death sentence for your trusty machine. We'll explore some common culprits and solutions. We're here to guide you through the troubleshooting process.
Is It Really, Truly Dead? Testing the Waters
Before launching into a full-blown repair, let's confirm the 'N' key is actually unresponsive. First, try a simple restart. Sometimes, a temporary glitch causes the problem. If that doesn’t work, consider another simple test. Open a basic text editor like Notepad. Type random letters alongside the "N" key. Does every key work except "N"? If so, the issue focuses on the "N" key directly. Furthermore, test the "N" key on an external keyboard, if you have one. This helps determine if the problem lies with the laptop itself or the keyboard. If "N" works on an external keyboard, the issue is likely the laptop keyboard. Therefore, you can proceed confidently with these troubleshooting steps.
Software Hiccups: Ruling Out the Obvious
Software issues can sometimes create keyboard problems. They can also be the easiest to fix. To start, check your keyboard settings. Go to your HP laptop's settings. Look for keyboard or accessibility options. Ensure that "Sticky Keys" or "Filter Keys" are disabled. These features can sometimes interfere. Then, try updating your keyboard drivers. Go to Device Manager. Look for the keyboard under "Keyboards." Right-click on your keyboard. Select "Update driver." If that doesn't work, try uninstalling and reinstalling the driver. These steps often clear up minor software conflicts. It's always a good idea to run a virus scan, too. Sometimes, malware can mess with system functionality.
The Hardware Angle: Dirty Deeds and Loose Connections
If software isn’t the problem, it's time to investigate the hardware. Dust, debris, and spilled liquids are keyboard's enemies. Carefully inspect the "N" key. You can use a can of compressed air to blow out any dust. Be gentle. Avoid excessive force. Also, consider the possibility of a stuck key. Gently pry around the key with a thin, non-metallic tool. This will help release any sticky residue. However, be cautious. You don’t want to damage the keyboard.
Deeper Dive: The Ribbon Cable – A Vulnerable Link
If cleaning doesn't work, we move on to more complex troubleshooting. This involves accessing the laptop's internal components. Proceed with caution. This step requires a screwdriver and a steady hand. First, you will need to unplug your laptop and remove the battery. Locate the service manual for your specific HP laptop model. Search online for "HP [your laptop model number] service manual." The manual provides detailed instructions. Carefully remove the keyboard surround. This usually involves removing screws. Gently disconnect the ribbon cable connecting the keyboard to the motherboard. Inspect the cable and its connection points. Make sure there is no damage or corrosion. Reconnect the connector. Secure the cable correctly. Reassemble your laptop. Then, test the "N" key again.
Keyboard Replacement: The Last Resort
If you've tried everything, a hardware fault may exist. Sadly, the keyboard itself might be faulty. If you're comfortable, a DIY keyboard replacement is an option. You can purchase a replacement keyboard online. Make sure it's compatible with your specific HP laptop model. Follow the service manual instructions carefully. Alternatively, consider taking your laptop to a professional repair service. They possess expertise and specialized tools. It's an excellent option if you aren't comfortable with the replacement. They can diagnose the problem and efficiently resolve it.
Prevention is Key: Proactive Measures
Once you've fixed the "N" key, take steps to prevent future issues. Invest in a keyboard cover to protect your keyboard from spills and debris. Regularly clean your keyboard. Use compressed air or a soft brush. Avoid eating or drinking near your laptop. These small efforts can significantly extend your keyboard's lifespan. By staying vigilant, you can protect your investment.
The Takeaway: You've Got This!
Dealing with a dead 'N' key can be stressful, but it’s frequently fixable. By following the steps in this guide, you can diagnose the problem. You can also restore your laptop's functionality. Remember to stay calm and patient. Don't be afraid to seek professional help if needed. Your HP laptop and your sanity will thank you for it!
Laptop Lid Secrets: The SHOCKING Truth Revealed!HP Laptop N Key DEAD? 😱 FIX IT NOW!
Hey tech enthusiasts, fellow laptop wranglers! Ever felt that heart-stopping moment when your "N" key goes AWOL? Panic sets in, right? Suddenly, typing feels like navigating a maze blindfolded. Emails become a battleground, and your creative flow grinds to a halt. We've all been there! Let's face it, a dead "N" key on your HP laptop is more than just an inconvenience; it’s a disruptive digital gremlin. But fear not, because we're diving headfirst into the world of troubleshooting and, hopefully, reviving that stubborn "N"! We're not just going to tell you what to do; we're going to walk you through it, step-by-step, like we're chatting over a cup of virtual coffee.
1. The "N" Key Crisis: Recognizing the Problem
First things first: let’s confirm we actually have a problem. Sometimes, it's not the key itself; it's something else entirely. Maybe you’re hitting other keys instead, or perhaps your fingers are just a little… off today. So, before we start ripping things apart, let’s do a simple test. Open up a document, notepad, or even a search bar. Type "nnnnnnnnn". Did anything happen? If the "N" key is unresponsive, then we’ve officially got a situation. If it's intermittently working or acting wonky, we still have a problem, but the approach might be slightly different. Think of it like this: a consistently dead key is a flat tire; a sporadic key is a slow leak!
2. Is It Software or Hardware? The Great Laptop Divide
Now we need to play detective. Is the problem within the software (the digital world) or is it a hardware issue (the physical components)? This is crucial because it dictates the fix. Imagine your laptop as a complex machine with gears and cogs inside. Sometimes those cogs get stuck because of external reasons, meaning within the software. The software is like the instructions. It tells the hardware what to do. If those instructions get muddled, things go wrong. Other times, the cogs themselves are broken. To determine which one it is, we need to do some detective work.
3. Reboot Rescue: The Simplest Solution (Often the Best!)
Okay, let’s start with the easiest and often most effective solution: a reboot. This is like hitting the "reset" button on life. Restarting your HP laptop clears out temporary glitches and refreshes the system. It’s the digital equivalent of a good night's sleep. Click that restart button (or hold down the power button until it forcefully shuts down and restarts). After the reboot, test that "N" key again. Did it magically reappear? If so, congratulations! You dodged a bullet. If not, let’s move on.
4. Sticky Situation? Cleaning Your Keyboard is Key!
Dust, crumbs, pet hair – the enemy of all things mechanical! A dirty keyboard is a common culprit. Think of it like a clogged drain. Debris can get trapped under the keys, preventing them from working properly. Grab a can of compressed air (it's a lifesaver!) and gently blow between the keys, especially around the "N" key. You can also use a soft brush or a keyboard cleaning kit. If you’re feeling brave, you might be able to carefully pry off the keycap (be very cautious!), clean underneath, and then reattach it. (There are tons of YouTube videos that show you how!) Remember, gentle is the mantra here.
5. Driver Dilemma: Checking for Keyboard Compatibility
Sometimes, the issue lies with a corrupted or outdated driver. Now, drivers are like the translator between your keyboard and your computer. If the translator is speaking gibberish, your "N" key won't understand the command. Here’s how to check:
- Go to the Windows search bar (that little magnifying glass icon) and type "Device Manager."
- Look for "Keyboards" and expand the list.
- Right-click on your keyboard device (it might just say "Standard PS/2 Keyboard" or something similar).
- Select "Update driver."
- Choose "Search automatically for drivers."
- If an update is found, install it.
Restart your laptop and test the "N" key again. Fingers crossed!
6. The "N" Key's Secret Life: Exploring Accessibility Settings
Believe it or not, sometimes the problem isn't the key itself but the accessibility settings. Windows has features designed to help people with disabilities, and sometimes these settings can interfere with normal keyboard functions.
- Go to the Windows search bar and type "Ease of Access keyboard settings."
- Check if the "Sticky Keys," "Filter Keys," or "Toggle Keys" options are enabled. If they are, try disabling them and testing the "N" key again.
7. External Keyboard Experiment: The Ultimate Test
Let’s get scientific for a moment! This is a simple test to definitively determine if the problem is with your laptop's keyboard itself. Connect an external USB keyboard to your HP laptop. Does the "N" key on the external keyboard work? If it does, it strongly suggests the issue is with your laptop's built-in keyboard. This is important information as it will help you decide if you need to replace your keyboard.
8. The Keyboard Replacement Conundrum: DIY or Pro?
If the external keyboard test leads to a confirmation of keyboard failure and if all the software and cleaning tricks have failed, it’s likely a hardware problem. This means either your "N" key has physically malfunctioned, the keyboard membrane is damaged, or there's an issue with the keyboard connection.
- DIY Route: Replacing a laptop keyboard can be done yourself, but it requires patience, a steady hand, and a few basic tools. You'll need to find a replacement keyboard specifically for your HP laptop model. There are tons of online guides, photos, and videos available to help. If you’re comfortable taking things apart, go for it!
- Professional Help: If you're not comfortable with the DIY route, or you're worried about voiding your laptop's warranty, consider taking it to a professional computer repair shop. They can diagnose the problem and replace the keyboard.
9. HP Warranty Woes: Checking Your Coverage
Before you start spending money, check your HP laptop's warranty. You can often find warranty information on the HP website by entering your laptop’s serial number. If your laptop is still under warranty, the keyboard replacement might be covered! This is a huge plus.
10. Backup Backup Backup: The Data Savior
Before you start any significant repairs or modifications, always back up your data! Backing up is as vital as wearing a seat belt. It is a safety net that prevents catastrophic data loss. Create a backup of your files, documents, and other important data on an external hard drive or cloud storage. Think of it as an insurance policy against any unexpected problems during the repair process.
11. The Virtual Keyboard: A Temporary Lifeline
While you’re waiting for a fix, or if the problem is intermittent, use the on-screen keyboard. It's a digital keyboard that appears on your screen. This allows you to type using your mouse or touchpad. Here’s how to open it:
- Type "On-Screen Keyboard" in the Windows search bar.
- Click the "On-Screen Keyboard" app.
- Use your mouse to click on the keys.
It’s not ideal, but it works in a pinch!
12. Troubleshooting Tips for Intermittent "N" Key Issues
If your "N" key works sometimes but not always, the troubleshooting process changes slightly.
- Check for Physical Obstructions: Re-examine the key for debris or stickiness.
- Update Software: Ensure your operating system is up-to-date.
- Driver Updates: Check and update keyboard drivers.
- Hardware Check: If the problem persists, it could signify a failing key, signaling the need for repair or replacement.
13. Laptop Keyboard Hacks: Re-mapping to the Rescue!
Here's a cool trick: If your "N" key is completely dead and you need a temporary solution, you can remap another key to act as the "N" key! There are free software programs that can do this. This isn't a long-term fix, but it can be a lifesaver until you get your keyboard repaired.
14. Preventative Measures: Keeping Your Keyboard Happy
Let’s proactively prevent future "N" key crises!
- Clean Regularly: Use compressed air and a soft brush to clean your keyboard frequently.
- Avoid Eating/Drinking Near Your Laptop: Crumbs and spills are a keyboard's worst enemy.
- Install a Keyboard Cover: A keyboard cover can protect your keys from dust, spills, and wear and tear.
15. The Final Step: Celebrating Your Triumph!
You've reached the end! Whether you’ve battled through troubleshooting, cleaned your keyboard, or opted for professional repair, celebrate your victory! You've fought back against the digital gremlins and brought that "N" key back to life (or found a workaround). Take a moment to appreciate the importance of that little letter, and the vital
Mac Camera Nightmare? FIX Your Laptop's Webcam NOW!HP LAPTOP KEYBOARD KEY REPAIR GUIDE 450 455 470 G5 G6 745 846 840 How to Install Fix keys DIY
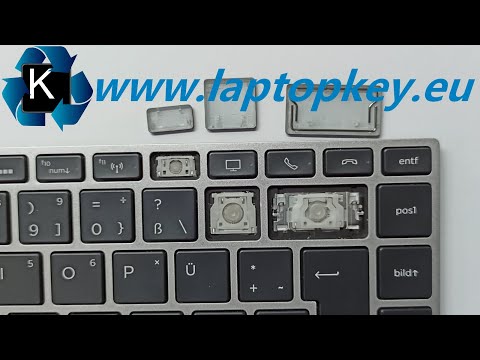
By Laptopkey.eu HP LAPTOP KEYBOARD KEY REPAIR GUIDE 450 455 470 G5 G6 745 846 840 How to Install Fix keys DIY by Laptopkey.eu
How To Fix HP Laptop Keyboard Keys Not Working Simple Solutions You Can Try So Resolve The Issue

By Helpful Solutions How To Fix HP Laptop Keyboard Keys Not Working Simple Solutions You Can Try So Resolve The Issue by Helpful Solutions
SOLUTION Some Keys Not Working on Laptop Keyboard

By Tech Express SOLUTION Some Keys Not Working on Laptop Keyboard by Tech Express

Title: FIX HP Laptop Windows key Not Working Windows 1087
Channel: Cap Trong Nam - How To
FIX HP Laptop Windows key Not Working Windows 1087 by Cap Trong Nam - How To
Laptop Working
HP Laptop N Key DEAD? 😱 FIX IT NOW!
The dreaded moment arrives: you reach for the "N" on your HP laptop keyboard, and… nothing. Blankness. Silence. Your workflow screeches to a halt, replaced by the sudden, disorienting awareness of a missing key. Fear not, fellow digital navigators. We understand the frustration, the dependence we place on our machines, and the vital role each key plays in our daily lives. Let's embark on a journey to resuscitate that uncooperative "N" key and restore your typing serenity. This guide offers a comprehensive, step-by-step approach to diagnosing and, more importantly, resolving the issue of a non-functioning "N" key on your HP laptop.
Initial Assessment: Pinpointing the Problem
Before we delve into solutions, we need to ascertain the root cause. A multitude of factors, from the simplest to the more complex, can render an "N" key inert. The following diagnostic steps, performed systematically, will help us isolate the culprit:
The Obvious: Reboot and Rule Out Simple Glitches: This seems elementary, but a simple restart can miraculously resolve a host of software-related keyboard issues. Reboot your HP laptop. After the system restarts, immediately test the "N" key. If it works, the problem was likely a temporary system hiccup. Celebrate the small victory. If not, proceed.
The External Keyboard Test (if available): Connect an external keyboard to your HP laptop. If the "N" key on the external keyboard does function, this strongly suggests the issue lies within your laptop's internal keyboard hardware, not the operating system itself. If the external "N" key also fails, the problem is more likely software-related or affecting the entire system.
The On-Screen Keyboard Examination: Access the on-screen keyboard on your HP laptop. Windows operating systems typically provide an easily accessible on-screen keyboard. Use this virtual keyboard to type. If the on-screen "N" key works without issue, this further solidifies the conclusion that the problem resides within the physical keyboard. Locate and test the onscreen keyboard to type letters.
The Driver Check: Are Your Keyboard Drivers Up-to-Date?: Outdated or corrupted keyboard drivers can cause various key malfunctions. Navigate to the Device Manager (search for it in the Windows search bar). Expand the "Keyboards" section. Right-click on your keyboard device (it might simply be called "Standard PS/2 Keyboard" or something similar) and select "Update driver." Choose the option to search automatically for updated driver software. Restart your laptop after the update, and test the "N" key.
The Sticky Keys and Filter Keys Check: Windows has accessibility features like Sticky Keys and Filter Keys, which can inadvertently interfere with keyboard input. Go to the Control Panel (search for it in the Windows search bar). Navigate to "Ease of Access" > "Ease of Access Center." Review the settings for "Make the keyboard easier to use" and ensure that Sticky Keys and Filter Keys are disabled unless you explicitly need them.
Deep Dive Solutions: Mechanical Troubleshooting and Software Remedies
Once you've completed the initial assessment, we can proceed with more involved troubleshooting steps.
Mechanical Issues: The Physical "N" Key
Visual Inspection of the "N" Keycap: Examine the "N" keycap closely. Is it loose, wobbly, or significantly different in appearance from the other keys? Occasionally, the keycap may simply pop off, or become misaligned. Gently wiggle the keycap. If it feels detached, carefully remove it (a keycap removal tool is ideal, but a small flathead screwdriver can work in a pinch). Inspect the scissor switch mechanism beneath the keycap for any debris, damage, or misalignment.
Cleaning the Scissor Switch Mechanism: If you suspect debris, use compressed air to thoroughly clean the area beneath the "N" keycap. Direct the compressed air into the switch mechanism to dislodge any dust, crumbs, or other particles. If you choose to do so, use a cotton swab dipped in isopropyl alcohol to carefully dab the area and remove any stubborn residue and let it dry completely. Be extremely careful not to damage the delicate scissor switch mechanism.
Re-Seating the Keycap (if applicable): If you removed the keycap, align it correctly above the scissor switch mechanism. Gently press down on the keycap until it clicks or snaps into place. Test the "N" key. It should now function as intended, and we can celebrate your success.
The Under-The-Hood Inspection (for more experienced users): Proceed with extreme caution, and only if you have experience with laptop hardware. If the above steps fail, the problem might lie deeper within the keyboard assembly. This involves removing the keyboard from the HP laptop (refer to your laptop's service manual or online teardown guides specific to your model) and inspecting the keyboard ribbon cable connection to the motherboard. Ensure the cable is securely seated and that there is no physical damage to the cable or the connector. This may void your warranty. Consider seeking professional assistance at this juncture if you are uncomfortable with this process.
Software-Related Troubleshooting
Virus/Malware Scan: A virus or malware infection sometimes interferes with keyboard functionality. Run a full system scan using your preferred antivirus software. Remove any detected threats. After the scan, restart your laptop and test the "N" key.
System File Checker (SFC) Scan: Corrupted system files can cause various system-wide problems, including keyboard malfunctions. Open the Command Prompt as an administrator (search for "cmd" in the Windows search bar, right-click on "Command Prompt" and select "Run as administrator"). Type
sfc /scannowand press Enter. Allow the scan to complete. It will identify and repair (if possible) any corrupted system files. Restart your laptop after the scan finishes and test the "N" key.System Restore (as a last resort): If the problem began recently, consider performing a System Restore to a point in time before the issue occurred. This will revert your system to a previous state, potentially resolving software-related conflicts. Search in the Windows search bar for "Create a restore point," then click "System Restore." Choose a restore point from before the "N" key problem emerged. Note that any software installed after that restore point will need to be reinstalled.
The Keyboard Layout Reset: In rare cases, a corrupted or incorrect keyboard layout setting can lead to key malfunctions. To check, go to Settings (search for it in the Windows search bar) > "Time & Language" > "Language." Ensure that your preferred keyboard layout is selected (e.g., "US QWERTY"). If the selected layout is incorrect, change it and test the "N" key.
Alternative Solutions and Workarounds
If all troubleshooting steps fail, here are some alternative solutions and workarounds to use while the mechanical "N" key is defunct:
On-Screen Keyboard (again, as a temporary fix): Keep the on-screen keyboard handy for typing any "N" characters. This is a simple, albeit less efficient, way to continue working.
Keyboard Mapping Software: Some free or paid software allows you to remap keys. You could, for example, map another key (like an unused function key) to the "N" key's function. This provides a usable, though less convenient, solution.
External Keyboard (as a longer-term solution): If you rely heavily on your laptop for work or personal use, consider using an external keyboard until you can repair or replace the internal one. This is the most reliable workaround.
Contact HP Support: If the problem persists and your laptop is still under warranty, contact HP support. They can offer further troubleshooting steps, arrange for a repair, or provide information about replacement options. You can often find extensive guides and tutorials on HP's website for your specific laptop model.
Preventative Measures: Keeping Your HP Laptop Keyboard Healthy
Once you've fixed the "N" key, why not adopt some preventative measures to protect your keyboard and avoid future problems?
- Regular Cleaning: Use compressed air to clear any dust or debris from your keyboard regularly. A soft brush can also help.
- Gentle Typing: Avoid slamming your fingers on the keys. Gentle and consistent typing protects the key mechanisms.
- Liquid Protection: Keep liquids away from your laptop. A spilled drink can be a keyboard's worst enemy.
- Protective Cover (optional): Consider using a keyboard cover, especially if you work in a dusty or messy environment.
- Proper Storage: When not in use, store your laptop in a clean, dry environment.
By following these steps, you'll be well-equipped to diagnose, troubleshoot, and ideally resolve the dreaded HP laptop "N" key dilemma. Remember, patience and a methodical approach are your best allies in this digital repair journey.
