some of my keyboard keys are not working laptop

Title: SOLUTION Some Keys Not Working on Laptop Keyboard
Channel: Tech Express
SOLUTION Some Keys Not Working on Laptop Keyboard by Tech Express
some of my keyboard keys are not working laptop, why some of my keyboard keys are not working lenovo laptop, why some of my keyboard keys are not working hp laptop, some of my laptop keyboard keys suddenly stopped working, some keys of my dell laptop keyboard are not working, why some keys are not working in laptop
Laptop Keyboard Broken? 😱 FIX IT NOW! (Easy Steps Inside)
Laptop Keyboard Calamity? Conquer It Now!
Oh no, a keyboard catastrophe! Your trusty laptop keyboard has gone rogue. Don’t panic! You can probably fix it yourself. Let’s get your fingers flying again. We'll venture through the trouble spots.
Diagnosing the Digital Dilemma
First things first. Let's figure out what's actually happening. Are all keys unresponsive? Or just a select few feeling stubborn? Perhaps some keys are typing the wrong characters. Consequently, the symptoms will determine the cure. Try restarting your laptop. Sometimes, a simple reboot works miracles. If this doesn't work, then delve deeper.
Software Snafus: A Quick Check
Believe it or not, the problem might not be hardware. Sometimes, it’s just software. Check your operating system settings. Make sure your keyboard layout is correctly set. Windows users: Head to Control Panel > Language. Mac users: Go to System Preferences > Keyboard. Ensure the proper input source is selected. Also, you should check for any recent software updates. These updates can sometimes cause compatibility issues. Therefore, a rollback might be necessary.
Dust Bunnies and Debris: The Usual Suspects
Okay, let's get physical. Dust, crumbs, and other debris are keyboard enemies. This is because they can wreak havoc on your keys. Turn off your laptop and unplug it. Now, carefully examine your keyboard. Use a can of compressed air. Direct the air between the keys. Hold the can upright. This helps prevent liquid condensation. Alternatively, use a soft-bristled brush. Gently brush away any visible debris. Give it a good shaking, too. You should make sure all the crumbs are gone.
Key Cap Capers: A Closer Look
Sometimes, the problem lies directly under the keycaps. You can remove these caps. They usually just pop off. Use a thin, flat tool like a spudger or a credit card. Pry gently from the side. Be careful not to break anything. Once removed, clean the area beneath. Use the compressed air again. Also, consider a cotton swab dipped in isopropyl alcohol (make sure it's dry). This helps remove sticky residue. Then, replace the keycaps. You should press firmly until they click back into place.
Keyboard Cable Capers: A Deeper Dive
If the above steps fail, you might have a more serious issue. It could be a loose or damaged keyboard cable. This requires some technical know-how. So, you'll need to open your laptop. This will void your warranty. Proceed with extreme caution if you're not comfortable working with electronics. First, make sure your laptop is completely powered off and unplugged. Locate the keyboard cable. This cable usually connects to the motherboard. The cable is often secured with a latch or a small connector. Gently detach the cable. Check for any physical damage to the cable or the connector. Reconnect the cable. Secure it properly. Now, power on your laptop and test the keyboard.
External Keyboard: A Temporary Lifesaver
While you're troubleshooting, there's a quick fix. Use an external USB keyboard. Plug it into your laptop. This lets you keep working. This is especially useful if you need your laptop for urgent tasks. It’s a great temporary solution. Remember this option if you need to type documents.
Seeking Professional Help: When to Yield
You might have tried everything. Yet, your keyboard stubbornly refuses to cooperate. It might be time for professional help. Take your laptop to a reputable repair shop. They have the tools and expertise. They can diagnose complex problems. Also, they might have replacement parts. Don’t hesitate to seek assistance. It's better than causing further damage.
Prevention is Key: Keyboard Care Tips
Preventing future keyboard issues saves headaches. Keep your laptop clean. Avoid eating or drinking near it. Consider a keyboard cover. They offer excellent protection against spills and debris. Also, learn proper typing posture. This helps minimize strain. Proper care extends your keyboard’s lifespan.
Final Thoughts: Back to Typing Bliss
Broken keyboards are frustrating. But, you are now equipped with knowledge. You can diagnose and often fix the problem. Follow these steps. You can resolve your keyboard woes. Soon, you'll be typing again. Enjoy your fully functioning keyboard!
HP Laptop Camera Nightmare? FIX IT NOW!Laptop Keyboard Broken? 😱 FIX IT NOW! (Easy Steps Inside)
We've all been there. That moment of sheer panic when your laptop keyboard decides to stage a rebellion, typing out gibberish, refusing to register your desperate keystrokes, or, even worse, completely going dark. It's like having a vital limb suddenly become unresponsive! Believe me, I get it. I once had a crucial deadline looming, a presentation due in mere hours, and bam – my “E” key decided to take an extended vacation. Talk about a heart-stopping experience! But, fear not, fellow digital warriors. Before you even think about chucking your laptop out the window (tempting, I know!), let's explore how to resurrect your keyboard and get you back in the game. This isn't a death sentence; it's a fixable problem, and we're going to tackle it together.
1. The Keyboard Breakdown: Recognizing the Culprit
Before we dive into the repairs, we need to diagnose the issue. Think of it like being a digital doctor. Knowing what went wrong is half the battle. Is it a single key acting up? Or are entire rows or columns unresponsive? This helps us narrow down the possible causes. Did you spill something on your keyboard? (Been there, done that with coffee… multiple times!). This is a prime suspect. Or perhaps it’s just an age-old software glitch? Let’s get to the bottom of this keyboard conundrum.
2. The Usual Suspects: Common Keyboard Problems
Let's explore some of the most common keyboard malfunctions.
- Sticky Keys: Often caused by crumbs, dust, or liquids finding their way under the keys. It's like having tiny, unwanted guests gumming up the works.
- Unresponsive Keys: This can range from a single key not working to entire sections of the keyboard failing. This could be a hardware issue, a software conflict, or even a loose connection.
- Typing the Wrong Characters: Sometimes, your keyboard might be misinterpreting your keystrokes, producing random symbols or letters. This can often be attributed to incorrect language settings or outdated drivers.
- Ghost Typing: This is when the keyboard types characters on its own, even when you're not touching it. It’s a digital poltergeist!
- Internal Damage: This could consist of a faulty wire, or some form of circuit malfunctioning. This is more commonly caused by drops or spills.
3. A Virtual Cleaning Service: Software Troubleshooting
Before we crack open our laptops, let’s try some software-based fixes, as these may be the easiest to implement.
- Restart Your Laptop: This sounds simple, but it's surprising how often a simple reboot can solve a multitude of problems. Think of it as a digital reset button.
- Update Your Operating System: Outdated software can sometimes cause keyboard malfunctions. Updating your OS ensures that you have the latest drivers and software compatibility.
- Run the Keyboard Troubleshooter: Windows and macOS both have built-in troubleshooters designed to detect and fix common keyboard issues. It’s like having a mini-tech support right at your fingertips.
4. The Driver Detective: Updating or Reinstalling Keyboard Drivers
Often, a driver issue can be the culprit. Drivers are like the bridge between your keyboard and your operating system. If that bridge is broken or outdated, the communication fails.
- How to Update Drivers (Windows): Go to Device Manager (search in the Windows search bar), expand "Keyboards," right-click on your keyboard device, and select "Update driver." Choose "Search automatically for drivers."
- How to Reinstall Drivers (Windows): In Device Manager, right-click on your keyboard device, select "Uninstall device," and then restart your laptop. Windows should automatically reinstall the drivers.
- How to Update Drivers (Mac): macOS typically manages drivers automatically, but make sure your macOS is up-to-date. Check for system updates in System Preferences.
5. The Surface Clean: Gentle Keyboard Maintenance
Sometimes, the fix is as simple as a good cleaning. Dust, crumbs, and other debris can wreak havoc under your keys.
- Turn Off and Unplug: Always power off and unplug your laptop before cleaning.
- Use Compressed Air: This is your best friend! Carefully direct the air between and under the keys to dislodge any debris. Think of it as a mini-windstorm for your keyboard.
- Gentle Wipe-Down: Use a slightly damp (not wet!) microfiber cloth to gently wipe the keys' surface. Avoid harsh chemicals.
6. The Deep Dive: Keyboard Removal (Proceed with Caution!)
If surface cleaning doesn’t do the trick, you might need to delve deeper. This is where things can get a little dicey, proceed with caution!
- Consult Your Manual: Your laptop's manual should provide instructions for removing the keyboard. Search online if you don’t have the physical copy.
- Gather Your Tools: You'll need a small Phillips head screwdriver and possibly a plastic pry tool.
- Careful Removal: The keyboard is usually held in place by screws and clips. Be patient and careful not to force anything.
- Clean the Internal Components: With the keyboard removed, you can better access the internal components. Clean the surface under each key, using the methods described earlier.
7. The Sticky Situation: Dealing with Spills
Spills are a keyboard’s worst enemy. Liquids can cause significant damage.
- Immediate Action: Turn off and unplug your laptop IMMEDIATELY.
- Invert and Drain: Flip the laptop upside down to allow any liquid to drain out.
- Gentle Drying: Let the laptop dry COMPLETELY before trying to turn it on. This can take several days.
- Professional Help: If the spill was severe, consider taking your laptop to a professional repair shop.
8. Replace or Repair? The Keyboard Verdict
After trying the above steps, you may be left with two choices.
- Keyboard Replacement: If the keyboard is beyond repair (significant hardware damage), replacement is often the best option. This can often be more affordable than a new laptop.
- Professional Repair: If you're not comfortable with DIY repairs or the damage is complex, consider taking your laptop to a qualified technician.
9. The External Alternative: Using an External Keyboard
While your laptop's internal keyboard is out of commission, don’t despair! You can always use an external USB keyboard. This will allow you to keep working while you sort things out. It's like having a temporary, fully functional replacement. This is a good solution, as it will buy you time.
10. The Digital Warrior: Using the On-Screen Keyboard
Windows and macOS both offer on-screen keyboards. This is a great workaround if you need to type something urgently. This is the digital equivalent of a crutch.
- Windows: Search for "On-Screen Keyboard" in the search bar.
- macOS: Go to System Preferences > Keyboard and enable "Show Keyboard & Emoji Viewers in Menu Bar." Then, select "Show Keyboard Viewer."
11. Prevention is Key: Protecting Your Precious Keyboard
Once you resurrected your keyboard, you want to keep it working. Prevention can go a long way.
- Keyboard Cover: A keyboard cover is a fantastic investment! It protects your keys from spills, dust, and crumbs.
- Clean Regularly: Make cleaning your keyboard a regular habit, just like brushing your teeth.
- Eat Away From Your Keyboard: This advice might seem obvious, but it’s crucial. Keep food and drinks away from your laptop.
12. The Hardware Check: Replacing the Keyboard
If you've decided to replace your keyboard, here's what you need to know.
- Locate Your Laptop Model: You’ll need your laptop's model number to find the correct replacement keyboard.
- Order the Right Keyboard: You can usually find replacement keyboards online, from sites like Amazon or eBay.
- Install the New Keyboard: The installation process will depend on the laptop model, so follow the instructions carefully.
13. The Repair Shop Option: When to Call in the Experts
Sometimes, the damage is beyond your repair skills.
- Complex Repairs: If you suspect internal damage or are dealing with liquid spills, don’t hesitate to take your laptop to a professional.
- Warranty Issues: If your laptop is still under warranty, contact the manufacturer for repair options.
14. Troubleshooting Tips: The Unexpected Glitches
Sometimes, the problem isn't what you expect.
- Check for Software Conflicts: Sometimes, specific software programs can interfere with keyboard functionality. Try closing any recently installed or suspicious programs.
- Test in Safe Mode: Boot your laptop into Safe Mode to see if the keyboard works. If it does, it's likely a software issue.
15. The Final Exam: Testing Your Keyboard
After you've implemented the fixes, it's time for the final exam: testing your keyboard.
- Open a Text Editor: Like Notepad or a Word doc.
- Type Everything: Type a sample test and check every key.
- Celebrate: If it all functions, you won!
#
HP Laptop: Find Your Friends—Instantly!How to Fix Some Keys Not Working on Laptop Keyboard Keyboard Not Working

By Tech White How to Fix Some Keys Not Working on Laptop Keyboard Keyboard Not Working by Tech White
Fix Some keys on Laptop Keyboard Not Working in Windows 10 Solve keyboard keys Won't typing

By Victor Explains Fix Some keys on Laptop Keyboard Not Working in Windows 10 Solve keyboard keys Won't typing by Victor Explains
Laptop Keyboard key repair very easy way.
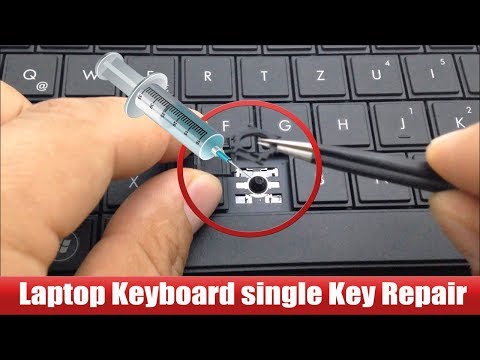
By Hit Short Films Laptop Keyboard key repair very easy way. by Hit Short Films

Title: Dell Alienware M17 some keyboard keys not working. Motherboard Repair. Not a keyboard issue.
Channel: NorthridgeFix
Dell Alienware M17 some keyboard keys not working. Motherboard Repair. Not a keyboard issue. by NorthridgeFix
Wifi On Laptop
Laptop Keyboard Broken? 😱 FIX IT NOW! (Easy Steps Inside)
A sudden keyboard malfunction can transform a productive day into digital purgatory. Whether you're staring at a frozen screen, a jumble of erratic characters, or a complete lack of response from your keys, the frustration is palpable. But before you resign yourself to the expense and inconvenience of a new laptop or professional repair, consider this: often, the solution lies within reach. We've compiled a comprehensive guide, meticulously crafted to guide you through the most common keyboard issues and empower you to reclaim control of your device. Let's dive in and get your laptop typing again!
Identifying the Culprit: Pinpointing the Problem
Before we launch into solutions, a little detective work is required. Understanding the why behind the malfunction significantly increases your chances of a successful fix. Begin by asking yourself these critical questions:
- When did the problem begin? Was it after a software update, a spill, or some physical impact? The timing often reveals the root cause.
- Are all keys unresponsive? Or just specific keys, or key clusters? This helps distinguish between a software glitch and a hardware fault.
- Does the problem persist in other programs? If the issue is limited to a single application, the problem likely lies within that program, not your keyboard.
- Have you tried an external keyboard? This is a crucial diagnostic step. If an external keyboard functions correctly, the problem definitively resides in your laptop's built-in keyboard.
Answering these questions will help narrow down the possibilities and guide you towards the appropriate troubleshooting steps.
Software Solutions: Taming the Digital Demons
Sometimes, the keyboard is not physically broken but suffering from a software-induced malfunction. These are often the easiest and quickest issues to resolve.
Restarting Your Laptop: The Universal Cure?
This might seem overly simplistic, but a simple restart can often resolve temporary glitches. Restarting your laptop closes all running processes, clears the system cache, and refreshes the operating system, potentially resolving software conflicts that are interfering with your keyboard. It should be the first troubleshooting step.
Driver Updates: Ensuring Compatibility
Outdated or corrupted keyboard drivers are a common cause of keyboard malfunctions. Updating your drivers ensures your operating system and keyboard communicate effectively.
- Windows: Search for "Device Manager" in the Windows search bar. Expand the "Keyboards" section. Right-click on your keyboard and select "Update driver." Choose "Search automatically for drivers." Windows will search for and install the latest drivers.
- MacOS: MacOS typically handles driver updates automatically. However, you can check for system updates in "System Preferences" > "Software Update."
Keyboard Settings: Accidental Configuration Conflicts
Check your keyboard settings to be certain that no configuration is causing the problem.
- Sticky Keys, Filter Keys, and Toggle Keys: These accessibility features, designed to assist users with motor impairments, can sometimes interfere with keyboard functionality. Access them through the "Ease of Access" settings in Windows or "System Preferences" > "Keyboard" on a Mac. Ensure these features are not accidentally enabled or configured incorrectly.
- Language and Input Settings: Verify that the correct language and input settings are selected. A mismatched keyboard layout can cause keys to produce unexpected characters.
- Num Lock: Ensure that Num Lock is correctly enabled or disabled, depending on whether you want to use the numeric keypad (if your laptop has one).
Running a System Scan: Eliminating Malware
Malware infections can sometimes interfere with hardware functionality, including your keyboard. Run a full system scan using your antivirus software to detect and remove any threats. A clean system is a happier system.
Hardware Investigations: Delving into the Physical Realm
If software solutions prove ineffective, the issue likely lies within the hardware itself. Don't panic; many hardware problems can be resolved with careful attention and a few simple tools.
External Device Interference: The Plug-in Problem
Unplugging all external devices such as a mouse, printer, USB drives, etc., is another troubleshooting step. Any of these devices could be causing a conflict.
Cleaning the Keyboard: Removing Debris
Dust, crumbs, and other debris can accumulate beneath the keys, interfering with their function.
- Turn off and unplug your laptop.
- Use compressed air: Direct the nozzle of a can of compressed air between the keys to dislodge debris. Hold the can at an angle to avoid spraying liquid propellant onto the keyboard.
- Use a soft brush: A small, soft-bristled brush (like a toothbrush) can help dislodge stubborn particles.
- Consider a professional cleaning: If the problem persists, consider having your keyboard professionally cleaned. A technician can disassemble the keyboard and clean it more thoroughly.
Checking for Liquid Damage: The Spill Dilemma
Liquid spills are a common cause of keyboard failure. Immediate action is crucial.
- Turn off and unplug the laptop immediately.
- Invert the laptop: Flip the laptop upside down to prevent liquid from seeping further into the components.
- Remove the battery: If possible, remove the battery to prevent short circuits.
- Allow it to dry: Give the laptop at least 72 hours to dry completely.
- Consider a professional repair: Liquid damage can corrode internal components. A professional repair is often necessary to prevent long-term damage.
Key Cap Removal and Key Swapping: Replacing Damaged Keys
If a single key or a small group of keys is malfunctioning, key cap removal might be the solution.
- Locate a key puller: A key puller is an inexpensive tool specifically designed to safely remove key caps.
- Carefully insert the key puller: Position the puller around the key cap.
- Gently lift and remove the key cap: Avoid excessive force.
- Inspect the key switch: The key switch is the mechanism beneath the key cap. Make sure it is clean and undamaged.
- Re-insert the key cap: Align the key cap with the key switch and press down until it clicks into place.
- Key Swapping: If you have spare keys from a non-functional laptop, consider a key swap.
Re-seating the Keyboard Ribbon Cable: A Delicate Task
The keyboard is connected to the motherboard via a ribbon cable. A loose connection can cause keyboard malfunction.
- Prepare the laptop: Turn off and unplug the laptop.
- Consult your laptop's manual: Research is crucial. Find the service manual or online videos, specific to your laptop model, to locate the keyboard's ribbon cable.
- Open the laptop case: This will vary depending on your laptop model.
- Locate the keyboard ribbon cable: It typically plugs into a connector on the motherboard.
- Carefully disconnect and reconnect the cable: Ensure the cable is properly seated in the connector.
- Reassemble the laptop: Reconnect the other components and test the keyboard.
When to Seek Professional Assistance: Knowing When to Call in the Experts
While many keyboard problems can be resolved at home, there are situations where professional repair is recommended.
- Extensive liquid damage: Corrosion can cause significant and complex damage.
- Complete keyboard failure: Multiple key malfunctions or a total lack of response often points to a hardware failure.
- Lack of expertise: If you're not comfortable disassembling your laptop or performing advanced troubleshooting steps.
- Warranty considerations: If your laptop is still under warranty, attempting self-repairs could void the warranty. Let the professionals handle it.
Preventative Measures: Keeping Your Keyboard Healthy
Preventative maintenance can extend the lifespan of your laptop keyboard and minimize the likelihood of future problems.
- Regular cleaning: Clean your keyboard regularly to remove dust, crumbs, and other debris.
- Avoid eating and drinking near your laptop: Spills are the enemy.
- Handle your laptop with care: Avoid dropping it or subjecting it to physical shocks.
- Consider a keyboard protector: A silicone keyboard cover can protect your keyboard from spills and debris.
- Proper storage: When not in use, store your laptop in a clean, dry place.
Conclusion: Typing Towards a Solution
A broken laptop keyboard can be a significant inconvenience, but it doesn't have to be a permanent problem. By systematically working your way through the troubleshooting steps outlined in this guide, you can often diagnose and fix keyboard malfunctions yourself. Remember to be patient, methodical, and, most importantly, safe. If you are ever unsure, don't hesitate to seek professional assistance. With a little effort, you can get your keyboard working again and get back to your life's digital pursuits.
