how does printscreen work on laptop
Title: How to take a screenshot on a PC or laptop with Windows
Channel: Digital Trends
How to take a screenshot on a PC or laptop with Windows by Digital Trends
how do print screen on laptop, how to use print screen on laptop
Laptop Screenshot Secrets: The Ultimate Guide!
Unlock the Laptop's Hidden Canvas: Your Epic Screenshot Bible!
Ever felt a pang of tech-frustration, grasping for a way to immortalize that fleeting digital moment? You aren’t alone. We've all been there, staring at our screens, wishing for a freeze-frame button for the digital world. Well, prepare to say goodbye to those head-scratching moments. Consider this your exhaustive guide to mastering the art of the laptop screenshot!
Snapping Success: The Universal Screenshot Symphony (and Keyboard Chaos!)
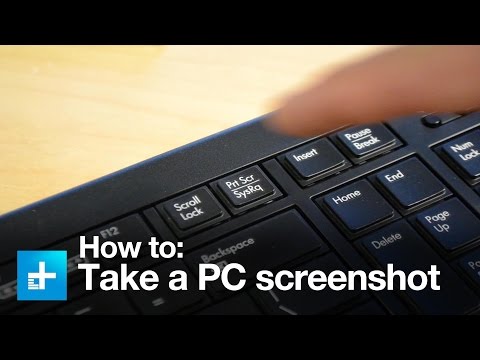
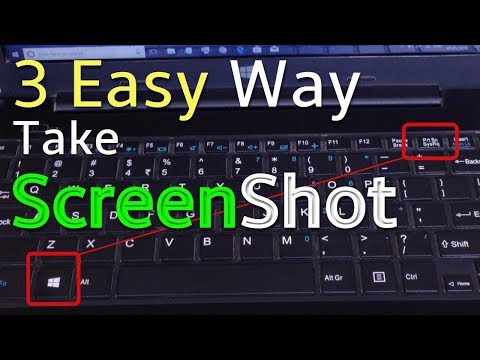
First things first: let's decode the keyboard's cryptic language. You see, different operating systems sing their own screenshot song. However, the melody remains fundamentally the same. On Windows, you’ll likely find the “Print Screen” key (often abbreviated as PrtScn, Prnt Scrn, or similar) lurking near the top-right corner. Now, here’s the twist: hitting this key directly often places the captured image onto your clipboard.
Consequently, you’ll need to paste it into an image editor (like Paint, Photoshop, or even a simple word processor) to view it. Alternatively, many Windows systems offer “Win + PrtScn.” This keyboard combination saves an image of your entire screen directly to a “Screenshots” folder within your Pictures library. Plus, it's a quick and easy method.
For macOS aficionados, the command is different. Press “Shift + Command + 3” to capture the entire screen, saving it as a .png file to your desktop. But wait, there’s more! If you’re after a specific area, use the classic “Shift + Command + 4” keys. Then, drag your mouse to select the region you desire. After that, release the mouse, and voila!
Beyond the Basics: Level Up Your Snipping Game
Now, let's delve into some advanced maneuvers. Besides the standard screen grab, there is so much more. For Windows users, the “Snipping Tool” (or “Snip & Sketch” on newer systems) provides a suite of image-capturing options. Therefore, you can snip rectangular areas, freeform shapes, windows, or the entire screen. Also, these tools allow markup.
Subsequently, you can annotate your screenshots with a pen or highlighter. This is perfect for highlighting specific parts of your screen. In macOS, "Preview" and third-party apps unlock similar capabilities. Consider this a treasure chest of digital capture control.
Speaking of customization, let's tailor your captures. You can edit them to perfection. Cropping, resizing, and annotating screenshots are the keys to clarity. These actions simplify your message. Then, consider adding arrows, text, or highlights to draw attention. Therefore, your message becomes crystal clear.
Screenshot Software Superstars: Unleashing the Power of Third-Party Apps
While built-in tools are useful, sometimes you need more. Fortunately, there's a plethora of third-party screenshot software. These apps introduce a level of sophistication, with features like scrolling screenshots, advanced editing tools, and cloud integration. For instance, consider programs like Snagit, Lightshot, or Greenshot. These can revolutionize how you capture and share information.
Hence, these tools often offer advanced features. Take scrolling screenshots, for example, to capture entire webpages. Furthermore, many apps have built-in image editing tools. These help you annotate your captures directly within the software.
Sharing is Caring: The Art of Screenshot Distribution
You've captured your masterpiece, now what? Sharing your screenshot is as important as the capture itself. Furthermore, understanding the best methods depends on your audience. For quick sharing, pasting the image directly into an email or messaging app is often sufficient.
However, for more formal communications, saving the image as a .png or .jpg file allows for better quality control. You can then attach it to an email or share it via a cloud service. Consequently, consider cloud storage services like Google Drive or Dropbox. These facilitate effortless sharing and collaboration.
Troubleshooting Time: When Screenshots Go Awry
Even the most skilled screenshot artists encounter roadblocks. Have you ever pressed the wrong key and gotten nothing? If your screenshot isn't working, troubleshoot. First, confirm you’re pressing the correct key combinations. Review your operating system’s screenshot instructions again. Ensure your drivers remain updated.
If the issue persists, try restarting your computer. Moreover, close any programs that might be interfering. You could also explore the settings within your screenshot tool. There, you can adjust hotkeys or other configurations.
The Future of Screenshots: Where Do We Go From Here?
The world of screenshots is constantly evolving. As technology improves, so do the ways we capture and share our screens. Moreover, we expect to see even more intuitive and powerful tools. Furthermore, expect smarter AI-powered image editing. Also, anticipate greater integration with collaboration platforms.
Beyond that, perhaps we’ll see the dawn of immersive screenshot experiences. Imagine capturing interactive elements within a screenshot. Therefore, the possibilities are nearly endless! The future is bright, and your screenshot skills will be invaluable.
ThinkPad Touchpad Dead? This SHOCKING Fix WORKS!Laptop Screenshot Secrets: The Ultimate Guide!
Hey everyone! Ever found yourself staring at your laptop screen, desperately wanting to capture that one specific thing, that witty meme, that important email, or that hilarious typo? Well, you’re in the right place! We've all been there, and today, we're diving deep into the wonderful world of laptop screenshots – unlocking the secrets to becoming a screenshot ninja. Forget those awkward, blurry captures – we’re talking about professional-grade grabs that'll make you look like a tech wizard. Let’s get started!
1. Why Screenshots Are Your New Best Friend: The Power of Visual Communication
Think of screenshots as your visual memory. They’re like digital sticky notes, but way more shareable and effective. Whether you’re a student trying to capture a complex formula, a designer showcasing your latest work, or just trying to share a funny cat video with your bestie, screenshots are invaluable. They literally freeze a moment in time, allowing you to communicate ideas, troubleshoot problems, and preserve information with unparalleled clarity. It’s like having a photographic memory, but for your computer screen. And who wouldn’t want that?
2. The Universal Screenshot Keys: Your Gateway to Instant Capture
Knowing the basic keyboard shortcuts is the first step on your screenshot journey. It’s like learning your ABCs. The commands vary slightly depending on your operating system:
- Windows: The trusty Print Screen (PrtScn) key is your friend. Tapping it copies the entire screen to your clipboard. You then need to paste it into an image editor (like Paint) or a document. For a specific window, use Alt + Print Screen.
- Mac: Simplicity reigns supreme here. Shift + Command + 3 captures the entire screen, while Shift + Command + 4 turns your cursor into a crosshair, letting you select a specific area. Shift + Command + 5 offers even more control, with a menu that lets you record video, too!
We’re talking instant gratification here! Practice these, and you'll be a screenshot pro in no time.
3. Beyond the Basics: Mastering Your Screenshot Tools
Okay, we’ve covered the basics. Now, let’s level up.
- Windows Snipping Tool/Snip & Sketch: This built-in utility is a game-changer. You can select a rectangular area, a free-form shape, a window, or the entire screen. Plus, you can annotate your screenshots with a pen or highlighter, making them super useful for explanations or marking up documents. It’s like having a built-in digital pen and paper!
- Mac Screenshot Toolbar: Remember Shift + Command + 5? That’s your gateway to the screenshot toolbar. It gives you options like a timer, and lets you record video of your screen activity, a very valuable feature.
- Third-Party Software: Want even more control? There’s a whole universe of screenshot software out there, boasting features like automatic uploads, cloud storage, and advanced editing capabilities. Think of it as having a personal photo studio right on your laptop.
4. Cropping, Editing, and Annotating: Making Your Screenshots Shine
A good screenshot is more than just a capture; it’s a communication tool. And that means editing is key.
- Cropping: Remove unwanted areas to focus on the essential information. Think of it as getting rid of the visual clutter.
- Highlighting: Use arrows and text boxes to direct your audience's attention. It's like drawing a big red arrow on what's important.
- Blurring/Pixelating: Need to protect sensitive information? Blur it out! We're talking masking passwords, personal details, or anything you want to keep private.
- Annotations: Add text, arrows, and shapes to highlight specific elements or provide additional context.
5. How to Take a Screenshot on Every Laptop Brand
It doesn’t matter if you’re Team Apple or Team Windows, we’ve got you covered. The screenshot key combinations work across different laptop brands. So whether you have a Dell, HP, Acer, Lenovo, MacBook, or anything else, the core method stays the same. Refer to section 2 and you’ll be good to go!
6. Screenshot Best Practices: Tips and Tricks for Optimal Results
Want to be a screenshot master? Here's some insider info:
- Plan your shot: Think about what you want to capture before you press the buttons.
- Clean up your screen: Close unnecessary windows and tidy up your background.
- Use the right tool: Choose the features that fit the job with each screenshot.
- Save smart: Name your files descriptively and save them in an organized folder.
7. Sharing Your Screenshots: From Email to Social Media
Once you've captured your perfect screenshot, it's time to share it with the world (or your colleagues, at least). You can easily insert screenshots into emails, documents, presentations, and social media posts. Just copy and paste, or upload the image file. It's that simple.
8. Troubleshooting Common Screenshot Problems
Sometimes, things don't go as planned. Here are a few quick fixes:
- Screenshot not working? Make sure you’re pressing the right keys and that your operating system is up-to-date. Restarting your laptop can also work.
- Can't find your screenshot? Check your default save location (usually the "Pictures" folder). If you used the clipboard, remember to paste it into an image editor or document.
9. Screenshotting for Work: A Communication Savior
Screenshots are invaluable in the workplace. They're great for:
- Explaining technical issues: Show a problem better than words can.
- Providing visual instructions: Guide colleagues through tasks.
- Documenting progress: Track project timelines.
- Sharing feedback: Mark up designs or documents.
10. Screenshotting for Fun: Capturing the Moments
Screenshots aren't just for work! They're also great for capturing the fun moments in life:
- Saving funny memes: Share the laughs with friends.
- Remembering important details: Store travel itineraries or recipes.
- Creating collages: Design fun visuals for social media.
11. Security Concerns: Protecting Your Privacy
Be mindful of what you're capturing. Avoid taking screenshots of sensitive information, such as passwords, credit card details, or private conversations. Always review your screenshots before sharing them.
12. Legal Considerations: Copyright and Permissions
Respect copyright laws. Don't share screenshots of content you don't have permission to use. When in doubt, ask for permission.
13. The Art of the Perfect Screenshot: Composition and Aesthetics
Think of your screenshots as mini-works of art.
- Consider composition: Frame your shot carefully.
- Use the rule of thirds: Place important elements off-center.
- Maintain balance: Ensure a pleasing visual arrangement.
14. Advanced Screenshot Techniques: Taking Your Skills to the Next Level
Ready to unleash your inner screenshot ninja? Get familiar with:
- Scrolling screenshots: Capture entire web pages or long documents.
- Timed screenshots: Set a delay for capturing dynamic content.
- Annotating live video: Capture those perfect frames.
15. The Future of Screenshots: Predictions and Innovations
The tools will continue to evolve. Expect:
- AI-powered editing: Automated cropping, object removal, and more.
- Enhanced sharing: Seamless integration with social media and cloud platforms.
- More intuitive interfaces: Easier capturing and editing on the go.
Closing Thoughts: So, You're A Screenshot Pro!
And there you have it! You've now unlocked the secrets to laptop screenshots. Armed with these tips and tricks, you’re ready to capture, edit, and share like a pro. Remember, practice makes perfect. So go out there and start capturing those moments! Have fun with it, experiment, and don't be afraid to get creative. Who knows, you might even become a screenshot artist!
Frequently Asked Questions (FAQs):
- Q: My Print Screen key isn't working. What should I do? A: First, make sure your keyboard is connected correctly. Try pressing the key in combination with the "Fn" key (Function key), as this activates some keys. If it still doesn't work, test another keyboard, or check for driver issues.
- Q: Where do my screenshots get saved by default? A: Usually, screenshots are saved to your "Pictures" folder, or in a subfolder named "Screenshots". If you use the Print Screen key and don't paste the image, it will sit on your clipboard.
- Q: Can I take a screenshot of a specific window only? A: Yes! On Windows, press Alt + Print Screen. On a Mac, you can use Shift + Command + 4, then click on the window you want.
- Q: Is there a way to edit screenshots directly after taking them? A: Absolutely! On Windows, use the Snipping Tool or Snip & Sketch. On a Mac,
How to Screenshot on PC
By Kevin Stratvert How to Screenshot on PC by Kevin Stratvert
How To Take Screenshot On PC & Laptop Windows - Full Guide

By GuideRealm How To Take Screenshot On PC & Laptop Windows - Full Guide by GuideRealm
how to take screenshots in computer or laptop2way to screenshot

By smithaanjali how to take screenshots in computer or laptop2way to screenshot by smithaanjali
Title: How to take a screenshot on a PC or Laptop any Windows
Channel: WebbyFan
How to take a screenshot on a PC or Laptop any Windows by WebbyFan
Laptop Working
Laptop Screenshot Secrets: The Ultimate Guide!
We’ve all been there. Trying to capture that crucial detail on our laptop screen – a recipe, a complex data visualization, a hilarious meme, a critical error message. But a simple screenshot? It’s often more than just pressing a few buttons. It’s about capturing precisely what you need, when you need it, and in the perfect format for sharing and utilizing. This guide unveils the hidden potential of laptop screenshots, transforming them from basic captures into powerful tools for communication, productivity, and even creative expression. Let’s unlock those secrets.
Understanding the Core: Basic Screenshot Functionality
Before diving into advanced techniques, let’s ensure we’re all on the same page. The fundamental method for taking a screenshot varies depending on your operating system.
Windows: The classic
Print Screenkey (often abbreviated asPrtScn) is your starting point. Pressing this key typically copies the entire screen to your clipboard. You then need to paste it into an image editor like Paint or Photoshop to save it. Alternatively,Windows Key + Print Screenwill directly save a full-screen screenshot to your "Pictures" folder, specifically within a "Screenshots" subfolder. For a more precise capture, utilize theWindows Key + Shift + Scombination. This activates the "Snip & Sketch" tool, allowing you to select a specific region of the screen.macOS: The ease of use is a hallmark of the Apple ecosystem, which is readily apparent in its screenshot capabilities. Pressing
Shift + Command + 3captures the entire screen and saves it as a PNG file on your desktop. If you need to capture a selected portion, useShift + Command + 4. This turns your cursor into crosshairs, enabling you to drag and select the desired area. For capturing a specific window, tapShift + Command + 4, then press the Spacebar, and then click on the window. Pressing the Spacebar before clicking the window turns the cursor into a camera icon.
Mastering the Art of Selective Captures: Precision is Key
Full-screen screenshots are often overkill. They include extraneous information, eat up storage space, and require additional editing. Selective captures offer pinpoint accuracy, ensuring you only grab what’s essential.
Targeted Snipping: The Windows
Snip & Sketchtool (activated byWindows Key + Shift + S) provides exceptional control. You can choose from rectangular snips, freeform snips (perfect for irregular shapes), window snips, and full-screen snips. This tool also allows for basic annotation, such as drawing with a pen or highlighter, and adding text. Once the screenshot is taken, it automatically opens within the tool, offering a streamlined editing experience.macOS Snipping Excellence: macOS boasts similar, yet intuitive, screenshot capabilities. When using
Shift + Command + 4(the area selection tool), you’ll notice that the dimensions of your selection are displayed as you drag the cursor. This allows for precise cropping and ensures accurate captures, especially useful in fields where pixel-perfect accuracy is crucial, such as web design or software documentation. Remember that holding the Spacebar while selecting an area allows you to move the entire selection, adjusting its position even after it is already created.Beyond the Basics: Third-Party Snipping Tools: While built-in tools are functional, consider exploring third-party applications such as Snagit or Lightshot. They offer advanced features like scrolling capture (for capturing entire web pages), advanced annotation options, cloud storage integration, and the ability to quickly share screenshots via URLs. They come with advanced features, in particular, automatic object recognition, and the ability to extract text from images, creating a more streamlined workflow.
Formatting for Impact: Choosing the Right File Type
The file type of your screenshot significantly impacts its usability and visual quality.
PNG (Portable Network Graphics): PNG is the preferred format for most screenshots. It supports lossless compression, meaning no image data is lost, preserving sharp details. Crucially, PNG supports transparency, enabling you to create screenshots that seamlessly blend into different backgrounds. This is highly valuable for creating mockups, adding visual elements to presentations, or extracting UI components.
JPG/JPEG (Joint Photographic Experts Group): JPG uses lossy compression, which reduces file size by discarding some image data. It’s suitable for screenshots with complex colors or photographic content, where a slight loss of quality may be less noticeable. However, avoid using JPG for screenshots containing text or sharp lines, as the compression artifacts can blur the text.
Other Formats: GIF (Graphics Interchange Format) can be used for animated screenshots, which is valuable for demonstrating software functionality or interactive elements. PDF (Portable Document Format) is useful for capturing entire documents or web pages while preserving formatting.
Annotation Powerhouse: Transforming Screenshots into Visual Guides
Annotations are your secret weapon for clarifying information and guiding your audience.
Essential Annotation Tools: Utilize the built-in annotation tools available in Windows
Snip & Sketchand macOS'sPreviewapplication to add arrows, highlights, and text boxes. These tools provide basic but sufficient functionality for annotating your notes.Advanced Annotation Techniques: Delve into more advanced annotation techniques using specialized software. Such software frequently has more advanced tools for shapes, lines, and text labels.
Color Psychology & Design Principles: Apply color theory to enhance your annotations. Use contrasting colors for highlights and callouts to draw attention to key areas. Ensure that the font size and style are legible and that the text is appropriately sized for the intended display. Consider using different weights or styles of text depending on your needs.
Scrolling Screenshots: Capturing the Complete Picture
Websites and documents often extend beyond the visible screen area. Scrolling screenshots allow you to capture the complete context.
Native Scrolling Capabilities: Utilize native scrolling screenshot tools. Some third-party applications, such as Snagit, have automated scrolling capabilities, which simplify the process of capturing long web pages or documents.
Manual Stitching Techniques: For basic solutions, you may need to rely on manual stitching. Take multiple screenshots of different sections of content and then manually combine them in an image editor. This method offers flexibility, at the cost of being less efficient than automated options.
Organizing and Managing Your Screenshot Library
An unorganized screenshot library can rapidly become an overwhelming mess. Proper management is crucial.
Dedicated Folders: Create dedicated folders for different projects, topics, or clients. This organizational structure will help you locate the screenshots you need quickly.
Descriptive File Naming: Adopt a consistent file-naming convention that includes the date, a brief description of the content, and relevant keywords. For example,
2024-01-27-Product-Feature-Highlight.png.Cloud Storage Integration: Utilize cloud storage services such as Google Drive, Dropbox, or OneDrive to store your screenshots and make them accessible from any device. These services also provide version control and collaboration features.
Metadata Management: Implement the use of metadata by adding tags, descriptions, and keywords to your screenshot files to make them searchable. Many image management applications provide robust metadata features.
Advanced Use Cases: Unleashing the Full Potential
Screenshots extend far beyond documenting the basics.
Creating Tutorials & Guides: Screenshots are invaluable for creating step-by-step tutorials and guides. They offer a visual understanding of processes that are far more immediate than any text description.
Bug Reporting & Troubleshooting: When reporting software bugs, screenshots clearly illustrate the issue, helping developers quickly identify and resolve problems.
Web Design Mockups & UI Prototyping: Screenshots are the workhorse of website design. Use them to mock up designs and create prototypes, allowing you to visualize layouts and user interfaces before implementation.
Social Media & Content Creation: Leverage screenshots for creating engaging social media content, such as highlighting interesting articles, sharing visual quotes, or presenting data visualizations. Create compelling content that will captivate followers.
Troubleshooting Common Screenshot Issues
Let’s address some common problems.
Screenshots are blurry: Ensure you’re capturing at the native resolution of your laptop screen. Verify that the compression settings for your selected file format are not set too high.
Screenshot captures the wrong area: Double-check that you have selected the correct capture method (full screen, selected area, or window). Use the appropriate shortcuts or software settings to capture the intended area.
Keyboard shortcuts aren't working: Make sure that no other applications are interfering with the keyboard shortcuts. Try restarting your laptop or updating your operating system.
Dealing with Sensitive Information: Before sharing screenshots, redact any sensitive information, such as personal data or confidential company information. Use the built-in annotation tools or specialized redaction software to obscure sensitive areas.
Conclusion: Embrace the Screenshot Revolution
Screenshots are not just a basic function; they are a vital communication tool. Whether you are a professional, student, designer, or casual user, leveraging the secrets outlined in this ultimate guide will transform your screenshot capabilities. Embrace these strategies, experiment with the techniques, and discover how to harness the power of the perfect screenshot to enhance your productivity, creativity, and overall digital experience. Now, go forth and capture!
