laptop keys not working after water spill

Title: What to do after WATER SPILL on a computer shorts shortsyt ytshorts
Channel: Bob Johnson's Computer Stuff Inc.
What to do after WATER SPILL on a computer shorts shortsyt ytshorts by Bob Johnson's Computer Stuff Inc.
laptop keys not working after water spill, laptop keyboard stopped working after water spill, laptop keyboard not working after water damage, hp laptop keyboard not working after water spill, dell laptop keyboard not working after water spill, acer laptop keyboard not working after water spill, laptop keyboard not working water spilled, my laptop keyboard is not working after spilled water, laptop keyboard not working properly after water spill, laptop not working after water spill
Laptop Drowned? Emergency! Keys NOT Working After Water Spill!
SEO Title: Laptop SOS: Water Damage Woes and Keyless Chaos – A Survival Guide
The Dreaded Splash and the Silent Treatment: Your Laptop's Underwater Adventure
It happens in a blink. A rogue glass of water, a spilled coffee, or perhaps the unthinkable – a full-blown laptop plunge into a bathtub. The world screeches to a halt. The heart pounds. And then, the aftermath: sheer panic. Suddenly, your digital world is threatened. Your once-reliable companion, your laptop, is now gasping for digital air. You're staring down the barrel of potential data loss and expensive repairs.
Immediate Action: A Race Against Rust
Time is of the essence. The moment that H2O kisses your precious computer, every second counts. Firstly, disconnect all power sources. Unplug the charger immediately. Then, if you can do it safely, remove the battery. Every minute spent connected to power increases the risk of short circuits and permanent damage. Speed is the key, so act fast.
After that, gently tilt the laptop to drain any excess liquid. Avoid shaking it vigorously. This can spread the water further. Next, grab some absorbent materials. A microfiber cloth or a clean towel will work wonders. Carefully wipe down the exterior. Try to remove any visible water from the ports and seams. Remember, finesse is important.
The Keyboard Conundrum: When the Keys Refuse to Cooperate
Now, let’s address the keyboard. This is a common casualty in a water-spill scenario. Water may have seeped beneath the keys. This is why they're refusing to function properly. Furthermore, sticky residue from sugary drinks can exacerbate the issue. At this stage, several options are available.
You could try gently cleaning the keys with a damp cloth. Alternatively, you could use compressed air. Be very careful with this method. Don’t hold the can too close to the keys. Otherwise, you could cause further damage.
The DIY Dilemma: To Take Apart or Not to Take Apart?
At this point, you face a crucial decision. Are you comfortable opening up your laptop? This is a question you must genuinely consider. If you have some technical know-how, you might consider disassembling the laptop. However, be warned! This can void your warranty. It also risks causing more damage. Make absolutely sure you know what you're doing.
If you do decide to venture into the internal components, proceed with extreme caution. First, consult your laptop's service manual. This can be found online. Locate the screws. Carefully remove them. Then, gently lift the keyboard. Be aware of any cables.
The Rice Myth and Other Remedies
You’ve probably heard about the rice trick. Placing your wet laptop in a bag of uncooked rice. The supposed reasoning: the rice absorbs the remaining moisture. While this has been a popular method, its effectiveness is debated. It can work to some extent. However, it is not a guaranteed fix. The rice may not be able to absorb all the moisture.
Therefore, consider exploring more effective methods. You can try using silica gel packets. These are desiccant packets. They also absorb moisture. You can obtain these from packing materials or online retailers.
The Importance of Professional Help
In many instances, professional help is the best option. Therefore, consider taking your laptop to a qualified repair technician. They have specialized tools and expertise. They can properly diagnose the damage. They can safely clean internal components.
Furthermore, a professional can tell you if your data is salvageable. They can provide an estimate of the repair costs. So, seek out reputable repair services in your area.
Data Recovery: Saving Your Digital Life
Data recovery is often the top priority. Because, often, the data on your hard drive is irreplaceable. If your laptop is still functional, back up your data immediately. If it isn't, seek professional data recovery services. There are specialized companies for this purpose. They have the equipment to retrieve your vital files.
Prevention: Shielding Your Digital Sanctuary
Prevention is always better than cure. Invest in a laptop sleeve. This provides protection against minor spills. Avoid eating or drinking near your laptop. And, consider a waterproof keyboard cover. These simple steps can save you from a digital disaster. Moreover, these steps are easily incorporated into daily routines.
Final Thoughts: Hope for the Best, Prepare for Anything
Facing a water-damaged laptop is undoubtedly stressful. But, don't give up hope. Take immediate action, follow the steps outlined above, and seek help when necessary. Your data is worth saving. Following these methods may help you. Remember to stay calm. Be proactive. Your laptop may yet live to see another day. Good luck!
Unleash Gaming Fury: Best Budget Work & Play Laptop Under $XXX!Laptop Drowned? Emergency! Keys NOT Working After Water Spill!
Oh, the sinking feeling! You reach for your trusty laptop, ready to tackle that presentation or binge-watch your favorite show, and… splash! A rogue cup of coffee, a clumsy spill of water, or maybe even a full-blown liquid assault – your laptop has taken a swim. Now, the keys aren't working, you're staring at a lifeless screen, and panic starts to bubble. Don't worry, friend, we've all been there. Or, at least, we’ve feared being there. Consider this your ultimate survival guide. We're going to walk you through what to do, step-by-step, to give your waterlogged laptop the best chance of survival. Think of it as a digital CPR course, but instead of pumping a chest, we're meticulously drying and diagnosing.
1. The Moment of Impact: Immediate Actions Are Crucial
Time is of the essence! Like a drowning person needing immediate rescue, your laptop requires immediate action to prevent further damage. The longer it sits submerged, the greater the chance of irreversible harm. So, take a deep breath, and follow these crucial initial steps:
- Unplug It Immediately: This is paramount! Disconnect the power adapter from the wall and, crucially, from the laptop itself. Electricity and water are a volatile cocktail. Think of it like trying to put out a fire with gasoline – it's a recipe for disaster.
- Remove the Battery (If Possible): Many modern laptops have built-in batteries. If yours has an easily accessible and removable battery, take it out immediately. If it's sealed, don't force it; focus on the other steps. Removing the battery further minimizes the risk of short circuits and potential damage.
- Turn It Upside Down: Immediately flip the laptop over onto a clean, absorbent surface, like a soft towel. Gravity is your friend! Let the water drain out of the keyboard, ports, and vents. Think of it like emptying a water balloon – you want to get as much liquid out as possible.
- Wipe Down the Exterior: Gently wipe down the exterior of the laptop with a clean, dry cloth. Pay particular attention to the keyboard, ports, and any areas where water might have seeped in.
2. The "Don't Do" List: Things To Avoid at All Costs
Now, let's talk about what not to do. In this moment of panic, it's easy to make mistakes that worsen the situation. Think of these as the digital "don't touch" signs:
- Do NOT Try to Turn It On: This is a big one. Resist the urge to press the power button! Turning it on while wet is like turning on a faulty electrical appliance – it could fry the components and lead to more extensive damage.
- Do NOT Use a Hair Dryer: Tempting, right? But resist! The heat from a hairdryer can severely damage sensitive internal components. It's like baking your laptop instead of drying it.
- Do NOT Put it in Rice (Yet): While the rice trick is a popular myth, it's better used as a last resort. It might work, but it's not the best and might not entirely remove the moisture. Plus, rice grains can get lodged inside the laptop, creating further problems.
- Do NOT Shake the Laptop Vigorously: Gentle is the key here. Aggressive shaking can spread the water further inside the machine, potentially reaching areas that might have escaped the initial spill.
3. Disassembly and Inspection: A Closer Look
Now comes the delicate part – a more thorough assessment and, potentially, some disassembly. This is where you decide if you are comfortable, and have the skills and tools to do the job! If you're not technically inclined, or if your laptop is still under warranty, it's wise to skip this step and seek professional help. However, for the brave, here's how to proceed:
- Gather Your Tools: You’ll need a small Phillips head screwdriver, possibly a spudger or plastic opening tools, and a clean, dry workspace.
- Consult Your Laptop's Manual: Or, do a quick internet search using your laptop's model number to find disassembly instructions. YouTube is your friend here! Search for videos showing how to take apart your specific laptop model.
- Carefully Disassemble (If Comfortable): Start by removing the bottom panel. Then, carefully disconnect the battery. Pay attention to screws; keep them organized (a muffin tin works great). From there, you'll want to assess the extent of the water damage: Are there visible water marks? Corrosion?
- Inspect Components: Once you've got it open, take a look at the internal components, especially the motherboard and keyboard. See if you can identify any areas where water seems to have reached.
4. Drying Techniques: Evaporate That Water!
Okay, you’ve bravely opened your laptop, you're now dealing with a damp situation. Let's get that water out! Here are some proven drying methods:
- Air Drying: Place the disassembled laptop in a dry, well-ventilated area, ideally out of direct sunlight. Let it air dry for at least 48-72 hours, or even longer. Patience is key!
- Silica Gel Packets: Place the disassembled components (especially the motherboard and keyboard) in a sealed container with silica gel packets. Silica gel is a desiccant that absorbs moisture. You can find these packets online or in many stores. Replace the packets as needed.
- Professional Cleaning: Consider having the motherboard and keyboard professionally cleaned with isopropyl alcohol (90% or higher). This can dissolve any corrosive residue left by the water.
5. The Keyboard Conundrum: Addressing the Key Issues
If the keys of your laptop are not working, it's highly probable that your keyboard has been affected by the water damage. The keys aren't working because the circuits on your keyboard are damaged. Here's how you can address this problem:
- Clean the Keyboard: Disassemble the keyboard (following the disassembly instructions for your laptop). Clean each key individually with isopropyl alcohol and a soft brush or cotton swab.
- Check for Damage: Inspect the keyboard's circuits for corrosion, short circuits, or other damage.
- Consider Replacement: If the keyboard is severely damaged, or if cleaning doesn't restore functionality, you may need to replace it. Replacement keyboards are often available online.
- Utilize an External Keyboard: If you can't repair or replace the keyboard immediately, connect an external USB keyboard to your laptop, so you can access your files.
6. The Motherboard: The Brain of Your Laptop
The motherboard is the most critical component. Water damage here can be catastrophic. If you discover any signs of corrosion, it's imperative that you act to minimize it.
- Clean the Motherboard: Once you have the motherboard out of the laptop, use a soft brush and high-concentration isopropyl alcohol. Gently clean the area.
- Look for Corrosion: If there is significant corrosion, consult a professional.
- Test After Cleaning: After the motherboard has been cleaned, it's time to test it. Connect it to the power supply and connect a monitor so you can see what happens.
7. Replacing Damaged Components: When Repair Isn't Enough
Sometimes, despite your best efforts, components are beyond repair. Here's what to consider:
- Assess the Damage: After you've cleaned and dried the components, reassemble the laptop, or at least the essential parts.
- Identify Replacement Parts: Once you know what needs to be replaced, source replacement parts online or from a reputable computer repair shop.
- Installation: Carefully install the new components.
8. The Rice Myth: Should You Use It?
We touched on the rice myth earlier. It's a popular option, but should you use it?
- Pros of Rice: Rice can absorb some moisture, and it's readily available.
- Cons of Rice: Rice is not as effective as silica gel. Rice grains can get inside the laptop.
- Best Use: Rice can be used as a last resort, but it really shouldn't be your first plan of action.
9. Preventing Future Disasters: Proactive Measures
Once you've saved your laptop, you'll want to prevent this from happening again.
- Invest in a Spill-Proof Keyboard Cover: These covers protect your keyboard from spills, dust, and other debris.
- Be Mindful of Liquids: Keep drinks away from your work area.
- Back Up Your Data Regularly: This is critical! If your laptop damage results in data loss, having a backup will save you.
10. Data Recovery: Protecting Your Valuable Information
Water damage can lead to data loss, which is a terrifying thought, but you want to be prepared in case this occurs.
- Data Recovery Services: If you can’t access your data, data recovery services can often retrieve data from damaged hard drives and solid-state drives.
- Back Up Your Data: As we said before, this is the single most important thing.
11. Seeking Professional Help: When to Call an Expert
Sometimes, the damage is beyond the scope of DIY repair.
Repair Laptop Keyboard Water damaged Wasserschaden Part 1 Disassembly
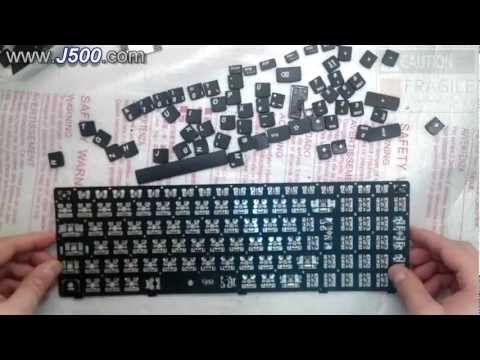
By Laptop Repair j500j500 Repair Laptop Keyboard Water damaged Wasserschaden Part 1 Disassembly by Laptop Repair j500j500
How To Fix a Water Damaged Laptop

By HowToBasic How To Fix a Water Damaged Laptop by HowToBasic
How To Repair A Laptop After Liquid Spill Laptop Water Damage Repair Home Guru Vijay Sales

By Vijay Sales How To Repair A Laptop After Liquid Spill Laptop Water Damage Repair Home Guru Vijay Sales by Vijay Sales
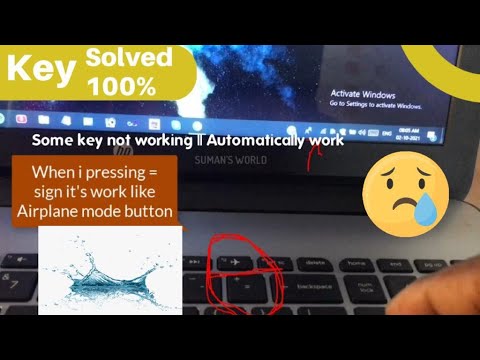
Title: Laptop keyboard water damage, not working solved laptopkeyboard
Channel: SUMAN'S WORLD
Laptop keyboard water damage, not working solved laptopkeyboard by SUMAN'S WORLD
Working With Laptop
Laptop Drowned? Emergency! Keys NOT Working After Water Spill!
The sinking feeling hits first. The agonizing realization that your precious laptop, your portal to the digital world, has just taken an unexpected plunge – a liquid baptism that could spell disaster. Whether it was a rogue coffee cup, a spilled glass of water, or a more catastrophic event, the immediate aftermath of a laptop water spill is a race against time. And if, on top of everything else, your keys aren't working? Panic is understandable, but a calm and decisive response can be the difference between a salvaged machine and a data-loss catastrophe. We are here to guide you through this harrowing ordeal, offering a roadmap to recovery that prioritizes your data and your device.
Immediate Actions: The Crucial First Moments
The speed of your response directly correlates with your chances of salvaging your laptop. Every second counts. Do not delay.
Power Down IMMEDIATELY: This is paramount. Unplug the power adapter immediately. If the laptop is still on, force a shutdown. Press and hold the power button until it turns off. Continuing to operate while wet can cause short circuits and permanent damage to your internal components.
Disconnect Peripherals: Unplug any external devices such as USB drives, external hard drives, mice, and monitors. These can also become casualties of the spill.
Invert and Drain: Carefully turn the laptop upside down, placing it on a stable surface. This helps to drain any excess liquid that may be trapped inside. Open the lid as much as possible to facilitate drainage.
Blot, Don't Rub: Use absorbent materials like paper towels, soft cloths, or microfiber cloths to blot away any visible moisture on the surface of the laptop. Do not rub, as this can press the liquid further into the internal components. Pay close attention to the keyboard, the vent areas, and any ports.
The Keyboard Calamity: Addressing the Key Problems
A malfunctioning keyboard is a common and frustrating consequence of a water spill. The keys may stick, become unresponsive, or act erratically. Here's how to approach keyboard-specific issues:
The Keyboard Disassembly (If Comfortable): This step is reserved for those with a reasonable level of technical aptitude. Consult your laptop’s manual or search for specific disassembly guides for your model. Carefully remove the keyboard from the chassis. This allows for a more thorough cleaning.
Gentle Cleaning Techniques: Using isopropyl alcohol (90% or higher) and a cotton swab, gently clean around the key switches. Isopropyl alcohol evaporates quickly and is less likely to cause damage than water. Do not pour alcohol directly into the keyboard. Dampen the swab and clean around the keys.
Air is Your Ally: Use compressed air to blow out any remaining liquid or debris from under the keys. Pay close attention to the areas where the keys were sticking or malfunctioning. Direct the air into the key switches.
The Waiting Game: After cleaning, allow the keyboard to dry completely. Leave it in a dry, well-ventilated area for at least 24-48 hours. Patience is essential.
Deeper Dive: Internal Components and Data Preservation
The liquid’s infiltration beyond the keyboard is a serious concern. The motherboard, hard drive (or SSD), and other internal components are vulnerable.
Professional Intervention: This is generally recommended. If you are not comfortable disassembling your laptop further, or if the water spill was extensive, seek professional help immediately. A technician with experience in water damage repair can assess the extent of the damage and take appropriate steps to save your data.
Data Backup Priority: Before attempting any internal cleaning, prioritize data recovery. If the laptop still boots (even partially), immediately back up your critical data to an external drive or cloud storage service.
Careful Disassembly (When Necessary): If you are confident in your ability and have the necessary tools, you can attempt to disassemble your laptop. Refer to your laptop's service manual or online guides. Take photographs during disassembly to remember how everything goes back together.
Cleaning Internal Components: Using the same isopropyl alcohol and cotton swab technique, gently clean any affected internal components. Pay close attention to the motherboard, the hard drive/SSD, and the RAM modules. Avoid static electricity by grounding yourself with an anti-static wrist strap.
Thorough Drying: After cleaning, ensure all components are completely dry before reassembling the laptop. This can take several days, depending on the extent of the water damage and the ventilation.
The Aftermath: Assessment and Recovery
Even after the initial frantic response, the work isn't over. A thorough assessment is crucial.
Visual Inspection: After cleaning and drying, visually inspect all components for signs of corrosion, residue, or damage. Look for discoloration, warping, or any other abnormalities.
Component Testing: If possible, test individual components to determine if they are still functional. This may require specialized tools.
Boot-Up and System Checks: Once the laptop is reassembled, attempt to boot it up. Monitor the boot process carefully. If the laptop boots successfully, run diagnostic tests to check the overall health of the system. Test all functions, including the keyboard, ports, and wireless connectivity.
Data Recovery (If Necessary): If the hard drive/SSD was damaged, you may need to seek professional data recovery services. These services employ specialized equipment and techniques to retrieve data from damaged storage devices.
Preventative Measures: Safeguarding Your Tech in the Future
Preventing future water damage is equally important.
Invest in a Waterproof Laptop Case or Sleeve: These cases provide an extra layer of protection against spills and other environmental hazards.
Keep Liquids Away: Avoid placing drinks or other liquids near your laptop while working.
Use a Spill-Proof Keyboard Cover: These covers can protect your keyboard from spills, but they might also affect key travel, especially on some modern laptops. Consider this downside.
Regular Backups: Implement a regular data backup schedule to protect your important files and documents. Back up your data to an external hard drive or cloud storage service.
Be Mindful of Your Environment: Be aware of the environment in which you are using your laptop. Avoid using your laptop near water sources, such as sinks, bathtubs, or swimming pools.
Consider an Extended Warranty: An extended warranty may provide coverage for accidental damage, including water damage, depending on the terms and conditions of the warranty.
Conclusion: Hope and Resilience
While a laptop water spill is a stressful and potentially devastating experience, quick and decisive action can significantly improve the chances of a successful recovery. Following these steps, while prioritizing the safety of your data, you can navigate this technological emergency with more confidence. Remember, even if the damage seems extensive, there's always a chance to salvage your data and potentially even your device. With patience, persistence, and a proactive approach, you increase the chances of a successful recovery!
