lenovo laptop arrow keys not working

Title: Fix Arrow keys are not working in Windows 1110 laptop keyboard
Channel: TheWindowsClub
Fix Arrow keys are not working in Windows 1110 laptop keyboard by TheWindowsClub
lenovo laptop arrow keys not working, lenovo laptop arrow keys not working in excel, lenovo thinkpad down arrow keys not working, lenovo laptop keyboard cursor not working, lenovo arrow keys not working
Lenovo Laptop Arrow Keys DEAD? FIX This NOW!
Lenovo Laptop Arrow Keys: Reviving Your Navigation – Don't Panic!
Your Lenovo laptop's arrow keys have suddenly gone silent? You're not alone! This frustrating problem plagues many users. But before you envision a tech meltdown, breathe. Fixing those unresponsive arrow keys is often surprisingly straightforward. So, let's get those directional arrows working again, shall we?
Troubleshooting the Uncooperative Arrow Keys: A Step-by-Step Guide
First things first: remain calm. Random key malfunctions happen, even on top-of-the-line laptops. Therefore, a little detective work is necessary. We'll methodically explore common causes. In the meantime, avoid excessive pressing. Avoid excessive pressing, as it might exacerbate the issue.
1. Reboot: The Universal Fix (Sometimes!)
Perhaps the simplest solution is often the most effective. Restarting your Lenovo can magically resolve many glitches. It's a digital reset. It clears temporary files. So, try restarting your laptop. Subsequently, check your arrow keys immediately after rebooting.
2. Driver Dilemmas: Outdated or Corrupted?
Device drivers are crucial. They act as intermediaries. They allow your hardware to communicate with your software. Outdated or corrupted keyboard drivers can easily cause malfunctions. As a result, it’s time to update or reinstall.
Here’s how:
- Go to the Device Manager. You can search for it in the Windows search bar.
- Expand the "Keyboards" section.
- Right-click on your keyboard.
- Select "Update driver". Windows should automatically search online for a new driver.
- If that fails, try uninstalling the driver. Then, restart your laptop. Windows will automatically reinstall it.
3. Sticky Keys and Filter Keys: Are They Enabled?
Windows offers accessibility features. These features can sometimes interfere with normal keyboard function. Sticky Keys and Filter Keys are two such features. Consequently, they might be the culprits.
- Sticky Keys: This feature allows you to press modifier keys (Shift, Ctrl, Alt, Windows key) one at a time. It can sometimes lead to unintended behavior.
- Filter Keys: Filter Keys ignores brief or repeated keystrokes. It's designed for users with hand tremors. However, it can make your arrow keys seem unresponsive.
To disable these:
- Go to your Windows settings (use the Windows key + I shortcut).
- Navigate to "Ease of Access".
- Select "Keyboard".
- Toggle off both "Sticky Keys" and "Filter Keys."
- Test your arrow keys again.
4. External Keyboard Interference: Check the Connection
Do you have an external keyboard connected? If so, it might be interfering. Sometimes, an external keyboard can become the primary input device. Therefore, it could override your laptop’s built-in keyboard.
Disconnect any external keyboards. After disconnecting, test your arrow keys. Furthermore, ensure your built-in keyboard is selected as the primary input.
5. Hardware Hurdles: A Physical Inspection
Sometimes, the issue is less about software and more about hardware. Carefully inspect your arrow keys. Are any physically stuck or damaged? Are there any signs of liquid spills or debris? If there's debris, try gently cleaning around the keys with compressed air. Be extra careful!
6. BIOS/UEFI Settings: A Deep Dive (If Necessary)
This step can be intimidating. However, it can sometimes provide a solution. Your BIOS (Basic Input/Output System) or UEFI (Unified Extensible Firmware Interface) settings control many hardware functions. Occasionally, keyboard settings can be altered here.
- Restart your laptop.
- Enter your BIOS/UEFI setup. Usually, this involves pressing a key like Del, F2, F12, or Esc during startup. The specific key varies depending on your Lenovo model. Look for the prompt on your screen during startup.
- Navigate through the settings. Look for options related to keyboard or input devices.
- Ensure keyboard functionality is enabled.
- Save your changes and exit the BIOS/UEFI. Carefully, test your arrow keys again.
7. System File Corruption: A Deeper Level of Repair
System files sometimes become corrupted. These corrupted files can disrupt various functions. This includes keyboard operations. Fortunately, Windows provides tools. These tools can help repair these files. Run the System File Checker (SFC) and Deployment Image Servicing and Management (DISM).
- Open Command Prompt as an administrator (search for "cmd" in the Windows search bar, right-click it, and select "Run as administrator").
- Type
sfc /scannowand press Enter. This process may take some time. - Once the SFC scan completes, type
DISM /Online /Cleanup-Image /RestoreHealthand press Enter. You might need an internet connection for this. - Restart your laptop after both processes are complete.
8. The Ultimate Resort: Contacting Lenovo Support
If none of these steps work, the problem might be more severe. At this point, contact Lenovo support. They have specialized tools. They can help diagnose more complex issues. They can also guide you through repair or replacement options. Don't hesitate to reach out.
9. Preventative Measures: Keep Your Keys Happy
You can take steps to prevent future arrow key problems. Firstly, keep your laptop clean. Secondly, avoid eating or drinking near it. Finally, update your drivers regularly. These simple habits can go a long way.
Conclusion: Arrow Keys Restored!
We’ve covered various troubleshooting methods. Now, one of these should have fixed your Lenovo laptop arrow keys. So hopefully, you're back to smooth navigation. Don't give up hope. Good luck, and happy computing!
Laptop Keys Broken? This SHOCKING Fix Worked INSTANTLY!Lenovo Laptop Arrow Keys DEAD? FIX This NOW!
Hey everyone, it's me, and I've been there. We’ve all been there, staring blankly at our Lenovo laptop screen, fingers hovering, desperately trying to navigate a document, game, or spreadsheet, only to find… silence. Those oh-so-crucial arrow keys? Dead as a doorknob. It's frustrating, right? Like your favorite pair of jeans suddenly developing a hole right at the worst possible moment. But fear not, fellow Lenovo enthusiasts! Because we are going to dissect this problem, figure out what's going on, and get those arrow keys back in action, pronto. Let's get this party started!
1. The Arrow Key Apocalypse: Why Did This Happen to Me?
Before we dive into solutions, let's understand the why. Knowing the enemy, as they say, is half the battle. There are a few common culprits behind a Lenovo laptop's arrow key rebellion. Think of it like a detective novel – we need to identify the suspect! It could be anything from a simple software glitch to a hardware malfunction, a mischievous update, or even a coffee spill (we’ve all been there, haven’t we?). Here are some of the most likely scenarios:
- Software Conflicts: Maybe a recent driver update went awry, or a program is interfering with your keyboard's functions.
- Hardware Issues: Sometimes, it's something more serious, like a loose connection or, in the worst-case scenario, a hardware failure.
- Sticky Keys/Filter Keys: These accessibility features, designed to help users with motor impairments, can sometimes cause unexpected behavior if enabled accidentally.
- Driver Problems: Outdated, corrupted, or missing keyboard drivers are a classic cause.
- Physical Damage: This could range from a simple crumb lodged under a key to a more severe impact.
2. First Aid: The Quickest Fixes Before Panic Sets In
Okay, let's start with the easy stuff. Before we start tearing things apart (unless you're feeling adventurous!), there are a few quick checks you can perform that might just save the day. Think of these as the equivalent of putting a Band-Aid on a paper cut.
- Restart Your Laptop: This is the classic, the go-to, and it works surprisingly often. A simple reboot can clear out temporary glitches and get things running smoothly again. Just like a good night's sleep fixes most of my problems!
- Check the Physical Keys: Are the arrow keys visibly stuck? Look for crumbs, dust, or anything else that might be obstructing them. Try gently pressing each key several times.
- Clean the Keyboard: Use a can of compressed air to dislodge any debris. Be gentle, and avoid spraying directly into the chassis. I like to use a microfiber cloth to wipe down the surface too.
- External Keyboard Check: If you have an external keyboard, plug it in and see if the arrow keys work. If they do, it suggests the problem is isolated to your laptop's built-in keyboard.
- Function Key Combination: Some Lenovo laptops have a function (Fn) key that, in combination with another key, can disable/enable the arrow keys or other keyboard functions. Check your laptop’s manual or the key combinations marked on the keys, and ensure they aren't accidentally disabled.
3. Diving Deeper: Troubleshooting Windows Settings
If those quick fixes didn't do the trick, let’s delve into Windows settings. We need to become digital detectives and root out the problem.
- Check for Sticky Keys/Filter Keys: Go to Settings > Ease of Access > Keyboard. Make sure Sticky Keys, Filter Keys, and Toggle Keys are disabled. These features can sometimes interfere with keyboard functionality. It's like wearing a glove when you don't need to!
- Run the Keyboard Troubleshooter: Windows has a built-in troubleshooter that can often identify and fix keyboard-related problems. Go to Settings > System > Troubleshoot > Other troubleshooters. Look for the Keyboard option and run it.
- Update Your Keyboard Drivers: Outdated drivers are a common culprit. To update them, go to Device Manager (search for it in the Windows search bar). Expand the "Keyboards" section, right-click on your keyboard, and select "Update driver." Windows will (hopefully!) search for and install the latest drivers.
4. Driver Derby: Reinstalling and Rolling Back Drivers
If updating drivers doesn't work, it’s time to get a little more hands-on. This is where we reinstall or even roll back drivers. Think of it like resetting the game when you get a bad hand of cards.
- Uninstall and Reinstall Keyboard Drivers: In Device Manager, right-click on your keyboard and select "Uninstall device." Then, restart your laptop. Windows should automatically reinstall the drivers during startup.
- Roll Back the Driver: If you recently updated your keyboard drivers and the problem started afterward, you can try rolling back to the previous version. In Device Manager, right-click on your keyboard, select "Properties," go to the "Driver" tab, and click "Roll Back Driver."
5. Battling the BIOS: A Rare but Crucial Check
For a small percentage of cases, it's worth checking your BIOS (Basic Input/Output System) settings. This is more technical, so proceed with caution!
- Accessing the BIOS: You'll need to restart your laptop and enter the BIOS setup. The specific key to press (e.g., F2, Del, Esc) varies depending on your Lenovo model. Consult your laptop's manual for instructions.
- Check Keyboard Settings: Once in the BIOS, look for any keyboard-related settings. Ensure that the internal keyboard is enabled. Again, I must recommend you seek some guidance to assist performing this step to avoid any potential pitfalls.
- Resetting the BIOS (Caution!): As a last resort, you could try resetting the BIOS to its default settings. However, be careful, as this can affect other settings. I would only recommend this if you are comfortable with the BIOS of your Lenovo model.
6. Hardware Hazard: What If It's a Hardware Problem?
If nothing else works, it’s time to face the music – it might be a hardware issue. Don’t panic! It doesn’t necessarily mean the end of the world, or your laptop.
- External Keyboard Test: If working outside of the laptop, the external keyboard test can confirm the issue as internal.
- Physical Inspection (Optional): If you're comfortable doing so (and have the right tools!), you could try carefully taking apart your laptop's keyboard and inspecting the arrow keys for any damage. However, this can void your warranty, so proceed with caution.
- Professional Help: This is often the best option if you're not tech-savvy. Take your laptop to a reputable repair shop. They can diagnose the problem and replace the keyboard if necessary. Think of it like taking your car to a mechanic - they know what they're doing!
7. When a Spill Happens: Liquid Damage Strategies
Coffee spills, juice mishaps – they happen! Liquid can wreak havoc on electronics.
- Immediate Action: Unplug your laptop immediately and turn it off. Do not attempt to power it on!
- The Drying Process: Turn the laptop upside down (keyboard facing down) and let it drain for at least 24-48 hours.
- Professional Intervention: Liquid damage often requires professional cleaning and repair.
8. The Importance of Backups: Protecting Your Data
Before you start any major troubleshooting, I strongly recommend backing up your important data! It’s like having an insurance policy on your memories.
- Cloud Storage: Services like Google Drive, Dropbox, or OneDrive are excellent for backing up files.
- External Hard Drive: A physical backup is always a good idea.
- System Restore Point: Create a system restore point before making significant changes to your system.
9. Identifying Your Lenovo Model: Key for Specific Fixes
Lenovo laptops come in various models, and troubleshooting steps can sometimes vary.
- Check the Model Number: Usually found on the bottom of your laptop.
- Search Online: Use your model number to find specific troubleshooting guides or forums for your laptop.
10. The "Fn" Key Conundrum: A Forgotten Function
The Fn key (Function key) often controls secondary functions on other keys, potentially including arrow keys!
- Check for Fn Key Combinations: Look for symbols on the secondary keys that might involve the Fn key for arrow key functions.
- Experiment: Try pressing Fn + the arrow keys to see if it resolves the issue.
11. Accessibility Features and Their Impact
Accessibility features can sometimes affect the keyboard's behavior.
- Review Accessibility Settings: Double-check your Ease of Access settings to ensure that nothing is interfering with normal keyboard functionality.
12. Gaming and Arrow Keys: A Special Case
Gamers, I know that you understand me when I say, "It has to work!"
- Game-Specific Settings: If the issue is within a game, check the game's key bindings or settings.
- Driver Compatibility: Ensure that your keyboard drivers are compatible with
Lenovo 83DV Series Laptop Touchpad Not Working Problemmacniteshkeyboardtricks2024short

By Mac Nitesh Lenovo 83DV Series Laptop Touchpad Not Working Problemmacniteshkeyboardtricks2024short by Mac Nitesh
Arrow key not functioningcell locked

By Excel junior Arrow key not functioningcell locked by Excel junior
Lenovo thinkpad touchpad trackpad and buttons not working Bios setting
By cagmito76 Lenovo thinkpad touchpad trackpad and buttons not working Bios setting by cagmito76

Title: How to Remove Laptop Key to Repair Lenovo Laptop Keyboard Cleaning and Repairing Keyboard Fix
Channel: News N View
How to Remove Laptop Key to Repair Lenovo Laptop Keyboard Cleaning and Repairing Keyboard Fix by News N View
Change Wifi Settings
Lenovo Laptop Arrow Keys: A Comprehensive Troubleshooting Guide to Resurrection
The cursor, that tiny beacon guiding your digital explorations, falters. You reach for the arrow keys, the unsung heroes of efficient navigation and precise input, only to find them unresponsive. A wave of frustration washes over you – deadlines loom, projects stall, and the seamless flow of your workflow crumbles. Breathe. We, the digital architects of Lenovo laptop solutions, understand your plight. This isn't just a minor inconvenience; it's a disruption. Let us guide you, step-by-step, through a definitive solution, ensuring those essential arrow keys are resurrected and ready to serve your needs once more. This guide is designed to equip you with the knowledge and the tools to conquer this digital dilemma definitively.
Diagnosing the Unresponsive Arrow Keys: Pinpointing the Culprit
Before diving headfirst into elaborate fixes, a methodical investigation is paramount. We need to ascertain why your Lenovo laptop arrow keys have declared a digital truce. The problem's source dictates the solution.
1. The Obvious: Physical Obstruction and External Peripheral Interference
Begin with the elementary. Examine the arrow keys themselves. Has a crumb, a speck of dust, or an errant object found its way beneath the keycaps, creating a physical impediment? Employ a can of compressed air, directing short, controlled bursts into the crevices surrounding the keys. Gently dislodge any debris that might be hindering their movement.
Next, consider external factors. Are you utilizing an external keyboard? Unplug it. Do the arrow keys on your laptop now function? If so, the issue undeniably lies with the external peripheral, not the laptop itself. Inspect the external keyboard's connection (USB, Bluetooth, etc.) and troubleshoot accordingly. Replace batteries if necessary.
2. The Keyboard Driver: A Software Hiccup
The keyboard driver is the software that acts as the critical translator between your keystrokes and the operating system. Outdated, corrupted, or malfunctioning drivers are frequent culprits. Here's how we address this potential hurdle.
- Accessing Device Manager: Click the Windows Start button, search for "Device Manager," and launch the application.
- Locating the Keyboard: Within Device Manager, navigate to "Keyboards." You should see your Lenovo laptop's keyboard listed (often as "Standard PS/2 Keyboard" or a device-specific entry).
- Updating the Driver: Right-click on your keyboard entry and select "Update driver." Choose "Search automatically for drivers." Windows will scan for and install the latest driver if available. Should this fail, select "Browse my computer for drivers," and download the latest drivers from the Lenovo website, if available.
- Reinstalling the Driver: If updating doesn't work, try uninstalling the keyboard driver (right-click then "Uninstall device"). Restart your laptop, and Windows will automatically attempt to reinstall the driver upon boot-up.
3. Sticky Keys and Filter Keys: Accessibility Features Gone Awry
Windows includes accessibility features designed to assist users with mobility impairments. However, sometimes these features can inadvertently interfere with normal keyboard functionality.
- Sticky Keys: This feature allows users to press modifier keys (Shift, Ctrl, Alt, Windows) one at a time, rather than simultaneously. Repeatedly pressing the Shift key for several seconds often activates Sticky Keys. A dialog box will appear, prompting you to enable it. To disable, press the Ctrl, Shift, and Alt keys, and then click "No" or "Cancel". Ensure that Sticky Keys is disabled in the "Ease of Access" settings. Navigate to Settings > Ease of Access > Keyboard and ensure Sticky Keys is disabled.
- Filter Keys: This feature instructs Windows to ignore brief or repeated keystrokes, designed to filter out unintentional key presses. Disable Filter Keys through a similar process, checking within the "Ease of Access > Keyboard" settings.
4. BIOS Configuration: A Deep Dive into Firmware
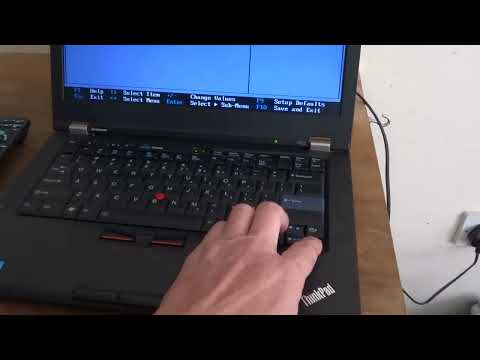
The Basic Input/Output System (BIOS) is the fundamental software embedded within your laptop, managing essential hardware operations before the operating system loads. Occasionally, BIOS settings can impact keyboard functionality.
- Accessing the BIOS: You will typically enter the BIOS by pressing a specific key (F2, F12, Del, Esc, or others) during startup. Consult your Lenovo laptop's user manual for the accurate key.
- Navigating the BIOS: Use the arrow keys (if they are functional at the BIOS level) or the Tab key to navigate the BIOS interface. Look for settings related to keyboard functionality or USB device configurations.
- Resetting BIOS to Default: Consider resetting the BIOS settings to their defaults. This can address any unintended configurations. Locate the "Load Setup Defaults" or similar option within the BIOS and select it.
Advanced Troubleshooting: Unveiling the Hidden Causes
If the foundational steps have proven unsuccessful, it's time to delve into more intricate analyses.
1. System File Corruption: Repairing the Operating System Fabric
Corrupted system files can wreak havoc on your operating system, leading to various malfunctions, including keyboard issues. Windows possesses built-in tools to address this issue.
- System File Checker (SFC): Open the Command Prompt as an administrator (search for "cmd," right-click, and select "Run as administrator"). Type
sfc /scannowand press Enter. This utility will scan for and attempt to repair corrupted system files. - Deployment Image Servicing and Management (DISM): If SFC fails to resolve the problem, use DISM. In the same Command Prompt, type
DISM /Online /Cleanup-Image /CheckHealthto check the integrity of the Windows image. Then, runDISM /Online /Cleanup-Image /RestoreHealthto repair it.
2. Registry Errors: Patching the Windows Database
The Windows Registry is a complex database containing configuration settings for your operating system and applications. Errors within the Registry can cause a multitude of problems. Proceed with caution, as editing the Registry incorrectly can damage your system.
- Backing Up the Registry: Before making any modifications, back up the Registry. Search for "regedit" in the Start menu, right-click on "Computer" in the Registry Editor, and select "Export." Save a backup to a safe location.
- Identifying and Repairing Errors: While manually identifying and repairing Registry errors is a highly advanced process, consider using a reputable third-party registry cleaner to scan for and resolve potential issues. Exercise caution when using any third-party tools.
3. Malware Infection: Eliminating Digital Threats
Malware can infiltrate your system and interfere with keyboard functionality. Run a comprehensive scan using your installed antivirus software. Ensure that your antivirus definitions are up to date. Consider a second scan with a different antivirus program to detect any persistent threats.
4. Hardware Failure: The Ultimate Test
If all software-based solutions fail, the problem may lie with the physical keyboard itself.
- Keyboard Testing: If you have access to an external keyboard, connect it to your laptop. If the external keyboard's arrow keys function correctly, the laptop's built-in keyboard is likely at fault.
- Internal Keyboard Replacement: Replacing the keyboard is usually a manageable task, but the specific steps will vary depending on your Lenovo laptop model. Consult your laptop's service manual or a reputable online guide for detailed instructions. Consider seeking professional assistance from a qualified technician. This is especially relevant if you're uncomfortable disassembling your laptop.
Final Thoughts: A Path to Resolution
We trust this comprehensive guide equips you with the knowledge and tools to conquer the Lenovo laptop arrow key conundrum. Begin with the elementary steps and progress through the advanced troubleshooting techniques if necessary. Remember to back up your data before attempting major system modifications. Your arrow keys will function flawlessly once more.
