laptop mic jack not working

Title: Fix Microphone Not Working on Windows 10
Channel: The Geek Page
Fix Microphone Not Working on Windows 10 by The Geek Page
laptop mic jack not working, laptop mic input not working, laptop microphone input not working, dell laptop mic jack not working, msi laptop microphone jack not working, laptop combo jack microphone not working, laptop 3.5 mm jack microphone not working, laptop microphone jack not working
Laptop Mic Jack DEAD? 😱 FIX This NOW!
Laptop Mic Jack Nightmare? Breathe Easy, We've Got You Covered!
The silence is deafening, isn't it? You're ready to jump into that video call, record that podcast, or dominate your online game. Suddenly, poof – no audio. Your laptop's microphone jack has decided to stage a walkout. Don't hyperventilate yet! Before you chuck your beloved device out the window, take a deep breath. Fortunately, this frustrating problem does tend to have surprisingly simple solutions. I've seen this happen, and believe me, it's fixable.
Is It REALLY Dead? Troubleshooting Before You Panic
First things first: let's confirm the worst. Is the mic jack truly a goner? Or, is there a simple fix? Firstly, rule out the obvious. Is the microphone actually plugged in securely? Then, double-check the jack itself. Is it bent, broken, or filled with debris? Finally, examine the cable leading to the microphone. Sometimes, a simple cable snag or fray is to blame. So, before you dive into the techy stuff, do a quick once-over.
Software Shenanigans: Where the Audio Gremlins Hide
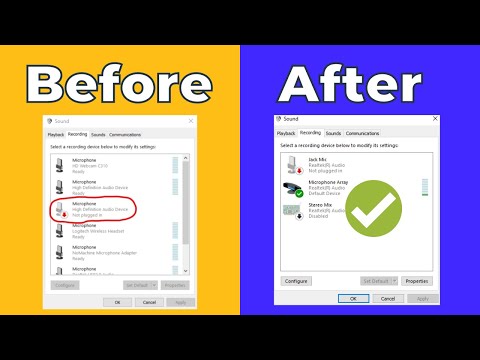
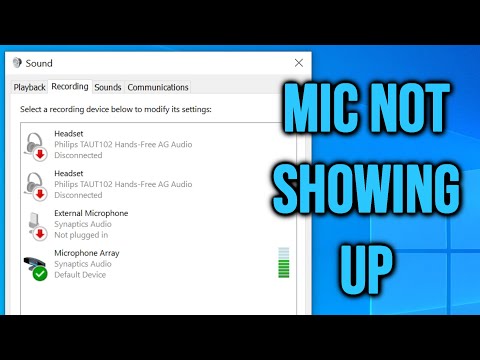
Often, the culprit isn't the hardware, but the software. Your operating system or audio drivers could be the silent saboteurs. Here’s where we need to delve a bit deeper. First, navigate to your sound settings. Look at the playback and recording devices. Is your microphone listed, and, if so, is it enabled? Select it as the default device. It would have been a good idea to check these beforehand!
Next, examine the volume levels. Is the microphone muted? Is the volume set to zero? If so, un-mute it and crank up the volume. Also, explore the driver situation. Are your audio drivers up-to-date? Outdated drivers can lead to all sorts of audio anomalies. Go to Device Manager (search for it in your Windows search bar). In the "Sound, video and game controllers" section, you'll generally find your audio hardware. Right-click on your audio device and choose "Update driver." If there is a driver update, install it. The same goes for your computer's BIOS update, which can also influence audio functionality.
Physical Inspection and Basic Cleansing
Okay, software is clear, and the problem persists? It's time to get physical. Inspect the jack. Do you see any visible damage? A bent pin within the jack can completely disrupt the connection. If you see any debris (dust, lint, etc.) inside the jack, carefully clean it out. You can use a compressed air duster for this. Alternatively, try a small, non-conductive probe (like a toothpick) gently to dislodge any obstructions. Do NOT use metal objects here; they could short circuit the jack.
External Testing: Isolate the Problem
Now, let's see if the jack is really the issue. Try a different microphone. If another microphone works flawlessly, the problem is likely with your original microphone. If a second microphone fails, the problem could be with your laptop's jack. Secondly, try your microphone with a different device. If it works on another laptop or computer, you'll now know the problem is not the microphone. This helps you further pinpoint where the problem resides.
Hardware Hurdles and Potential Repairs
Unfortunately, if the jack is damaged or the internal wiring has issues, then you may need a hardware repair. Opening your laptop is risky, and the extent of repairs is based on your confidence level. This isn't something to take lightly. You also risk voiding your warranty. Therefore, it is highly recommended to contact a professional computer repair technician. They can assess the damage and provide the best solution.
Alternative Solutions and Workarounds
Don't despair! There are always workarounds. Consider external microphones, either USB or wireless. These bypass the internal jack entirely. If you're on a tight budget, a USB microphone offers a cost-effective alternative. Furthermore, Bluetooth headphones with built-in microphones are also a viable option. These can provide a clean audio experience. In fact, using these methods can improve the overall sound quality, which is a bonus!
Prevention is Key: Protecting Your Precious Mic Jack
Now that we've covered the fix, how do you prevent this from happening again? Firstly, treat your laptop with care. Avoid dropping it or placing undue stress on the jack. Secondly, when inserting or removing the microphone, do it gently. Don't yank on the cable. Lastly, keep the jack clean. Regularly inspect it for debris. By taking these precautions, your mic jack should serve you well for years to come.
So there you have it. The laptop mic jack blues are often temporary. So, with a little troubleshooting, you're back in the audio game. Now go forth and enjoy clear, crisp sound! You've got this!
Unleash Your Inner Speed Demon: The Fastest Laptops EVER!Laptop Mic Jack DEAD? 😱 FIX This NOW!
Alright, friends, let's be real. We’ve all been there. You’re on a video call, ready to charm the socks off your coworkers or finally record that killer podcast episode, and… silence. Crickets. Your laptop mic jack is as useless as a chocolate teapot. The dreaded "mic not working" blues. Fear not! We’re diving deep to resurrect that little audio savior and get you back in the game, pronto. This isn’t just a ‘how-to’; it’s a journey, a quest to conquer the digital abyss of silence. Let's get your laptop mic jack singing again!
1. The Symphony of Silence: Diagnosing the Problem
First things first: Let’s figure out why your mic jack is playing the silent game. Think of it like being a detective. Is it a simple issue, or something more sinister?
- Hardware Woes: Is your microphone itself the problem? Try a different microphone. If that works, bingo – you’ve found the culprit. It could be a broken mic or even just a faulty cable.
- Software Sabotage: Operating system glitches? Driver issues? A mischievous program messing with your audio settings? These are all potential villains in our story.
- The Dreaded Port Itself: Sometimes, it’s just the jack. Think of it like a tiny, delicate portal. Dirt, dust, or even a bent pin can shut it down.
We need to investigate these potential problems like Sherlock Holmes!
2. The Microphone Tango: Testing Your Mic's Performance
Before we start dismantling, let’s make sure the problem is the jack. We need to rule out other potential problems. Think of it like checking the engine before you start ripping apart the car.
- Plug and Play: The most obvious step: plug in a known working microphone. If it works, the jack is probably fine. If not, keep troubleshooting.
- The Sound Recorder Test: Use your laptop's built-in sound recorder. Record a quick test. If you can’t hear anything, that's another clue pointing to the jack.
- Testing Across Devices: Try your microphone and headphones on a different device. This allows you to rule out a microphone issue.
Remember: we're building a case, one data point at a time.
3. Driver Drama: Are They Playing Fair?
Drivers! The unsung heroes (or villains) of the computer world. They’re the software that allows your hardware to speak to your operating system. If your audio drivers are outdated, corrupted, or simply not installed correctly, your mic jack won’t be able to hear a thing.
- Driver Updates: This is the first port of call. Go to Device Manager (search in your Windows search bar). Expand "Sound, video and game controllers." Right-click on your audio device and select "Update driver." Let Windows search automatically for updates, or manually.
- Reinstalling Drivers: If updating doesn't work, try uninstalling and reinstalling the driver. Right-click your audio device again, select "Uninstall device." Then, restart your laptop. Windows should automatically reinstall the driver on startup.
- Manufacturer Websites: Sometimes, the best drivers come straight from the manufacturer. Head to the laptop's manufacturer's website (e.g., Dell, HP, Lenovo) and download the latest audio drivers specifically for your model.
Think of drivers like the translators. If they're bad, the conversation is lost.
4. Audio Settings Audit: Unmasking the Hidden Culprits
Windows (and macOS) has a whole ecosystem of audio settings. Sometimes, the solution is hiding in plain sight.
- Playback Devices: Right-click the speaker icon in your system tray (bottom right of your screen). Select "Open Sound settings" or "Sounds." Make sure your microphone is selected as the default recording device.
- Input Levels: Check the input levels of your microphone. Are they muted? Are they set too low? Adjust them accordingly.
- App-Specific Settings: Some applications (like Zoom, Skype, or Discord) have their own audio settings. Double-check those to make sure the correct microphone is selected and isn't muted.
It's like checking all the dials and knobs on a spaceship before liftoff.
5. The Physical Examination: Inspecting the Jack Itself
Now for the hands-on part. This is where we become the digital surgeons.
- Dust and Debris: A tiny speck of dust can block the connection. Use a can of compressed air to gently clean the jack.
- Bent Pins: Take a peek inside the jack (carefully!). Are any of the pins bent or damaged? This requires a steady hand and a tiny tool (like a paperclip or a sewing needle) to try and gently straighten them. Proceed with extreme caution here – you don't want to make things worse!
- Loose Connections: If you're comfortable with it, you could (carefully!) open up your laptop (consult a repair guide!) and check the internal connections to the audio jack. If you’re not comfortable, definitely consult a professional.
Consider it a delicate operation. Precision is key.
6. The Magic of Rebooting: A Digital Reset
Sometimes, the simplest solution is the most effective. A reboot can clear temporary glitches and reset the system. Think of it as a digital "Ctrl+Alt+Delete."
- Restart Your Laptop: Close all your applications and restart your laptop. This can often resolve minor software hiccups.
- Factory Reset (Last Resort): This will erase all the data on your laptop. If all else fails and you're confident you've backed up your important files, consider a factory reset. This can restore your laptop to its original state.
Rebooting is like shaking the Etch-A-Sketch – it clears any lingering issues.
7. Software Conflicts: Identifying the Audio Bandits
Certain software, particularly audio or video editing programs, can sometimes conflict with your audio drivers.
- Close Problematic Programs: Close any audio-intensive programs you're not using (video editors, music production software, etc.). See if that solves the problem.
- Driver Rollback: If the problem started after a recent driver update, consider rolling back to a previous version. Go to Device Manager, right-click your audio device, select "Properties," and then go to the "Driver" tab. There should be an option to "Roll Back Driver."
Eliminating suspects can bring you closer to the truth.
8. The External Audio Solution: A Handy Workaround
If all else fails, there's a quick and relatively inexpensive fix.
- USB Microphones: These bypass the audio jack entirely. They plug directly into a USB port. They often offer better audio quality and are relatively cheap.
- USB Audio Adapters: These adapters offer an alternative. They plug into a USB port and provide separate headphone and microphone jacks.
- Bluetooth Headsets: Bluetooth headsets avoid wires entirely. They’re incredibly convenient and often easy to set up.
It's like switching to a different lane on the highway – it can get you where you need to go.
9. Hardware Failure: The Point of No Return
Sometimes, unfortunately, the jack is simply broken. It’s the digital equivalent of a car engine blowing up.
- Professional Repair: If you’re not comfortable opening up your laptop, it's time to consult a professional computer repair technician. They can diagnose and repair the audio jack.
- Motherboard Replacement (Rare): In extreme cases, the audio jack may be soldered directly to the motherboard. This means the entire motherboard might need to be replaced, which is often expensive.
Don't go into denial. Sometimes, the best thing to do is to concede defeat.
10. Preventing Future Audio Jack Disasters: Proactive Measures
Once you’ve fixed the problem, you don’t want to go through this again!
- Gentle Handling: Avoid yanking the microphone cord out of the jack.
- Cleanliness is Next to Godliness: Keep your laptop clean and free of dust and debris.
- Proper Storage: Store your laptop in a safe place to avoid accidental damage.
Think of it as preventative medicine for your technology.
11. Optimizing Audio Quality Beyond the Jack
A working mic jack is just the starting point. Let’s make sure you sound amazing.
- Microphone Placement: Experiment with microphone placement. Try to avoid background noise.
- Noise Reduction: Use noise-canceling software or plugins to filter out background noise.
- Audio Editing Software: Learn basic audio editing techniques to improve the quality of your recordings.
It's like polishing a gem – maximizing its brilliance.
12. Troubleshooting Specific Laptop Models: Device-Specific Tips
Some laptops are notorious for audio issues. Let’s provide some specific, model or manufacturer-specific tips. (Since I don't know your laptop, I will have to leave this blank, but the idea is to provide some hints)
ASUS Laptop Touchpad Nightmare on Windows 7? (FIXED!)
- Dell: (Example: Dell laptops often have audio settings in the Waves MaxxAudio Pro software. Check there).
- HP: (Example: HP laptops may have specific
How To Fix External Microphone Not Working In Windows 1011

By Windows Techsolutions How To Fix External Microphone Not Working In Windows 1011 by Windows Techsolutions
All Desktop Earphone Jack Not Working Motherboard Internal Earphone And Sound Cardmacnitesh

By Mac Nitesh All Desktop Earphone Jack Not Working Motherboard Internal Earphone And Sound Cardmacnitesh by Mac Nitesh
Fix Microphone Not Working On Windows 111087 2022
By ITGuy360 Fix Microphone Not Working On Windows 111087 2022 by ITGuy360
Title: How To Fix Microphone Not Showing Up on Windows 10 Complete Guide
Channel: Softbay
How To Fix Microphone Not Showing Up on Windows 10 Complete Guide by Softbay
Wifi Not Found
Laptop Mic Jack DEAD? 😱 FIX This NOW!
We've all been there. You're in the middle of a crucial video conference, ready to record a podcast, or gearing up to unleash your killer vocals during an online jam session, only to discover… silence. That dreaded moment when your laptop's microphone jack, the gateway to clear audio, has seemingly given up the ghost. Don't panic! While the situation might appear dire, a dead mic jack doesn't necessarily spell the end of your audio aspirations. We're diving deep into the common culprits and, more importantly, the solutions that can resurrect your laptop's audio capabilities. Let's troubleshoot and get you back up and running with crystal-clear sound.
Understanding the Problem: Diagnosing the Silence
Before we leap into fixes, let's understand the potential villains behind this audio tragedy. Pinpointing the source of the problem is half the battle. Several factors can contribute to a non-functional mic jack.
- Hardware Malfunction: This is the most frightening prospect, the actual demise of the physical jack located on your laptop. This can result from wear and tear, accidental damage (like dropping your laptop or pulling the cable with force), or internal component failure.
- Software Glitches: Sometimes, the problem isn't hardware; it's software. Drivers, the crucial software that lets your operating system communicate with your audio hardware, may be outdated, corrupted, or simply malfunctioning.
- Incorrect Settings: A seemingly harmless mistake in your audio settings can mute your microphone input or route it to the wrong device, leading you to believe the jack has failed when it hasn't.
- Cable or Microphone Issues: The problem might not be with the jack itself but the microphone or the cable connecting it. A faulty microphone or a damaged cable can prevent audio transmission, leading you to point the finger at the jack.
Step-by-Step Troubleshooting: Resurrecting Your Audio
Now, let's arm ourselves with a systematic game plan to diagnose and address the issue. We'll start with the simplest solutions and progress to more complex ones.
1. The Obvious Checks: Starting Simple
Before diving into the technical depths, let's cover the basics. Sometimes, the simplest solutions are the most effective.
- Physical Inspection: Carefully examine the mic jack itself. Look for any visible damage, such as bent pins, debris clogging the port, or any sign of physical trauma. A flashlight can be helpful. If you spot any obstructions, try gently removing them with a toothpick or compressed air. Do not use metal objects that could damage internal components.
- Cable & Microphone Testing: If you're using an external microphone, try another similar microphone. If you have access to another microphone cable, test that as well. Ensure they're securely plugged in; sometimes, a loose connection is the only issue.
2. Software Solutions: Tweaking the Settings
Next, let's explore the software side of things. Misconfigured settings are a surprisingly common cause of audio problems.
- Check Your Audio Input Settings: Navigate to your laptop's audio settings. Access these settings through Control Panel (Windows) or System Preferences (macOS). Locate the "Input" or "Recording" tab and ensure your microphone is selected as the default input device. Also, confirm that the volume level for the microphone isn't muted or set to a very low level. Increase the volume and check the microphone level.
- Driver Updates: The Key to Compatibility: Outdated or corrupted drivers can wreak havoc on your audio. To update your drivers, search for "Device Manager" in Windows. In macOS, information will be available under "System Information". Locate "Sound, video, and game controllers." Right-click on your audio device (usually Realtek High Definition Audio, or a similar manufacturer) and select "Update driver." Let Windows automatically search for updated drivers. For macOS, check the manufacturer's website for driver updates or specific driver software. Reboot your laptop after the update installs.
- Troubleshooting Tools: Letting the System Help: Both Windows and macOS come equipped with built-in troubleshooting tools designed to diagnose and fix common audio problems. In Windows, search for "Troubleshooting settings" and select "Playing Audio." Follow the on-screen instructions. In macOS, open "Audio MIDI Setup" (found in Utilities) and run the "Audio Devices" tests.
3. Advanced Troubleshooting: Delving Deeper
If the basic steps haven't resolved the issue, it's time to delve into more advanced solutions.
- Reinstalling Audio Drivers: A Fresh Start: If updating drivers doesn't work, try a complete removal and reinstallation. In Device Manager (Windows) or System Information (macOS), uninstall the audio driver. Then, restart your laptop. Windows or macOS will attempt to reinstall the drivers automatically. If not, download the latest drivers from the manufacturer's website and install them manually.
- BIOS Configuration: Internal Settings: In rare instances, the issue could be related to the BIOS settings. Be cautious when working with BIOS, as incorrect changes can cause further problems. Restart your laptop and access your BIOS setup (usually by pressing Delete, F2, F10, or Esc during startup – the specific key varies by manufacturer; you may need to consult your laptop's manual). Look for audio-related settings and ensure the integrated audio device is enabled. The setting is usually identified with “Onboard Audio,” “Integrated Audio,” or a similar term.
- Operating System’s Audio Settings: Occasionally, the operating system’s sound settings become corrupted. You might need to revert sound settings to the default. If you use Windows, type “Sound Settings” into the search bar and run the utility. Under “Input,” check that your microphone is selected and the volume is appropriately set. Also, ensure “Allow apps to access your microphone” is enabled. On macOS, check “System Preferences” > “Sound” to make sure that your input device is selected.
4. Hardware Considerations: Exploring Physical Solutions (If Necessary)
When software solutions fail, it's time to consider potential hardware problems.
- External USB Microphone: A simple and effective workaround is to use an external USB microphone. These microphones bypass the laptop's internal sound card and mic jack altogether, allowing you to bypass the potentially damaged component. It's a convenient way to get back up and running quickly.
- Headphone Jack Issues: If you have a combined headphone/microphone jack, try using headphones without a microphone. If audio is working, it indicates it is an issue specific to the microphone input functionality.
- Internal Inspection (Proceed With Caution): If you're comfortable with tech and have experience working with electronics, you might consider disassembling your laptop to visually inspect the mic jack's internal connections. However, this voids your warranty and can cause further damage if you're not careful. This is best left to trained professionals. If you decide to proceed, consult a detailed disassembly guide specific to your laptop model, which will be widely available online. Check the jack's solder points on the motherboard and ensure they are intact.
5. Seeking Professional Help:
If you've exhausted all other options, it's time to call in the experts.
- Laptop Repair Services: Take your laptop to a reputable computer repair shop. Technicians have the expertise and tools to diagnose and repair hardware problems, including a malfunctioning mic jack.
- Manufacturer Support: Contact your laptop manufacturer's support team. They can offer troubleshooting advice or arrange for your laptop to be serviced under warranty (if applicable).
Preventative Measures: Protecting Your Audio Future
Once you've solved your mic jack issue, take steps to prevent it from happening again.
- Gentle Handling: Avoid yanking or pulling on microphone cables. Always unplug them carefully, holding the connector rather than the cable.
- Proper Storage: When not in use, store your laptop and external microphones in a safe place to protect them from physical damage.
- Regular Dusting: Dust can accumulate in the mic jack and other ports, causing problems. Regularly clean the ports with compressed air or a soft brush.
- Software Updates: Keep your drivers and operating system up to date to ensure optimal performance and compatibility.
Conclusion: Back to Sound!
Losing your laptop's mic jack can be frustrating, but with careful troubleshooting and the right approach, you can often restore your audio capabilities. By following this structured approach, from the initial checks to more advanced solutions, you'll be well-equipped to diagnose and fix the problem. Whether it's a software glitch, a driver issue, or a hardware malfunction, we've provided the tools and knowledge to get you talking, recording, and creating again. Don't give up hope! The solution is often within reach, and with a little persistence, you'll be back to enjoying your audio in no time.
