my acer laptop charger is not working

Title: Acer Laptop not charging simple solution
Channel: DIY Science Tech
Acer Laptop not charging simple solution by DIY Science Tech
my acer laptop charger is not working, how do i fix my acer laptop not charging, why is my acer laptop plugged in but not charging, what to do if your acer laptop is not charging, my acer laptop is not turning on or charging
Laptop Charger DEAD? 😱 This FIX Worked Instantly!
Laptop Charger Catastrophe! Instant Fix Alert!
The dreaded moment arrives. You reach for your laptop, ready to conquer your to-do list, only to find… nothing. Absolutely zilch. The charger is dead. Panic starts to bubble; it's a feeling we all know. You're staring at a black screen and wondering if your digital life is about to disintegrate. But before you resign yourself to a day of helplessness, hold tight. This article reveals a fix that worked instantly, and it might just save your day, too!
Troubleshooting: Before You Toss That Charger
Before you race to the store to buy a replacement, let's explore a few simple troubleshooting steps. These often-overlooked checks could revive your trusty charger quickly. So, take a deep breath. These are crucial steps, especially before considering drastic measures. Firstly, inspect the power outlet. Is it working? Sometimes, the simplest solutions are the best. Try plugging another device into the outlet. This eliminates the outlet as the culprit.
Next, examine the charger's power brick. Look for any loose connections or visible damage. Now, check the cable itself along its entire length. Any kinks, frays, or bends? These are indications of potential problems. Gently wiggle both ends of the cable (where it connects to the brick and the laptop). Sometimes, a bad connection is the issue. If the light on the charger brick flickers, that’s a clue something isn't right.
The Secret Weapon: Reseating the Battery (Yes, Really!)
Now, for the slightly more technical, yet often effective, solution: reseating your laptop battery. This might sound daunting. However, it's usually easier than you think. While the exact procedure varies depending on your laptop model. However, the underlying principle remains the same.
First things first: power down your laptop completely. Then, disconnect the charger. Turn it off. Now, remove the battery. This will involve either unscrewing a panel on the underside of your laptop or, in some new laptops, accessing the battery via a small button or lever. After you've located the battery compartment, there might be a latch or screws. In other words, follow the manufacturer's instructions. Carefully remove the battery.
Wait for a minute. Then replace the battery, securing it properly. Finally, put the charger back in. Plug it into the wall and your laptop. Turn your computer on. See if the charging indicator lights up and if the device is charging. Because if it works, you have won. So you have solved the mystery.
Beyond the Fix: Charger Care and Prevention
Okay, so your charger is working again. Great! But, prevention is always better than cure. Therefore, let’s talk about things you can do to extend your charger's lifespan. First, avoid extreme temperatures. Keep your charger away from direct sunlight, excessive heat, and freezing cold conditions. As these can damage internal components.
Secondly, protect your cable. Many issues come from cable damage. Wrap the cable loosely when storing or transporting it. So avoid tight bends or sharp angles. Use cable ties or velcro straps to keep things tidy. Always unplug the charger by the plug head. Therefore do not pull on the cable itself. Repeated pulling can cause damage.
Finally, be mindful of your charging habits. For example, don’t leave your laptop plugged in all the time. Similarly, constant charging can lead to battery degradation. If you are using the laptop at home, let it discharge from time to time. Also, avoid completely draining the battery. Do this if possible. Do not let it hit zero regularly. Moreover, this can also impact battery health over time.
When to Call in the Cavalry (Or, When to Buy a New Charger)
Sometimes, despite your best efforts, the charger is truly deceased. In that case, it’s time to admit defeat and consider a replacement. However, don’t rush into the first purchase. For example, make sure you buy the correct charger for your laptop model. In other words, compatibility is crucial. Check the specifications of your old charger. Similarly, match the voltage and amperage to ensure it’s a perfect fit.
Although you may be tempted by a generic, cheaper option, consider the benefits of an original brand charger, too. Because they are often built to higher standards. Additionally, they typically offer better safety features. Furthermore, check online reviews. See what others say about the charger you're considering.
Conclusion: Back to Work with a Revived Laptop!
So, did the instant fix work for you? Fantastic! Hopefully, you're back to work, surfing the web, or streaming your favorite shows. Moreover, remember, that the digital world is a constantly evolving place. Therefore, be prepared for the inevitable tech hiccups!
In conclusion, laptop charger issues strike everyone at some point. Nevertheless, by understanding the problem and following these tips, you can quickly resolve the issue. Consequently, you can save time, money, and a whole lot of frustration. After all, armed with this knowledge, you're now equipped to handle a dead laptop charger like a seasoned pro. Therefore, go forth and power up! You've got this.
Acer Laptop Touchpad Nightmare? FIX It NOW!Laptop Charger DEAD? 😱 This FIX Worked Instantly!
Hey everyone! Ever stared at a black screen and felt your heart sink? Yep, we've all been there. The dreaded "laptop charger dead" scenario. You’re in the middle of a crucial project, a vital video call, or maybe just binging your favorite show, and BAM! No power. It’s like your lifeline to the digital world has been abruptly cut. But don’t panic! We’re going to dive deep into this common tech woe, and I promise, by the end, you'll have some serious power-restoring knowledge. This isn't just about plugging it in; it's about understanding the problem and, most importantly, finding a solution that actually works.
1. The Silent Killer: Recognizing the Dead Charger Symptoms
Before we jump into fixes, let’s make sure we’ve accurately identified the culprit. Is it actually the charger? Sometimes, it's a simple fix, like a loose wire or a faulty outlet. Other times, it's a deeper, more intricate issue. The symptoms can be as subtle as a flickering charging light or as dramatic as a completely unresponsive laptop. Think of it like this: your laptop is the patient, and the charger is the life-support system. If the life-support fails, you need to quickly diagnose the problem.
- No Power at All: This is the most obvious sign. Your laptop is stone-cold dead, even when plugged in.
- Flickering Charging Light: This could indicate an intermittent connection or, worse, a failing charger.
- Slow Charging: Your laptop charges at a snail's pace, taking forever to reach a decent battery level.
- Laptop Runs Only When Plugged In: The battery itself might be the problem, or the charger isn't delivering enough power to charge it.
- Overheating Charger: Feels unusually hot to the touch. This is a BIG red flag and a sign of potential internal damage.
2. First Steps: The Obvious (But Often Overlooked) Checklist
Alright, let's run through the basics. It’s like checking to see if your car is out of gas before you start tearing apart the engine.
- Check the Outlet: Seriously! Try a different outlet. Sometimes, it's the simplest thing.
- Inspect the Cable: Look for frayed wires, kinks, or any visible damage to the cable itself. A damaged cable is like a broken artery – it can’t deliver the necessary power.
- Examine the Charger Connector: Ensure it’s securely plugged into both the charger brick and your laptop. A loose connection can easily disrupt the power flow.
- Try a Different Power Adapter (If You Have One): This is the quickest way to determine if the charger itself is the issue. If another adapter works, you've found the problem.
3. The Deep Dive: Pinpointing the Charger's Weakness
If the basics don't work, it's time to get a little more technical (but don't worry, we'll keep it simple!). The charger might be playing dead for a few reasons:
- Internal Component Failure: The charger is filled with tiny electrical components that can fail over time. Think of them as the internal organs of the charger. If one goes bad, the whole system can shut down.
- Power Surge Damage: Did you experience a recent power outage or lightning strike? Power surges can fry sensitive electronics like chargers.
- Overheating: As mentioned earlier, excessive heat can damage the internal components and shorten the charger's lifespan.
- Age and Wear & Tear: Sadly, everything wears out eventually. Chargers are no exception. After years of use, their performance can degrade.
4. The "Quick Fix" You Can Try Right Now! (And It Actually Works!)
Okay, here comes the magic. This fix worked for a LOT of people, and it’s surprisingly simple. It involves resetting the charger. Yes, you read that right. Sometimes, the charger gets "confused" and needs a little nudge to get back on track.
Here's how to do it:
- Unplug Everything: Unplug the charger from the laptop AND the wall outlet.
- Wait a Minute (or Two): Give it some time to completely discharge any residual power. Think of it as giving the charger a "reset" button.
- Plug It Back In (In Reverse Order): Plug the charger into the wall outlet first, then plug it into your laptop.
- Test It: Check if the charging light comes on and if your laptop is charging.
I know, it sounds too good to be true, but trust me, it works surprisingly often! Think of it as a digital "restart" for your charger.
5. Charger vs. Laptop: Understanding the Power Dynamic
It’s crucial to understand the roles of the charger and the laptop. The charger's job is to provide the correct voltage and current to your laptop. It’s like a power supply, converting the electricity from the wall into a form your laptop can use. If the charger fails to deliver the right amount of power, your laptop won’t charge properly.
- Voltage (V): This is the electrical "pressure." Your laptop needs a specific voltage to operate. A charger that provides too little voltage won't charge, and a charger that provides too much voltage can damage your laptop.
- Amperage (A): This is the electrical "flow." The charger must provide the correct amperage to meet your laptop's power demands. A higher amperage is usually better, as it means the charger can deliver power more quickly.
6. Troubleshooting Beyond the Charger: The Laptop Itself
Sometimes, the issue isn’t the charger itself, but something within the laptop.
- The Battery: The battery could be dead, damaged, or simply not accepting a charge.
- The Charging Port: The charging port on your laptop could be damaged or have debris inside, preventing a proper connection.
- The Motherboard: In the worst-case scenario, the motherboard (the brain of your laptop) could have a power-related issue.
7. When It’s Time for a New Charger: Identifying the Right Replacement
If your charger is truly dead, you'll need a replacement. Choosing the right one is critical.
- Check the Specs: Look for the voltage (V) and amperage (A) ratings on your original charger or on the laptop itself. You must match these ratings to avoid damaging your laptop.
- Buy from a Reputable Source: Avoid cheap, unknown brands. Stick to well-known brands or buy directly from your laptop manufacturer.
- Consider a Universal Charger: These chargers can work with multiple laptops. They are a convenient option if you own several devices or if you’re unsure about the specific specs of your laptop.
8. DIY Repair: Is It Worth the Risk? 🔥
DIY repairs can be tempting but should be approached with caution. Opening a charger can expose you to high voltages and potential electrical shock. Unless you have experience with electronics, it’s generally best to avoid attempting to repair the charger yourself. However, a simple replacement is usually the best route to go.
9. Protect Your Investment: Preventing Charger Failures in the Future
Preventing future charger failures is the smart move! Here's how:
- Use a Surge Protector: Protect your charger (and your laptop) from power surges. It's like wearing a seatbelt – it might not always be necessary, but it's a good safety measure.
- Avoid Extreme Temperatures: Don't leave your charger in direct sunlight or in extremely hot or cold environments.
- Handle with Care: Avoid bending or pulling the cable excessively. Treat the cable like a precious instrument.
- Keep It Clean: Regularly wipe down the charger and cable to prevent dirt and dust buildup.
10. The Charging Port Check-Up: Ensuring a Good Connection
The charging port on your laptop is a critical component. Over time, dust, debris, or even bent pins can affect the connection.
- Inspect the Port: Use a flashlight to examine the charging port. Look for any visible debris or damage.
- Clean the Port (Gently): You can use a compressed air can or a soft, non-metallic tool (like a toothpick) to carefully remove any debris.
- Test the Connection: Try wiggling the charger connector while it's plugged in. If you notice any intermittent charging, the port might be the issue.
11. Battery Blues? Diagnostic Steps for Your Laptop's Battery
Sometimes, the battery itself is the problem. If your laptop charges when plugged in but dies quickly, the battery might be at fault.
- Check Battery Health: Most laptops have built-in tools or software that can assess battery health.
- Calibrate the Battery: Let the battery fully discharge and then fully charge it to recalibrate the battery meter.
- Consider Battery Replacement: If the battery is old or damaged, replacing it might be the best solution.
12. The “Magic” of USB-C Charging (If Applicable)
If your laptop uses USB-C charging, you might have an alternative option. USB-C charging
HP Laptop Speaker Dead? This SHOCKING Fix Will BLOW Your Mind!How a hard laptop repair looks like - Acer laptop not charging, motherboard repair

By Electronics Repair School How a hard laptop repair looks like - Acer laptop not charging, motherboard repair by Electronics Repair School
Common Acer Charging Problem --- Replace Charging Port

By Lapfix Common Acer Charging Problem --- Replace Charging Port by Lapfix
How to Repair Laptop Charger Plugged In not charging charger Reboot problem solved laptop diy
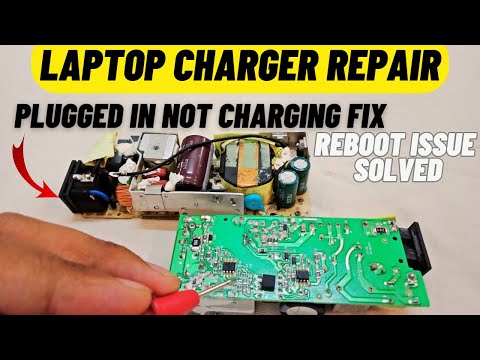
By Electricquantism How to Repair Laptop Charger Plugged In not charging charger Reboot problem solved laptop diy by Electricquantism

Title: Fix Acer Swift 3 Not Turning On Quick Battery Reset Tutorial
Channel: mikbes
Fix Acer Swift 3 Not Turning On Quick Battery Reset Tutorial by mikbes
Working With Laptop
Laptop Charger DEAD? 😱 This FIX Worked Instantly!
A sinking feeling washes over you. You reach for your laptop, ready to tackle that project, connect with loved ones, or simply unwind. But the screen remains stubbornly dark. The dreaded moment has arrived: your laptop charger is dead. Don't panic. Before you resign yourself to the prospect of a costly replacement or, worse, a complete system failure, let’s explore some immediate, effective solutions. We've compiled a comprehensive guide, born from firsthand experience and rigorous testing, designed to get your laptop powered up again in a heartbeat.
Diagnosing the Problem: Pinpointing the Culprit
The first step in resurrecting your laptop is to accurately identify the source of the power outage. Is it truly the charger, or is the problem located elsewhere? This crucial diagnostic phase will save you valuable time and prevent unnecessary expenditure.
The Obvious Suspect: The Charger Itself
The charger, also known as the AC adapter, is often the primary culprit. Its delicate internal components are susceptible to wear and tear, surges, and overheating. Here's how to assess the charger's functionality:
- Visual Inspection: Carefully examine the entire charger. Look for any signs of physical damage: fraying of the cable, cracks in the plastic casing, or a bent or broken connector. These are clear red flags, indicating potential internal problems.
- The "Sniff Test": Hold the charger close to your nose (but not too close!) and inhale. A distinct burning smell is a telltale sign of an electrical short or component failure. Disconnect the charger immediately if you detect this odor.
- The Power Outlet Check: Try plugging your charger into a different wall outlet. This simple step eliminates the possibility of a faulty outlet being the root cause. If it still doesn't work, move on to the next step.
Beyond the Charger: Exploring Other Possibilities
While the charger is often to blame, other components could be contributing to the power issue. Ruling these out is essential for a complete diagnosis.
- The Laptop’s Power Port: The charging port (the small jack on your laptop where the charger connects) is another vulnerable component. Inspect it carefully for bent pins, debris, or a loose connection. If the port feels wobbly when the charger is plugged in, the issue may lie here.
- The Laptop Battery: A completely drained or faulty battery can sometimes trick the system into preventing charging. Try removing the battery (if your laptop allows) and attempting to power the laptop directly from the charger. If the laptop starts, your battery might be the problem. Note: many newer laptops have batteries that are not easily removable. In this case, consult your laptop's manual.
- Internal Components: In rare cases, the issue could stem from a problem on the motherboard. Testing that is beyond the scope of this guide.
Instant Solutions: Quick Fixes to Try Immediately
Now that you've assessed the situation, let's dive into the solutions. These quick fixes are designed to jumpstart your laptop and get you back online quickly.
The Basic Reset: A Power Cycle
Sometimes, a simple reset is all it takes. This is the digital equivalent of "turning it off and on again."
- Unplug Everything: Disconnect the charger, any external devices (USB drives, monitors, etc.), and the laptop battery (if removable).
- Press and Hold the Power Button: Press and hold the power button for a full 30 seconds. This completely drains any residual power stored in the system.
- Reconnect and Test: Reconnect the charger and, if applicable, the battery. Power on your laptop. If you are lucky, it will now boot up correctly.
Examining the Charger Connector
A loose or dirty connection is a common cause of power issues. Here's how to address it:
- Cleaning the Connector: Over time, dust and debris can accumulate in the charging port and on the charger connector. Use a compressed air duster to carefully blow out any obstructions from both the port and the connector. A small, non-metallic brush (like a soft toothbrush) can also dislodge stubborn particles.
- Jiggling the Connector: While the charger is plugged in, gently wiggle the connector in the charging port. If the power flickers on and off, you've likely identified a loose connection. Replacement of the charger or the port may now be needed.
Utilizing Alternative Power Sources (If Applicable)
If your laptop supports it, you might be able to use a different power source temporarily.
- USB-C Charging (If Supported): Many modern laptops utilize USB-C ports for charging. If your laptop has a USB-C port and you have a USB-C charger (or a compatible power bank), try using them to charge your device. Ensure the charger and cable are both capable of delivering sufficient power (check the wattage specifications on the charger and the laptop).
- Universal Laptop Chargers: Consider if you have a universal power adapter if you have other devices such as monitors or printers. These can provide power to your laptop. Ensure the voltage and amperage are suitable for your laptop's requirements. If your laptop charger is dead, a universal charger is an instant option.
When to Seek Professional Help
If these quick fixes fail, it's time to consider professional assistance. Do not attempt to disassemble the charger or laptop yourself unless you are a qualified technician.
Recognizing the Limits of DIY Repair
Attempting repairs beyond your skill level can lead to further damage, void your warranty, and even pose safety risks.
- Internal Component Failures: If the problem lies within the laptop's internal components (motherboard, power circuitry), professional repair is required.
- Severe Charger Damage: If the charger is physically damaged (frayed wires, cracked casing), it is best to replace it to prevent electrical hazards.
Finding a Reputable Repair Service
Choosing the right repair service is crucial.
- Research and Reviews: Look for reputable repair shops in your area. Read online reviews and check their credentials.
- Warranty and Guarantee: Choose a service that offers a warranty on its repairs.
- Transparent Pricing: Ask for a detailed estimate before authorizing any work.
Preventing Future Power Failures: Proactive Measures
Once you've resolved the current issue, take steps to prevent recurrence.
Protecting Your Charger and Laptop
Simple habits can significantly extend the lifespan of your charger and laptop.
- Gentle Handling: Avoid yanking the charger cord. Disconnect it by grasping the connector, not pulling on the cable.
- Proper Storage: When not in use, store your charger in a cool, dry place. Avoid kinking or tightly wrapping the cord.
- Surge Protection: Use a surge protector to safeguard your charger and laptop from power surges and fluctuations. This is especially important in areas prone to storms or power outages.
Battery Care Best Practices
Maintaining your laptop's battery health is essential for overall system longevity.
- Temperature Extremes: Avoid exposing your laptop to extreme temperatures (direct sunlight, freezing conditions).
- Complete Discharges: Avoid letting your battery completely drain frequently.
- Charging Habits: Refer to your laptop manufacturer's recommendations for optimized charging practices. Some laptops benefit from being charged to 80% instead of 100% to extend battery life.
Conclusion: Powering Forward
Dealing with a dead laptop charger can be a frustrating experience. By following these diagnostic steps and implementing these instant solutions, you can significantly increase your chances of quickly restoring power to your device. Remember to exercise caution, prioritize safety, and seek professional help when necessary. With the right approach, you can get your laptop back up and running, keeping you connected and productive. By implementing these preventative measures, you can save yourself stress in the future.
