how to fix acer laptop keyboard keys not working

Title: Solved Acer Laptop Keyboard Not Working in Windows 10
Channel: Cap Trong Nam - How To
Solved Acer Laptop Keyboard Not Working in Windows 10 by Cap Trong Nam - How To
how to fix acer laptop keyboard keys not working, how to fix acer laptop keyboard some keys not working, why my acer laptop keyboard is not working, how do i fix the keys on my acer laptop keyboard
**Acer Keyboard Broken? FIX It NOW! (Easy Steps)**
Acer Keyboard Blues? Don't Panic! Get it Clicking Again
Feeling the sting of a malfunctioning Acer keyboard? That sinking sensation when your trusty typing companion goes rogue? Stop right there! Don't toss it into the digital graveyard just yet. Take a deep breath. We're diving into some easy fixes that might just resurrect your keyboard.
Troubleshooting the Typing Troubles: Where to Begin
First, let's get the lay of the land. Before you start tearing things apart, systematically check the obvious. Because sometimes, the simplest solutions are the most effective. Is your keyboard plugged in securely? Are the cables snugly connected? Perhaps a loose connection is the culprit, preventing that vital signal from reaching your computer.
Next, give your computer a swift reboot. Consequently, this can sometimes alleviate minor glitches, restarting the system and potentially resolving software conflicts. Doing so can be surprisingly effective. It’s a digital reset button.
Are you using a wireless keyboard? Ensure it has fresh batteries. Without power, it's useless! Also, make sure the USB receiver is plugged in and working correctly. Check for any interference from other devices, they will cause issues.
Software Shenanigans: Ruling Out Driver Drama
Often, the problem isn’t hardware at all, but lies within the software. Therefore, let's explore driver issues. Your keyboard relies on drivers to communicate with your operating system. These drivers can become corrupted.
How can you address this? Let’s begin by checking your device manager. This tool shows you all your connected devices, including your keyboard. If you see a yellow exclamation mark next to the keyboard, you’ve found your problem.
Right-click on the keyboard entry. Select "Update driver." Follow the prompts. Windows will search for an updated driver automatically. After the update completes, restart your computer. Hopefully, this solves the problem.
However, if updating the driver doesn't work, try uninstalling and reinstalling it. In your device manager, right-click on the keyboard. Select "Uninstall device." Then, unplug the keyboard. Restart your computer. Then, plug your keyboard back in. Windows will usually reinstall the driver automatically.
Sticky Situation: Cleaning Up the Mess
Dust, crumbs, and the general grime of everyday life can wreak havoc on a keyboard. These tiny invaders often find their way under the keys. They can prevent them from working properly.
So, it's time for a deep clean. Turn off your computer and unplug the keyboard. Consider using a can of compressed air. Carefully blast air between the keys. This dislodges debris.
You can also use a soft-bristled brush to sweep away loose particles. For a more thorough cleaning, consider removing the keycaps. Be extremely careful when doing this. Take pictures before removing them. This ensures you put them back in the correct order.
After removing the keycaps, you can use a cotton swab dipped in isopropyl alcohol. Gently clean around the key switches. Let everything dry completely before reassembling.
Hardware Headaches: Assessing the Damage
Sometimes, the problem is beyond simple fixes. The keyboard might have sustained physical damage. In this case, you’ll need to do some detective work. Inspect the keyboard closely.
Look for any visible signs of damage. Are any keys physically broken? Is the cable frayed or damaged? If you find such damage, it might be time for some DIY repair.
Repairing keyboards can be tricky. However, it can be done. Replacing individual keys is possible. You can buy replacement keycaps online. Also, you can purchase the switches or the membrane if they are the cause.
If only a few keys aren't working, and you're feeling adventurous, you want to try some tutorials online. Just make sure you are comfortable taking the case apart. Ensure you identify and replace the faulty part.
However, if the damage is extensive, it might be more cost-effective to replace the keyboard. Weigh the cost of repair. See if it's less than buying a new keyboard.
Beyond the Basics: Additional Tidbits
Here are some handy tips. These might fix your keyboard problem faster. Try another USB port. Sometimes, a faulty USB port causes problems. Test your keyboard on another computer. This helps determine if the issue is with the keyboard itself.
Check your keyboard settings in the operating system. Make sure the correct keyboard layout is selected. If you spilled liquid on your keyboard, immediately turn it off and unplug it. Then, try to dry it thoroughly.
The Final Word: Typing Towards Triumph
Don't let a broken Acer keyboard ruin your day. You can try these steps. They might just get you back to typing in no time. Because, in the digital age, a working keyboard is essential. So, go forth and troubleshoot. Hopefully, your keyboard will be clicking away happily again. And if all else fails, consider purchasing a new one. At least you will know that you tried.
Driverless Headphones DEAD on Laptop? FIX This NOW!Acer Keyboard Broken? FIX It NOW! (Easy Steps)
Hey there, fellow tech traveler! Ever felt that gut-wrenching pang when your Acer keyboard decides to go on strike, leaving you staring at a blank screen? You're not alone! We’ve all been there – the cursor blinking mockingly, the deadlines looming, and the overwhelming urge to chuck the whole darn thing out the window. But before you reach for the nearest replacement, take a deep breath. Often, the fix is easier than you think, and we're going to walk you through the steps to get your Acer keyboard back in action. Consider this your personal "how-to" guide to keyboard resuscitation!
1. The Keyboard Blues: Recognizing the Symptoms
First things first, let’s diagnose the problem. Is your Acer keyboard completely dead, or are only certain keys acting up? Knowing the symptoms is half the battle. Think of it like a doctor's visit – the more you can tell them, the better they can treat you. Common issues include:
- Complete Unresponsiveness: The whole keyboard is silent, refusing to acknowledge your frantic typing.
- Sticky Keys: Certain keys are sticking, repeating characters, or not responding consistently.
- Partial Malfunction: Some keys work, while others are stubbornly refusing to cooperate.
- Input Lag: There's a delay between your keystroke and the character appearing on the screen.
- Strange Characters: Your "A" key is suddenly typing "QWERTY" – well, maybe not that extreme, but you get the idea!
2. The Reboot Remedy: Your First Line of Defense
Before we dive deep into the techy stuff, let's try the simplest solution: a good old-fashioned reboot. Think of it as a digital reset button. Sometimes, your computer gets a little confused (just like we all do!), and a restart can clear up any glitches.
Here's what to do:
- Save Your Work: This is crucial! Close any open applications and save your precious documents.
- Restart Your Acer: Click the Start menu (or press the Windows key), and select "Restart."
- Cross Your Fingers: Allow your Acer to reboot completely. Then, test your keyboard. Did it work? If so, awesome! If not… onward we go!
3. The External Keyboard Test: Ruling Out the Usual Suspects
Okay, so the reboot didn't work. Perhaps it's time to determine if the issue lies within your Acer keyboard itself or the deeper software of your laptop. Using an external keyboard, if you can find one, is a fantastic way to determine the problem.
- Plug in an external USB Keyboard: or you can connect using a wireless connectivity.
- Test it out: Make sure it's set up properly and working
- Still issues? If the external keyboard runs like a dream, then the issue lies with your integrated Acer Keyboard.
4. Driver Dilemmas: Updating Your Keyboard's Software
Think of drivers as the language your keyboard uses to talk to your computer. If the driver is outdated or corrupted, communication can become a problem. Let's check those drivers!
- Open Device Manager: Search for "Device Manager" in the Windows search bar and open it.
- Expand "Keyboards": In the Device Manager window, find the "Keyboards" section and click the arrow to expand it.
- Right-Click Your Keyboard: You should see your Acer keyboard listed. Right-click on it and select "Update driver."
- Choose Your Update Method: You'll typically have two options:
- "Search automatically for drivers": Windows will try to find the latest drivers online.
- "Browse my computer for drivers": If you've downloaded a driver file, you can use this option.
- Restart Again: After the driver update, restart your Acer and test the keyboard.
5. The Clean Sweep: Cleaning Your Acer Keyboard
Often, the simplest solutions are the most effective, which is why this is next! Crumbs, dust, and other detritus can wreak havoc on your keyboard. It's like trying to run a marathon with a pebble in your shoe – it's just not going to work well.
Here's how to clean your Acer keyboard:
- Power Down: Turn off your Acer and unplug the power adapter.
- Flip it Over: Carefully flip your laptop upside down and gently shake it to dislodge any loose debris.
- Air Blast (Optional): Use a can of compressed air to remove dust and debris from between the keys. Be gentle!
- Gentle Wipe: Use a slightly damp (not wet!) microfiber cloth to wipe down the keys.
- Let it Dry: Make sure your keyboard is completely dry before you turn it back on.
6. Advanced Troubleshooting: Software Conflicts and Settings
Sometimes, the issue isn't hardware-related, but rather, some software is causing incompatibility issues with your Acer keyboard.
- Recent Software Installations: Have you installed any new software or drivers recently?
- Check Your Keyboard Settings: Go to your Acer's settings and check keyboard layout adjustments, function key behavior, and input language settings.
7. The Hardware Hurdle: Examining the Internal Connections (Proceed with Caution!)
Warning: This section involves opening your laptop. If you're not comfortable with this, or if your Acer is still under warranty, it's best to skip this step or seek professional help.
Let's carefully peer inside.
- Power Off and Unplug: Make sure your Acer is completely powered down and unplugged.
- Open Your Laptop: Follow your Acer's instructions to access the keyboard (or the internal components).
- Inspect the Cable: Locate the ribbon cable that connects the keyboard to the motherboard. Make sure it's securely connected and isn't damaged.
- Reconnect (If Necessary): Gently unplug and reconnect the ribbons, ensuring they snap into place.
- Close Up and Test: Replace all components and test your keyboard.
8. Warranty Woes: When to Call for Backup!
If you’ve tried everything, and your Acer keyboard is still stubbornly refusing to cooperate, it might be time to consider further actions. Has your Acer keyboard been like this since you bought it?
- Check Your Warranty: If your Acer is still under warranty, contact Acer support immediately.
- Professional Repair: If your warranty is expired or does not cover the issue, consider taking your Acer to a reputable computer repair shop.
9. The Liquid Spill Scenario: Immediate Action is Crucial!
Oh, the dreaded liquid spill! If you've accidentally spilled a liquid on your Acer keyboard, act fast! Time is of the essence.
- Immediate Power Down: Unplug the power adapter. Turn off your Acer and completely disconnect it from its power source.
- Quick Cleanup: Immediately wipe up any spilled liquid.
- Flip and Drain: Flip your laptop upside down (keyboard-side-down) to let liquid drain.
- Professional Help: Even if your keyboard seems okay, take your Acer to a repair shop for a thorough cleaning and inspection.
10. The Sticky Key Solution: Fine-Tuning Your Typing Experience
Sometimes, a key or two just won't behave. Here are a few targeted solutions:
- Try a Cleaning: See Step 5.
- Key Removal: If the key is removable, carefully remove it and clean underneath. Consult your user manual for instructions.
- Reboot the system Reboot system so the software can reset the keyboard settings
- Re-program the keyboard settings Sometimes the settings mess up the system so resetting the settings could help.
11. When to Seek Professional Help: Knowing Your Limits
There's no shame in admitting defeat! If you've tried everything and your Acer keyboard is still broken, it's time to seek help from professionals. Don't get discouraged.
12. Prevention is Key: Keeping Your Keyboard Tidy
Let's give some helpful advice about keyboard etiquette. After the repair, let's keep everything in working order!
- Avoid Eating and Drinking: Keep food and drinks away from your laptop.
- Regular Cleaning: Dust and cleaning regularly.
- Gentle Typing: Don't pound on the keys.
13. The Power of Third-Party Software
Sometimes, third-party software can cause all sorts of issues. Some software can overwrite your keyboard settings.
- Check for conflicts: Ensure you haven't inadvertently installed software known to tamper with keyboard settings.
- Disable potential offenders: If you suspect an application, temporarily disable it and see if the keyboard is restored.
14. Spare Parts and Replacements: Considering Your Options
Sometimes, the keyboard is just done. Here are some of your options:
- The cost Replacement keyboards can be expensive.
- Keyboard type Make sure that the keyboard type is compatible with your system.
15. The Keyboard Comeback: Success Stories and Final Thoughts
So, how did it go? Did you manage to bring your Acer keyboard back from the
Toshiba Laptop Spacebar Broken? FIX IT NOW! (Easy Steps)Acer laptop keyboard keys not working

By QUICK & EASY Acer laptop keyboard keys not working by QUICK & EASY
ACER ASPIRE 3 LAPTOP KEYBOARD DEFECTIVE HOW TO DISABLE ALL KEY AND LEAVE THE POWER BUTTON WORKING

By KudaTech ACER ASPIRE 3 LAPTOP KEYBOARD DEFECTIVE HOW TO DISABLE ALL KEY AND LEAVE THE POWER BUTTON WORKING by KudaTech
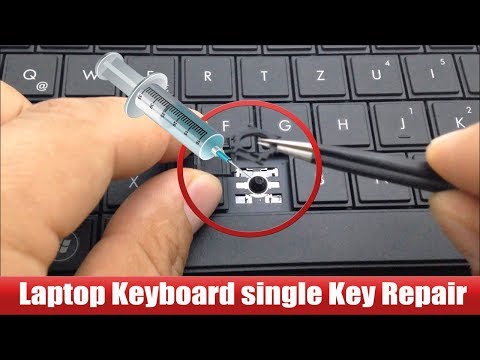
How To Fix Replace Keyboard Key - Acer Aspire 3 Laptop - Letter Arrow Number Keys

By PC Monkey How To Fix Replace Keyboard Key - Acer Aspire 3 Laptop - Letter Arrow Number Keys by PC Monkey
Title: Laptop Keyboard key repair very easy way.
Channel: Hit Short Films
Laptop Keyboard key repair very easy way. by Hit Short Films
Laptop Working
Acer Keyboard Woes? Conquer the Obstacle Course: A Comprehensive Guide to Fixing Your Broken Keyboard
Encountering a malfunctioning Acer keyboard can be a frustrating hurdle, disrupting your workflow and hindering your digital endeavors. Fear not, you've arrived at the definitive guide designed to not only diagnose the issue but also equip you with the knowledge and techniques to restore your keyboard to its former glory. We'll delve into a range of potential problems, from the simplest software glitches to more intricate hardware malfunctions, providing you with a comprehensive toolkit for resolving keyboard issues and getting you back in the digital game.
Initial Triage: Pinpointing the Problem Before You Start
Before launching into intensive troubleshooting, perform a preliminary assessment to identify the source of the problem. This crucial step will streamline your efforts.
Isolate the Culprit: Keyboard or Computer? Connect an external keyboard (if available). Does the external keyboard function correctly? If so, the issue resides within your Acer keyboard itself. If the external keyboard also exhibits similar anomalies, the problem might lie deeper within your operating system or the computer's hardware.
Software vs. Hardware: The Great Divide. Observe how the keyboard is failing. Are specific keys unresponsive, or is the entire keyboard incapacitated? Does the keyboard partially function, exhibiting sporadic errors? These observations provide crucial clues. Software-related problems often manifest as single keys, misinterpreting inputs, or unexpected behavior. Hardware issues often present as complete or partial failures affecting multiple keys simultaneously.
Recent Changes? A Critical Checkpoint. Think back: Did the keyboard’s dysfunction coincide with any recent installations, software updates, physical impacts (like spills – we'll address these later), or hardware alterations? Identifying recent modifications can help you pinpoint the root cause of the issue.
Software Solutions: Breathing Life Back into the Digital Interface
Assuming the keyboard malfunction isn't hardware related, let's begin the troubleshooting process with software solutions. These are typically simpler and can often resolve common issues without disassembling any hardware.
1. The Restart Ritual: A Software Reset. The most basic, yet often effective, is a system restart. This action resets the operating system and its associated drivers, potentially resolving temporary software conflicts that may be interfering with the keyboard. Ensure you’ve saved your work before initiating the restart.
2. Driver Detective: Updating and Reinstalling. Keyboard drivers are software programs that facilitate communication between the keyboard and the operating system. Outdated or corrupted drivers can easily cause keyboard issues.
- Driver Update: Access the Device Manager (search for it in the Windows search bar). Expand the "Keyboards" section. Right-click on your Acer keyboard and select "Update driver." Choose "Search automatically for drivers." Windows will scan for and install updated drivers.
- Driver Reinstallation: If updating the driver doesn't help, try reinstalling it. In Device Manager, right-click on your Acer keyboard and select "Uninstall device." Restart your computer. Windows will automatically attempt to reinstall the driver during the boot process.
3. Keyboard Language Settings: A Subtle Oversight. Incorrect keyboard language settings can lead to unexpected character outputs.
- Configuration: Go to "Settings," then "Time & Language," and finally "Language." Ensure the correct language associated with your keyboard layout is selected. If the correct language isn't listed, add it and then set it as the default. Verify your chosen layout matches your keyboard's physical configuration (e.g., QWERTY, AZERTY).
4. Sticky Keys and Filter Keys: Accessibility Settings. These accessibility features can sometimes interfere with normal keyboard operation.
- Sticky Keys: Sticky Keys allows users to press modifier keys (Ctrl, Alt, Shift, and Windows key) one at a time instead of simultaneously. If you accidentally enabled this feature, it could be causing problems. Go to "Settings," then "Ease of Access," and then "Keyboard." Disable "Sticky Keys."
- Filter Keys: Filter Keys adjust keyboard response to prevent repeated key presses. Similarly, this feature might be causing malfunction. Go to "Settings," then "Ease of Access," and then "Keyboard." Ensure "Filter Keys" is turned off.
5. Malware and Virus Scan: A Digital Shield. In rare scenarios, malware can interfere with keyboard functionality. Conduct a full system scan using your installed antivirus software to remove any potential threats that may be disrupting the function.
Hardware Inspection and Repair: Taking Matters into Your Own Hands
If software solutions haven't produced the desired results, it's likely that the issue is rooted in hardware. Don't be intimidated! Many hardware problems can be fixed with careful examination and a few readily available tools.
1. The External Keyboard Test: Firstly, connect an external keyboard. If the issue disappears with the external keyboard, it confirms that the problem lies in your Acer keyboard.
2. Visual Inspection: A Detailed Examination. Carefully examine your Acer keyboard for any visible signs of damage.
- Keycaps: Are any keycaps loose, damaged, or missing? Gently remove and re-seat any loose keycaps. Consider replacing any damaged keycaps.
- Spills and Debris: Look for any signs of liquid spills, dirt, or debris that may have accumulated under the keys.
3. Cleaning Ritual: The Keyboard's Cleansing. Dirt, dust, and debris can obstruct the sensitive mechanisms of a keyboard, leading to key malfunctions.
- Unplug and Power Down: Shut down your computer and disconnect the Acer keyboard from its power source (if it's a wired keyboard). If it's a laptop, turn it off completely.
- Air Blast: Use compressed air to blast away loose debris from under the keys and around the edges of the keyboard. Angle the nozzle to dislodge any trapped particles.
- Gentle Brushing: For stubborn debris, utilize a soft-bristled brush (such as a toothbrush) to gently dislodge particles.
- Isopropyl Alcohol (Optional): For sticky residue from spills, you can use a small amount of isopropyl alcohol (at least 70%) on a cotton swab, and carefully clean the affected areas. Make sure to allow the keyboard to dry completely before reassembling it.
4. Spill Recovery: Damage Control. Liquid spills are common keyboard adversaries. Quick action is essential.
- Immediate Response: Immediately unplug the keyboard (or turn off the laptop) and flip it upside down to drain any liquid.
- Disassembly (Optional/Advanced): If you're comfortable with it, carefully disassemble components of the keyboard to allow access to every part affected and ensure efficient drying.
- Thorough Drying: Allow the keyboard to dry completely for at least 24-48 hours. This ensures that all moisture evaporates. You can speed up the drying process using a fan, but avoid using heat sources (like a hairdryer), as this could potentially damage the internal components.
- Cleaning: Clean with isopropyl alcohol, using cotton swabs to remove debris.
5. Internal Examination (Advanced Users Only): Uncovering Internal Issues. If cleaning doesn't work, you can examine the internal components with caution.
- Access the Components: Carefully remove the keycaps and any screws. Then, examine the internal mechanisms, including the membrane sheet or the switches themselves (depending on your keyboard type.)
- Examine the Membrane Sheet: For membrane keyboards, look for any tears or breaks in the membrane sheet. If damaged, replacing the membrane might be necessary.
- Inspect the Switches: If the keyboard uses mechanical switches, inspect them for any damage or debris. Replacing faulty switches might be required.
6. Replacement: When to Seek New Horizons. Sometimes, the damage is irreparable or the repair is too costly and time-consuming.
- Cost-Benefit Analysis: Compare the cost of replacement components (like a new membrane sheet or switches) with the cost of a new Acer keyboard. If the repair costs are comparable to or higher than a replacement, replacing is the better option.
- Severity of Damage: If the keyboard has suffered severe damage from liquid spills, extensive physical damage, or multiple broken keys, replacement is generally recommended.
- Compatibility: Always ensure any replacements are compatible with your specific Acer laptop model or keyboard model.
Conclusion: Reclaiming Your Acer Keyboard's Functionality
By carefully following these steps, you can diagnose, troubleshoot, and potentially repair many of the issues related to your Acer keyboard. Understanding the root cause of the problem and systematically working through the solutions will greatly increase your success. Remember to exercise caution when disassembling hardware, and always prioritize your safety and computer's integrity. With a little patience and persistence, you can restore your Acer keyboard to perfect working order and continue your digital activities.
