hdmi cord not working with apple laptop
Title: Macbook Pro HDMI port not working Here's a quick fix
Channel: Levy
Macbook Pro HDMI port not working Here's a quick fix by Levy
HDMI Cord Dead? Fix Your Apple Laptop's Video NOW!
Apple Laptop's HDMI Hiccups: Get Your Video Back in Action!
So, you're staring at a blank screen when you connect your Apple laptop to your TV or monitor. The HDMI cord, that digital lifeline, seems unresponsive. Don't panic! It is frustrating, indeed. However, you are not alone. Many Apple users find themselves in this situation. Troubleshooting HDMI connectivity issues doesn't have to be a grueling ordeal. We will explore effective solutions. Therefore, let's dive into reviving your video display, shall we?
Suspect Number One: The Cable Itself
First things first: the HDMI cable. It is the most common culprit. After all, these seemingly robust connectors can be surprisingly temperamental. Examine the cable thoroughly. Are there any visible bends or kinks? Furthermore, check both ends. Ensure they are securely plugged into your laptop and display device. Try a different HDMI cable, if possible. Moreover, this simple swap can immediately pinpoint the issue. If the new cable works, congratulations! You have found the problem. If not, let's continue.
Peering into the Display Settings
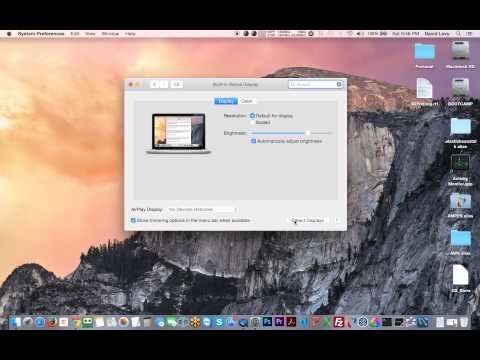
Next, let's peek into your display settings. Your Apple laptop likely thinks everything is just fine. To verify, access your System Preferences. Then, click on "Displays." Do you see your external display listed? If not, you may need to do a little detective work. Click the "Detect Displays" button. This forces your laptop to search for connected devices. Consequently, it should recognize your TV or monitor. After that, your external display will show up.
Resolution Revelation and Scaling Shenanigans
Once your external display is recognized, scrutinize the resolution settings. Sometimes, an incompatible resolution causes problems. Choose a resolution that your TV or monitor supports. Additionally, try adjusting the refresh rate. Experiment with different settings until you find the perfect combination. Also, check for any scaling options. These can sometimes interfere with proper display. Therefore, try adjusting the scaling to see if it resolves the issue.
The Power of a Restart (and Other Quick Fixes)
Have you tried the tried-and-true method: restarting? Sometimes, a simple reboot can work wonders. It's a digital reset button of sorts. So, close all applications and restart your Apple laptop. Similarly, restart your TV or monitor. Turn both devices off completely. Wait a few seconds. Then, power them back on. After that, try reconnecting the HDMI cable. In fact, this procedure often clears communication hiccups.
Digging Deeper: Software and Driver Troubles
If the basic troubleshooting steps haven't worked, dive into the software realm. Although rare, outdated drivers can occasionally cause HDMI failures. While Apple generally handles driver updates automatically, a manual check is possible. Ensure your operating system is up-to-date. Go to System Preferences, click "Software Update," and check for any available updates. Thus, updating your operating system can often resolve numerous issues, including HDMI problems.
The Secret Weapon: SMC and NVRAM Reset (Proceed with Caution!)
For more advanced users, resetting the SMC (System Management Controller) or NVRAM (Non-Volatile Random Access Memory) can be helpful. However, you must proceed very carefully. Be aware that this can affect other settings. Moreover, the process varies based on the Apple laptop model. Search online for specific instructions for your device. These resets can clear up obscure hardware conflicts. Nevertheless, this solution isn't a guaranteed fix.
External Hardware Interference: A Silent Culprit
Moreover, consider other connected hardware. Do you have a USB hub connected? Occasionally, these devices can interfere. Try disconnecting any unnecessary peripherals. Afterwards, reconnect the HDMI cable. Also, ensure your Apple laptop isn't overheating. Overheating can sometimes cause video output issues. Ensure proper ventilation.
Is the Port the Problem? A Physical Inspection
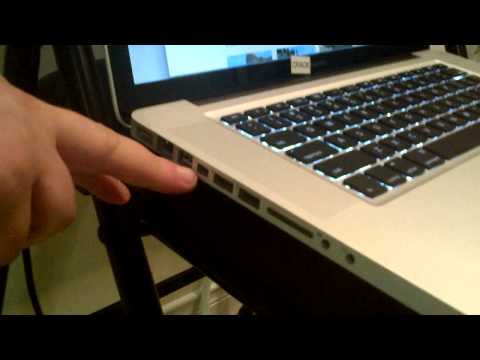
Now, let's inspect the HDMI port on your laptop. Is it damaged in any way? Look for bent pins or debris inside the port. A damaged port will require professional repair. However, sometimes a little dust or debris can be removed carefully. Use a can of compressed air to clean the port gently. Consequently, this might restore the connection.
When in Doubt: Professionals to the Rescue
If you've tried everything, and your Apple laptop's HDMI still isn't cooperating, it's time to call for professional help. Contact Apple Support or a certified Apple repair shop. They can diagnose the problem. They will offer a more complex solution. Then, a technician can assess the situation. They have the expertise to resolve hardware issues.
Conclusion: Back to the Big Screen!
In the end, HDMI problems can seem daunting. Yet, they are often easily remediable. By following the troubleshooting steps, you can quickly diagnose and fix the issue. Therefore, you will be back to enjoying your content on the big screen. Remember to be patient and methodical. Finally, you can regain your digital viewing experience.
Alienware Trackpad Dead? This FIX Will SHOCK You!HDMI Cord Dead? Fix Your Apple Laptop's Video NOW!
Hey everyone, let's be real. We've all been there. You're about to settle in for a movie night, a crucial presentation, or maybe just a massive gaming session, and…nothing. The HDMI cord, that digital lifeline between your shiny Apple laptop and your big screen, just decides to go rogue. It's like that friend who always cancels plans at the last minute – frustrating and totally inconvenient. But fear not, because we're diving headfirst into troubleshooting this tech-tantrum and getting your video back on track! We'll go through the common culprits, the sneaky fixes, and even some preventative measures to keep your connection strong. Think of this as your personal, behind-the-scenes masterclass on HDMI resuscitation for your Apple laptop.
1. The Initial Panic – Is the HDMI Cord Actually Dead?
Okay, first things first: Deep breaths. Before you start envisioning a world without your favorite shows on the big screen, let's confirm the enemy. Is it REALLY the HDMI cord that's causing the problems? Sometimes the issue is as simple as a loose connection, a forgotten setting, or even a broken TV. We'll start with the easy checks – the low-hanging fruit of tech troubleshooting. Think of it as scouting the battlefield before calling in the heavy artillery.
- Check the Connections: Unplug both ends of the HDMI cable (from your laptop and the TV/monitor) and plug them back in. Make sure they click securely. It's like making sure your shoes are properly tied before a marathon.
- Try a Different HDMI Port: Your TV or monitor likely has multiple HDMI ports. Try plugging the cord into a different one. Maybe the current port is on the fritz.
- Test the HDMI Cord: This is the most crucial step. If you have another device with an HDMI port (a game console, a Blu-ray player), try connecting that to your TV with the same HDMI cord. If it works, the cord is probably fine! If not… well, the plot thickens.
2. The Culprit: The HDMI Cord – Friend or Foe?
So, your initial checks suggest the HDMI cord might be the problem. Let's delve deeper. Think of the HDMI cord as a bridge – it's transferring video and audio from your laptop to your display. If that bridge is damaged, the traffic (your video) will simply stop. There are several reasons why your HDMI cord might be failing, including physical damage, wear and tear, and even manufacturing defects.
- Physical Damage: Look closely at both ends of the cable, especially near the connectors. Any bends, kinks, or exposed wires are red flags. Imagine the cord as a delicate vine; any damage weakens its integrity.
- Wear and Tear: Constant plugging and unplugging can eventually cause the connectors to loosen or the internal wiring to fray. Think of it like a repeatedly used door hinge that eventually loses its smoothness.
- Manufacturing Defects: Sometimes, a cord just doesn't work correctly from the start. It happens. This is like buying a car and finding out the engine is faulty right off the dealer's lot.
3. Apple Laptop HDMI Output Settings: The Silent Saboteur!
Even with a perfectly functional HDMI cord, the settings on your Apple laptop can be the digital equivalent of a locked door. Your laptop might be set to mirror the display, extend the display, or even be trying to output video to the wrong place. We need to make sure your laptop knows what it's supposed to be doing.
- Mirroring vs. Extending: Go to System Preferences (or System Settings, depending on your macOS version) > Displays. Here, you can choose to "mirror" your display (show the same thing on both screens) or "extend" it (use the TV as a second screen). Select the option that best suits your needs.
- External Display Detection: Sometimes, your laptop might not automatically detect the TV. In the Displays settings, look for a button that says "Detect Displays" (or something similar). Click it, and see if your laptop recognizes your external display.
- Resolution and Refresh Rate: In the Displays settings, you can also adjust the resolution and refresh rate. Make sure these settings are compatible with your TV or monitor. Too high, and you might see a blank screen; too low, and the image might look blurry.
4. Software Conflicts: The Digital Ghosts
Sometimes, the enemy isn't a physical cord or a misconfigured setting. Sometimes, it's a software conflict, a digital ghost in the machine causing havoc. This is more common than you might think, and it's often the most frustrating to diagnose.
- Driver Issues: While Apple generally handles display drivers well, sometimes updates or conflicts can arise. Check for any recent software updates that might have affected your display settings.
- Third-Party Software: Certain applications, like screen recording software or video editing programs, can sometimes interfere with HDMI output. Try closing these applications and see if that resolves the issue.
- Restart and Reset: The classic cure-all: a simple restart can often clear up minor software glitches. If that doesn't work, try resetting your System Management Controller (SMC). You can find instructions for resetting your SMC online; it's a relatively straightforward process.
5. Power Issues: Don't Overlook the Basics
Believe it or not, power can play a significant role in HDMI woes. A weak power supply, a faulty power outlet, or even a power surge can all disrupt the HDMI connection.
- Check the Power Supply: Make sure your laptop is properly connected to a power outlet. A low battery can sometimes affect display output, especially if your laptop's power settings are set to conserve energy.
- Test the Outlet: Try plugging your TV or monitor into a different power outlet. Sometimes, the problem isn't your laptop but the outlet itself.
- Power Surge Considerations: If you've experienced a recent power surge, it's possible that it damaged your HDMI components. Consider using a surge protector to safeguard your devices.
6. Troubleshooting Step-by-Step Guide: Your Playbook
Okay, let's get organized. Here's a simple, step-by-step guide to troubleshoot your HDMI woes:
- Check Connections: Make sure everything is plugged in securely.
- Test the HDMI Cord: Use the cord with another device to see if it works.
- Check Display Settings: Verify those settings in System Preferences/Settings.
- Restart Your Laptop: Always a good first step.
- Investigate Software Conflicts: Close any potentially interfering apps.
- Check Power: Ensure everything has sufficient power.
- Consider Professional Help: If all else fails, consult a tech expert.
7. HDMI Cord Quality: Investing in the Right Gear
Not all HDMI cords are created equal. Think about it: you wouldn't buy the cheapest tires for your Ferrari, right? The same principle applies to HDMI cords. Spending a few extra bucks on a high-quality cord can save you a lot of headaches down the road.
- Consider HDMI 2.1: If you have a newer TV and laptop, an HDMI 2.1 cable might be a good investment. It supports higher resolutions and refresh rates.
- Choose a Reputable Brand: Look for cords from well-known brands with good reviews.
- Read the Reviews: See what other people are saying about the cord before you buy it.
8. Apple's Special Considerations: Thunderbolt to the Rescue?
Apple's love for minimalism sometimes means fewer ports on their laptops. This is where adapters come in.
- Thunderbolt/USB-C to HDMI Adapters: If your Apple laptop doesn't have a full-size HDMI port, you'll need an adapter. Make sure the adapter is compatible with your laptop's Thunderbolt or USB-C port.
- Compatibility Matters: Ensure the adapter supports the resolution and refresh rate of your TV or monitor.
- Consider the Adapter's Quality: Like HDMI cords, adapter quality varies. Invest in a reliable adapter from a reputable brand.
9. The "No Signal" Headache: Decoding the Message
"No Signal" is the dreaded message everyone sees when the HDMI connection fails. But what does it really mean?
- The TV Isn't Detecting a Signal: This is the most common scenario. Check the signal source on your TV (often labeled "HDMI 1," "HDMI 2," etc.) to make sure it's set to the correct HDMI port.
- The Laptop Isn't Sending a Signal: This could be due to any of the issues we've already discussed – a faulty cord, incorrect display settings, or a software conflict.
- The TV is Broken: Okay, let's not rule it out. Try other devices with your TV to test it.
10. The Sound of Silence: Audio Troubleshooting
Video isn't the only thing that travels through the HDMI cord; audio does too. If you're seeing a picture but no sound, here's how to troubleshoot:
- Check Volume and Mute: Make sure the volume is turned up on both your laptop and your TV. Also, ensure neither device is muted.
- Audio Output Settings:
How to fix external monitorTV issues with Mac Mini, Macbook, or AppleTV

By Tallfreak's Favorite Finds How to fix external monitorTV issues with Mac Mini, Macbook, or AppleTV by Tallfreak's Favorite Finds
Which Cable Do You Need To Connect a Mac To an External Display
By macmostvideo Which Cable Do You Need To Connect a Mac To an External Display by macmostvideo
No HDMI On Mac No Problem. - Thunderbolt Mini Display Port Adapter Handy Hudsonite

By Handy Hudsonite No HDMI On Mac No Problem. - Thunderbolt Mini Display Port Adapter Handy Hudsonite by Handy Hudsonite
Title: Connect Macbook Pro with HDMI to TV
Channel: FrontSeatGamer
Connect Macbook Pro with HDMI to TV by FrontSeatGamer
Laptop Working
Let's get creating!
Title: The Ultimate Guide to Brewing the Perfect Cup of Coffee at Home
The aromatic promise of freshly brewed coffee often heralds the dawn, setting the stage for a day brimming with possibilities. But the journey from bean to cup is often shrouded in a mystique that belies its approachable nature. Brewing the perfect cup at home is not an unattainable art; it's a carefully cultivated skill that requires understanding, patience, and a touch of experimentation. This guide serves as your definitive companion, demystifying the process and equipping you with the knowledge to unlock the full potential of your coffee beans.
Choosing the Right Beans: The Foundation of Exceptional Coffee
The quality of your coffee is intrinsically tied to the quality of your beans. Think of them as the raw material: the better the foundation, the more impressive the structure. Start by prioritizing freshly roasted beans. The peak flavor profile of coffee is typically reached within one to three weeks of roasting. Look for a roasting date, not a best-by date, to ensure freshness. Consider buying from local roasters whenever you can. They often offer unique bean selections and can provide valuable insights into their origins and roasting processes.
Next, familiarize yourself with different coffee bean origins. Each region imparts unique characteristics to the beans. Ethiopian Yirgacheffe beans, for example, often boast bright citrus notes, while Sumatran beans tend to have a full body with earthy undertones. Explore different single-origin coffees to broaden your palate and discover your preferences. Blend experimentation can also unlock new flavor dimensions – consider the balance of body and acidity that a blend can provide.
Another crucial factor is the bean type: Arabica and Robusta. Arabica beans are generally favored for their complex flavor profiles, lower acidity, and higher quality. Robusta beans, on the other hand, have a higher caffeine content and a more bitter taste. They are often used in espresso blends for their ability to produce a rich crema.
Finally, bean processing methods influence the final cup. Washed coffees offer clean, bright flavors due to the removal of the fruit pulp. Natural or dry-processed coffees retain more of the fruit's sugars, resulting in a sweeter, more full-bodied profile. Honey-processed coffees, which fall somewhere in between, offer a balance of sweetness and clarity.
Essential Equipment: Your Brewing Arsenal
The right equipment transforms the act of brewing from a simple task into a rewarding experience. While elaborate setups are available, a few key pieces suffice to produce exceptional coffee.
- The Grinder: A burr grinder is indispensable. It grinds the beans evenly, extracting the full flavor potential. Blade grinders chop the beans unevenly, leading to inconsistent extraction and a bitter taste. Consider a conical burr grinder for home use, as it is a good balance of performance and cost.
- The Kettle: A gooseneck kettle provides precise control over your pour, allowing you to saturate the grounds evenly. Even heating is important, so consider an electric kettle with temperature control to dial in the perfect brewing temperature.
- The Scale: A digital scale is crucial for accurately measuring the coffee grounds and water. Precise measurements are essential for consistency and recipe replication.
- The Timer: Track your brew time. Timing brewing helps with consistent extraction.
- The Brewer: Choose a brewing method that aligns with your preference and lifestyle. Different methods extract flavors differently, creating a wide variety of flavors. A French press offers a full-bodied, rich experience. A pour-over brewing system like a Hario V60 provides a clean, bright cup. An automatic drip machine can brew consistently, but be mindful of the water temperature and brew time.
- The Filter: If using a pour-over or drip brewing method, choose a quality filter. Paper filters affect the final flavor by trapping oils and particles. Consider using unbleached paper filters. Reusable metal filters offer a certain body to the cup.
Mastering the Grind: Unlocking Flavor Through Particle Size
Grind size is the cornerstone of successful coffee brewing, playing a critical role in flavor extraction. It dictates the contact time between the water and the coffee grounds, influencing the extraction rate.
- Coarse Grind: Best for French presses and cold brew. This grind avoids over-extraction, yielding a full-bodied, less acidic cup.
- Medium Grind: Suitable for pour-over methods, drip machines, and Aeropress. It allows for a balanced extraction, with a good balance of acidity, sweetness, and body.
- Fine Grind: Ideal for espresso machines. It provides maximum surface area for extraction, leading to a concentrated, flavorful shot.
Experimenting with grind size is essential. Factors such as bean type, roast level, and brewing method influence the ideal grind. Small adjustments in grind size can significantly impact the final cup's flavor. Observe the final cup: If it tastes sour, the grind may be too coarse; if it tastes bitter, the grind might be too fine. Fine-tuning your grind will refine your brew and enhance the final cup.
The Golden Ratio: Water to Coffee
Finding the right water-to-coffee ratio is key to balance. The general guideline is a 1:15 or 1:17 ratio. Start with this as a base and adjust according to your taste preference. A coffee-to-water ratio of 1:15 means that for every gram of coffee, you will need 15 grams of water.
Use filtered water; its purity is essential for extracting the best coffee. The minerals present in the water can influence the flavor. The temperature of the water is also important. The ideal brewing temperature is typically between 195°F and 205°F (90°C and 96°C). Water that is too hot can scorch the grounds, resulting in a bitter taste. Water that is too cold will under-extract the coffee, resulting in a sour taste.
Brewing Methods: A Detailed Exploration
Each brewing method provides a distinct experience, suited to different preferences and the coffee's characteristics.
- Pour-Over (V60, Chemex): This method provides clean, bright, and nuanced cups. The process involves pouring hot water over ground coffee in a paper filter.
- Bloom: Begin by pouring a small amount of hot water over the grounds, just enough to saturate them. Let it sit for about 30 seconds to allow the grounds to degas.
- Pour: Slowly and steadily pour the remaining water in a circular motion, ensuring even saturation of the grounds.
- Brew Time: The typical brew time is 2:30 -3:30 minutes, adjusting ground size as necessary.
- French Press: The French press provides a full-bodied, rich, and often more complex flavor.
- Bloom: Preheat the French press with hot water, then discard the water. Add the ground coffee and pour in hot water, saturating all the grounds.
- Stir: Gently stir the grounds to ensure even saturation.
- Steep: Let the coffee steep for 4 minutes.
- Plunge: Slowly press the plunger down, separating the grounds from the extracted coffee.
- Aeropress: The Aeropress is a versatile and portable brewing method providing a clean and full-bodied cup.
- Bloom: Place the Aeropress on a sturdy mug, and add ground coffee.
- Pour: Add hot water and stir.
- Brew: Let the coffee steep for 1 minute.
- Plunge: Press down on the plunger for approximately 20-30 seconds, until all the water has been extracted.
- Automatic Drip Coffee Maker: This offers convenience and consistency. The best use for a drip machine includes:
- Choose a model with a heating element that maintains the water temperature.
- Preheat the machine.
- Measure the coffee to the desired coffee-to-water ratio.
- Espresso Machine: (Requires specific skills) Mastering the art of espresso extraction requires practice and precision.
- Tamping: Evenly distribute and tamp the ground coffee in the portafilter.
- Extraction: The extraction time for a double shot typically ranges from 25-30 seconds.
- Flavor: Experiment with grind size, tamping pressure, and extraction time to fine-tune your espresso.
Troubleshooting: Addressing Common Brewing Challenges
Even with careful preparation, brewing mistakes sometimes occur. Here's how to tackle common problems:
- Sour Coffee: Indicates under-extraction.
- Solution: Grind finer, increase brewing time, or increase water temperature.
- Bitter Coffee: Indicates over-extraction.
- Solution: Grind coarser, reduce brewing time, or lower water temperature.
- Weak Coffee: Can result from too little coffee, the grind being too coarse, or water temperature.
- Solution: Use more coffee, decrease the grind, or increase water temperature.
- Muddy Coffee: Often caused by fine particles getting through the filter.
- Solution: Use a finer filter, ensure the coffee is ground consistently, and consider using a metal filter.
Refining Your Technique: Continuous Improvement
Breeding perfect coffee is an ongoing process of refining the process.
- Keep a Coffee Journal: Document your brewing process, including bean origin, grind size, water temperature, brew time, and your assessment of the final taste
