asus laptop wireless not working windows 8

Title: How to Connect to WiFi on Windows 8
Channel: HOWTECH
How to Connect to WiFi on Windows 8 by HOWTECH
ASUS Laptop Wi-Fi DEAD? (Windows 8 Fix Inside!)
ASUS Laptop Wi-Fi Woes? Don't Panic! (Windows 8 Savior)
Ever stared at your ASUS laptop, yearning for the internet, only to be met by a frustratingly silent Wi-Fi icon? It happens. It's incredibly annoying, isn't it? Your digital lifeline seems to have vanished. Before you hurl your beloved device across the room, take a deep breath. Often, the solution is simpler than you think. Let's troubleshoot this connectivity crisis. We'll have you back online in no time.
The Silent Signals: Recognizing the Problem
First, acknowledge the symptoms. Is your Wi-Fi icon sporting a cross or an ominous exclamation mark? Perhaps the network list is utterly empty, offering no available connections. Maybe you're experiencing painfully slow speeds. These are all red flags. It signals something is amiss with your wireless connection. Consider it a digital emergency. Before you begin, remember that the best course of action is to take a look at the ASUS diagnostic.
Is Wi-Fi Actually Enabled? The Obvious But Necessary Check
Sometimes, the most obvious answers are hiding in plain sight. It's easy to overlook. Firstly, ensure your Wi-Fi is enabled. Many ASUS laptops have a physical switch or a function key combination. Check both. It's a good starting point. Secondly, confirm that your airplane mode is off. This is a common culprit! If the switch is off and airplane mode is disabled, move on.
Driver Dilemmas: The Root of the Connection Issue
Drivers. They're the essential software that lets your laptop talk to the hardware. Outdated, corrupted, or missing drivers can easily cripple your Wi-Fi. It's a frustrating reality. Therefore, understanding the drivers is critical. But, where do we begin?
Updating Your Network Adapter Driver: A Simple Solution
Thankfully, updating drivers is relatively straightforward. It’s a straightforward process, so it's worth a try. Follow these steps:
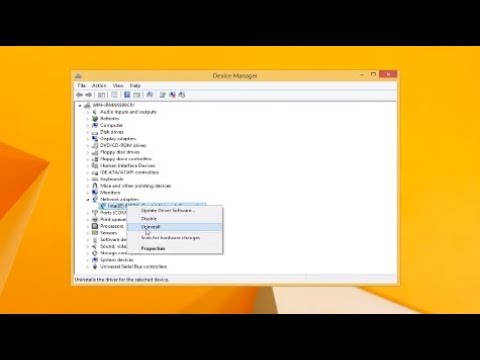
- Open Device Manager: Search for "Device Manager" in the Windows search bar. Then, open the application.
- Locate Network Adapters: Expand the "Network adapters" section. You'll see your Wi-Fi adapter listed. Likely, it will be something like "Intel Wireless-AC 9560" or something similar.
- Update Driver: Right-click on your Wi-Fi adapter. Select "Update driver."
- Automatic Search: Choose "Search automatically for drivers." Windows will search for and install the latest drivers.
- Restart: Once the update is complete, restart your laptop. Then, check the Wi-Fi connection.
If that doesn't work, try a manual update.
Manually Updating Your Driver
Sometimes, Windows can't find the correct driver. In such instances, a manual update is necessary. Here's how:
- Download Drivers: Visit the ASUS support website. Enter your laptop model. Download the latest Wi-Fi drivers from the "Support" section.
- Install Drivers: Find the downloaded driver file. Double-click to run it. Follow the on-screen instructions to install.
- Reboot: After installation, restart your laptop. Check your Wi-Fi connection.
Troubleshooting Further: Advanced Solutions
If driver updates fail, don't despair. There are other solutions. Try these advanced troubleshooting steps. Let's explore some other avenues.
Network Troubleshooter: Windows' Built-In Helper
Windows has a built-in troubleshooter. In many cases, it's surprisingly effective. Here's how to use it:
- Access Network Settings: Right-click on the Wi-Fi icon in the system tray. Choose "Troubleshoot problems."
- Follow Prompts: Windows will diagnose the issue. Follow the on-screen prompts to attempt a fix. This is an excellent initial step.
Network Reset: Restoring Default Settings
Sometimes, network settings become corrupted. A network reset can revert them to their defaults. This is another effective tactic. Be aware this resets all network settings, so you'll need to re-enter passwords.
- Open Settings: Open the Windows settings app. You can search for "Settings."
- Network & Internet: Click on "Network & Internet.”
- Network Reset: Scroll down. Select "Network reset."
- Reset Now: Click "Reset now." Windows will confirm the action.
Router Reboot: Don't Forget the Basics
Often, the problem isn't with your laptop. It could be the router acting up. Reboot your router. This is a simple fix that can often resolve connectivity issues. Unplug it from the power. Wait 30 seconds. Plug it back in. Give it a few minutes to restart.
Last Resort: System Restore (Use with Caution)
If all else fails, consider a system restore. This reverts your laptop to a previous state. It can undo recent changes that might be causing issues. Be cautious; this can erase changes since the restore point.
- Open System Restore: Search for "Create a restore point." Then, open it.
- System Restore: Click "System Restore."
- Choose a Restore Point: Select a restore point from before the Wi-Fi issue started.
- Follow Prompts: Follow the on-screen instructions to complete the restore.
The Takeaway: Persistence Pays Off
Troubleshooting Wi-Fi issues can be frustrating. However, be patient. Following these steps will help. Armed with these troubleshooting tips, you're well-equipped to conquer the Wi-Fi beast. Your ASUS laptop will be back online in no time. Remember that a little perseverance goes a long way. Keep investigating, and you'll find the solution. Ultimately, successful troubleshooting is about methodical action. Now go forth, and get back online!
Laptop Screen Too Dim? This SHOCKING Fix Works!ASUS Laptop Wi-Fi DEAD? (Windows 8 Fix Inside!)
Hey there, fellow tech travelers! Ever felt that icy dread creep up your spine when your trusty ASUS laptop suddenly throws a digital tantrum and your Wi-Fi just…vanishes? One minute you're happily browsing, streaming, or maybe even pretending to work, the next you're staring at a dead Wi-Fi signal, a modern-day ghost in the machine. We've all been there. It's like your best friend just stopped talking to you. Fear not, because if you’re rocking an ASUS laptop and possibly clinging to the Windows 8 era, you've stumbled onto the right digital porch. Today, we're diving deep into the mystery of the missing Wi-Fi – and, more importantly, how to resurrect it.
The Wi-Fi Apocalypse: Recognizing the Symptoms
Before we conjure up digital healing spells, let’s make sure we're all singing from the same hymn sheet. Is your ASUS laptop really suffering from a Wi-Fi outage? Think of it like diagnosing a sniffle before calling the doctor. Here's what to look for:
- The Dreaded "No Connections Available": This is the most obvious clue. The Wi-Fi icon in your system tray (usually down in the corner) has a little red 'X' or shows a globe with no bars. It's the digital equivalent of a shrug.
- "Limited Connectivity" or "Unidentified Network": This means your laptop sees Wi-Fi networks, but can't quite make a connection. Think of it as your laptop trying to wave hello, but the other end remains stubbornly oblivious.
- Missing Wi-Fi Option in Settings: When you go into your network settings, the Wi-Fi toggle is simply gone. Vanished. Poof! It's like your Wi-Fi card took a permanent vacation.
- Slow Browsing or Constant Disconnects: Even if you seem connected, if your browsing is slower than a snail in molasses or you’re constantly being booted off the network, something's amiss.
If any of these scenarios ring a bell, then chances are, you're dealing with a Wi-Fi crisis. Deep breath!
The Windows 8 Factor: Why This Matters
Now, the reason this article specifically targets Windows 8 users is because this operating system, let's be honest, has a few quirks of its own. It can sometimes be a bit, shall we say, temperamental when it comes to network connections. It’s a bit like a picky eater; it likes things just so! Windows 8 has unique driver implementations, network configurations, and sometimes, a tendency to hold onto old settings that interfere with new connections. This can lead to conflicts, and the result? You guessed it – Wi-Fi woes.
First Steps: The Tried-and-True Troubleshooting Checklist
Before we dig into the heavy-duty fixes, let's run through the easy stuff. Think of this as your initial triage.
- Restart Your Laptop: The classic. The perennial. The simple solution that actually works surprisingly often. Rebooting your machine can clear out temporary glitches that might be gumming up the works. It's like hitting the reset button on your brain after a long day.
- Restart Your Router and Modem: Your Wi-Fi connection goes through your router and modem. Sometimes, they are the problem. Unplug both devices for about 30 seconds, plug the modem back in first (giving it a chance to fully boot up), then the router. This is like giving your network a gentle defibrillation.
- Check the Physical Wi-Fi Switch: Believe it or not, some ASUS laptops have a physical switch to turn Wi-Fi on or off. Make sure it's in the "on" position. I swear, I’ve spent an embarrassing amount of time troubleshooting only to find this was the cause!
- Run the Windows Network Troubleshooter: Windows 8 has a built-in troubleshooter that can often detect and fix common network issues. Right-click the Wi-Fi icon in your system tray and select "Troubleshoot problems." It’s like having a digital doctor on hand.
Delving Deeper: Driver Drama and the Wi-Fi Card
If the basic troubleshooting didn’t work, we will need to dig a little deeper. Imagine your Wi-Fi card as a tiny, digital messenger. The driver is the language it speaks. If the messenger and the operating system don't speak the same language (or the messenger is misbehaving), your Wi-Fi connection falls apart.
Updating Your Wi-Fi Driver
Outdated drivers are a frequent culprit in Wi-Fi woes. Here's how to update them:
- Open Device Manager: Press the Windows key + X and select "Device Manager" (or search for it in the Start menu).
- Expand "Network adapters": Find the section and click the little arrow to expand it. You should see your Wi-Fi adapter listed (e.g., "Intel(R) Wireless-AC 9560").
- Right-click your Wi-Fi adapter, then "Update driver" and choose "Search automatically for updated driver software." Windows will search for the latest drivers online and install them. This is like giving your messenger a language lesson.
- Manually Update: If that doesn't work, consider grabbing the driver from the ASUS website of your specific laptop model. This is like teaching a messenger exactly how to deliver the message.
Reinstalling Your Wi-Fi Driver
Sometimes, a fresh start is needed. Think of it as retraining the messenger:
- Open Device Manager (same as above).
- Right-click your Wi-Fi adapter and select "Uninstall device."
- Restart your laptop. Windows should automatically reinstall the driver, hopefully fixing the problem.
Network Reset: A Nuclear Option (But Sometimes Necessary)
If drivers aren't the issue, we may need to reset your entire network configuration. This will wipe the slate clean, and is a bit extreme, but can be very effective.
- Open Settings: Open the Start menu and click on the Settings icon (the gear symbol).
- Go to "Network & Internet."
- Click on "Network reset."
- Click "Reset now." This will reset all your network settings back to default.
- Restart your laptop. Reconnect to your Wi-Fi and re-enter any saved passwords.
Be warned, you'll lose any custom network configurations! But this is like a deep clean of your entire network setup.
Advanced Tweaks: Playing with Network Settings
Sometimes, the problem lies in specific network settings. These tweaks can often fix conflicts.
Changing the Wireless Mode
You might need to change the wireless mode of your Wi-Fi adapter:
- Go to Device Manager (see above).
- Right-click your Wi-Fi adapter, and select "Properties."
- Go to the "Advanced" tab.
- Look for a setting like "Wireless Mode" or "802.11n/ac mode."
- Experiment with different modes. Try setting it to 802.11g, 802.11n, or a mixed mode. Save the configuration and test your Wi-Fi connection. This is like adjusting the volume on a communication channel.
Power Management Settings
Windows has the power to reduce power consumption of your Wi-Fi adapter. This can sometimes backfire:
- Go to Device Manager, find your Wi-Fi adapter, and go to the "Properties" dialog.
- Go to the "Power Management" tab.
- Uncheck the box: "Allow the computer to turn off this device to save power."
- Click "OK" and restart your laptop.
Bypassing the Browser: Testing the Connection
It is useful to test if the problem is with the browser itself or a deeper network issue. Try these:
- Ping Test: Open Command Prompt (type "cmd" in the search bar). Type
ping google.comand press Enter. If you see replies, your laptop can reach the internet, even if a browser isn't working. This suggests the browser is the key issue. - Try a Different Browser: Try a browser you don't normally use. If the Wi-Fi works there, the problem might be with your default browser, which can be resolved by clearing the cache, the history, and restarting.
The ASUS Support Option: When To Call in the Cavalry
If all else fails, don’t despair. It's time to lean on the experts. ASUS support is a valuable resource. If you’ve tried all of the steps above and are still experiencing Wi-Fi trouble, don't hesitate to reach out to ASUS support. They have access to more advanced diagnostic tools to narrow down if it is hardware or software, and provide tailored solutions for your specific model.
Prevention is key: Maintaining a Healthy Network
Once you have your Wi-Fi working, adopt some proactive measures to keep it that way:
- Keep Your Drivers Updated: Regularly update your Wi-Fi drivers (
Fix Asus Wi-Fi Not Working in Windows 1087 2025

By TechFixIT Fix Asus Wi-Fi Not Working in Windows 1087 2025 by TechFixIT
Windows 8 - How to Enable Bluetooth
By Acer Support Windows 8 - How to Enable Bluetooth by Acer Support
Wifi option not showing on window 8 Easy Fix 100 Working

By Vishal Wifi option not showing on window 8 Easy Fix 100 Working by Vishal
Title: Windows 8.1 - No Internet Connection Available
Channel: MDTechVideos
Windows 8.1 - No Internet Connection Available by MDTechVideos
Change Wifi Settings
Here's the title: The Ultimate Guide to Choosing the Perfect Espresso Machine for Your Home
The Ultimate Guide to Choosing the Perfect Espresso Machine for Your Home
The aroma, the ritual, the invigorating jolt – crafting the perfect espresso at home is a pursuit embraced worldwide. But the journey from coffee bean to that first, exquisite sip begins with a single, crucial decision: selecting the right espresso machine. This comprehensive guide, meticulously crafted for the discerning coffee aficionado, will empower you to navigate the often-confusing landscape of espresso machines, ensuring your investment yields years of rich, flavorful, and deeply satisfying espressos. We will explore the nuances of each type, delve into crucial features, and equip you with the knowledge to make an informed choice aligned with your individual needs and preferences. Prepare to elevate your home coffee experience beyond expectation.
Understanding the Espresso Machine Spectrum: A Comprehensive Overview
The world of espresso machines is diverse, encompassing a range of technologies and price points. Understanding the fundamental classifications is the first step towards finding the ideal match for your kitchen and your coffee aspirations.
Manual Lever Machines: The Art of Control
For the dedicated espresso purist, the manual lever machine represents the pinnacle of hands-on control. These machines, renowned for their simplicity and reliance on human input, require the user to manually pull a lever to generate the pressure necessary for extraction. This direct involvement allows for unparalleled precision in controlling pre-infusion, extraction time, and pressure, resulting in exceptionally nuanced and flavorful espresso. These machines demand a learning curve, requiring practice and experimentation to master the art of lever-pulling. However, the rewards are immense: a deep connection with the coffee-making process and the ability to tailor each shot perfectly to your specific taste. While requiring a greater time investment, the results are often exceptional.
Semi-Automatic Machines: The Classic Choice
Semi-automatic espresso machines represent the workhorse of home espresso brewing. They streamline the process while still providing significant control. The user manually starts and stops the extraction process, giving them command over shot length and, therefore, the strength and flavor profile of the espresso. These machines generally feature a pump that delivers the necessary pressure, eliminating the need for manual labor. Many semi-automatic models incorporate a built-in PID (Proportional-Integral-Derivative) controller, allowing for precise temperature regulation. Semi-automatics are often less expensive than fully automatic models, making them an attractive option for both beginners and experienced baristas seeking a balance between performance and affordability.
Automatic Machines: Convenience Redefined
Automatic espresso machines automate much of the brewing process, making them a suitable choice for those who prioritize convenience. These machines utilize a built-in volumetric system to automatically dispense a pre-programmed amount of water, ensuring consistent shot volumes. They typically offer multiple programmable settings, allowing you to customize shot sizes and other parameters with the touch of a button. Automatic machines often integrate features like automatic milk frothing, further simplifying the preparation of lattes and cappuccinos. However, the trade-off for convenience is often a reduction in control and a higher price point compared to semi-automatic models.
Super-Automatic Machines: The All-in-One Solution
The apex of espresso machine automation is the super-automatic machine. These machines are designed to handle every aspect of the espresso-making process, from grinding the beans to frothing the milk, at the touch of a button. Integrated grinders, automatic tamping mechanisms, and milk frothing wands or carafes are standard features. Super-automatic machines are ideal for individuals and families who want the convenience of espresso at home without the complexities of manual operation. While incredibly convenient, they often come with a higher price and may not deliver the same level of quality as manual or semi-automatic machines due to the inherent limitations of automation.
Pod/Capsule Espresso Machines: The Simplified Approach
Pod or capsule espresso machines offer the utmost simplicity in espresso preparation. These machines utilize pre-packaged coffee pods or capsules, eliminating the need for grinding, tamping, or measuring. Simply insert the pod, press a button, and the machine delivers a pre-measured shot of espresso. Pod machines are incredibly easy to use, making them an excellent choice for those new to espresso or those seeking a quick and convenient option. However, the quality of the espresso produced is generally lower than that of other machine types due to the limitations of pre-packaged coffee. The cost per serving tends to be higher as well.
Key Features to Consider: Navigating the Technical Landscape
Beyond the primary machine type, several features significantly impact the quality of your espresso and the overall brewing experience. Understanding these features is critical to making an informed decision.
The Boiler System: Heat is Key
The heart of any espresso machine is the boiler system, which heats the water to the precise temperature required for optimal extraction. There are several boiler system types:
Single Boiler: These machines use a single boiler for both brewing and steaming milk. While typically more affordable, they often require a short wait time between brewing and steaming, as the boiler needs time to adjust to the different temperature requirements.
Dual Boiler: Dual boiler machines feature a separate boiler for brewing and steaming. This allows you to brew espresso and steam milk simultaneously, eliminating wait times and enhancing efficiency. Dual boilers are a hallmark of higher-end machines and are highly valued by experienced users.
Heat Exchanger (HX): Heat exchanger machines use a single boiler but incorporate a heat exchanger to quickly heat the water for brewing. This allows for simultaneous brewing and steaming, similar to dual boiler systems. HX machines offer a good balance of performance and cost.
Thermoblock: Thermoblock systems heat water on demand using a heated metal block. These systems heat up quickly but may not offer the same temperature stability as boiler-based systems.
The Pump: Generating the Pressure
Espresso extraction requires a consistent pressure of approximately 9 bars (130 psi). The pump is responsible for generating this pressure.
Vibration Pumps: Vibration pumps are the most common and cost-effective type. They produce a characteristic buzzing sound during operation.
Rotary Vane Pumps: Rotary vane pumps are quieter and more durable than vibration pumps. They are often found in higher-end machines.
The Portafilter: Your Gateway to Espresso
The portafilter is the handle used to hold the coffee grounds during extraction.
Pressurized Portafilters: Pressurized portafilters are designed to create artificial pressure, which can compensate for inconsistencies in grinding or tamping. They are often included on entry-level machines.
Non-Pressurized Portafilters: Non-pressurized portafilters allow you to see the extraction process, allowing for precise control and a deeper understanding of the espresso-making process. They require a good quality grinder and proper technique for optimal results.
The Grinder: Freshly Ground is Best
Freshly ground coffee is essential for achieving optimal espresso flavor. Many espresso machines include built-in grinders.
Burr Grinders: Burr grinders use two revolving abrasive surfaces to crush the coffee beans, producing a more consistent grind size compared to blade grinders. Burr grinders are the preferred choice for espresso.
Blade Grinders: Blade grinders use spinning blades to chop the coffee beans. They are generally less consistent than burr grinders and not ideal for espresso.
PID Temperature Control: Precision for Perfection
PID (Proportional-Integral-Derivative) controllers allow for precise temperature control, which significantly impacts the extraction process and the resulting flavor of the espresso. Machines with PID controllers allow users to fine-tune the brewing temperature, leading to a more consistent and flavorful espresso experience.
Milk Frothing Capabilities: Elevating Your Creations
If you enjoy milk-based espresso drinks like lattes and cappuccinos, consider the milk frothing capabilities of the machine.
Manual Steam Wands: Manual steam wands allow for the greatest control over milk frothing, enabling you to create textured milk with varying degrees of microfoam.
Automatic Milk Frothers: Automatic milk frothers simplify the milk frothing process, making it easier to prepare milk-based drinks.
Water Reservoir and Capacity: Convenience and Capacity
Consider the size of the water reservoir and its ease of access. A larger reservoir means less frequent refilling.
Making the Right Choice: Matching Machine to Your Needs
The ideal espresso machine is the one that best aligns with your individual needs, preferences, and budget. Ask yourself the following questions to guide your decision:
- How much coffee do you drink daily? The frequency of your espresso consumption will impact the features and durability you require.
- What is your budget? Espresso machines range in price from a few hundred dollars to several thousand.
- How much control do you desire? Do you prefer a hands-on approach or a more automated experience?
- What types of drinks do you enjoy? Do you primarily drink espresso, or do you prefer milk-based beverages?
- How much space do you have? Consider the size and footprint of the machine.
Maintenance and Care: Ensuring Longevity and Performance
Proper maintenance is crucial for ensuring your espresso machine's longevity and maintaining optimal performance.
- Regular Cleaning: Clean the machine regularly, including the portafilter, drip tray, and exterior surfaces.
- Backflushing: Backflushing removes coffee oils and residue from the group head. Perform this regularly, following the manufacturer's instructions.
- Descaling: Descaling removes mineral buildup from the boiler and other components
