can stylus work on any laptop

Title: how to use stylus pen on laptop touchpad stylus pen kaise use kare stylish pen for laptop
Channel: TechGuru Narendra
how to use stylus pen on laptop touchpad stylus pen kaise use kare stylish pen for laptop by TechGuru Narendra
can stylus work on any laptop, does hp pen work on any laptop, can any stylus work on hp laptop, does stylus work on laptop touchpad, can i use stylus on any laptop
Can This Tiny Device Make YOUR Laptop AMAZING? (Stylus Compatibility SHOCKER!)
Unlocking Laptop Potential: The Unexpected Power of a Little Device
Ever feel like you’re not quite getting the most out of your laptop? It's a common feeling. You might even think you’re missing out on some hidden potential. Well, hold onto your hats, because a small device could be the key. Believe it or not, it could dramatically change your laptop experience. This article will reveal how.
Beyond the Ordinary: Discovering Hidden Laptop Capabilities
We all know our laptops can do a lot. We use them for work, play, and everything in between. But is there something more? Absolutely. It turns out, we are often overlooking some amazing features. The focus is often on the core functions. However, a simple addition can unlock a world of possibilities. Think drawing, note-taking, and seamless navigation.
The Shocking Truth: Stylus Compatibility Secrets Revealed!
Here’s the real kicker. Many laptops have a secret they're not telling you. They might be compatible with a stylus, even if you don’t realize it. Seriously. Most people never even consider this. This is especially true if your laptop isn't specifically marketed as a "2-in-1" device. So, how can you find out?
Unveiling Hidden Potential: Testing for Stylus Support
First, do some research. Check your laptop’s specifications online. Search its model number, and look for "stylus compatibility." Secondly, try it. Do you have a stylus lying around? Perhaps borrow one from a friend. Test it out on your laptop's screen. Try writing or drawing. If it works, fantastic! If not, don't give up.
The Benefits are Real: Elevate Your Productivity
Having a stylus can actually boost your productivity. Think about taking notes during meetings. Imagine sketching out ideas on the go. It can transform your workflow. Furthermore, a stylus offers enhanced precision. This is especially helpful for creative tasks, such as photo editing. You can achieve greater accuracy with a pen than a mouse.
Navigating the Options: Choosing the Right Stylus
Now, let’s discuss stylus selection. You have several choices available. There are active styluses and passive ones. Passive styluses are simple and affordable. They function much like a finger. Active styluses offer more features. These include pressure sensitivity. The perfect stylus depends on your needs.
Active Styluses: Unlocking Advanced Features
Active styluses are more sophisticated. They often connect to your laptop via Bluetooth. They also provide enhanced functionality. Many models offer advanced features. For instance, pressure sensitivity allows for variable line thickness. This makes them ideal for artists and designers. Consider your specific requirements for the best fit.
Passive Styluses: Simplicity and Affordability
On the other hand, passive styluses are more basic. They don't require batteries or pairing. They are typically more affordable too. These are a great starting point. They offer an easy way to interact with your screen. They’re perfect for simple tasks.
Software and Setup: Getting Started with Your Stylus
Once you have your stylus, the next step is setup. You'll typically need to install drivers. Check online for your laptop model. This will ensure full stylus functionality. Many laptops already have the necessary software pre-installed. Explore your laptop's settings. It will often have pen and touch settings.
Beyond the Basics: Creative Applications
The possibilities extend far beyond note-taking. Consider using your stylus for drawing. Or, perhaps, even digital painting. You can use it for photo editing. Get creative with applications. Many apps are specifically designed for stylus interaction. You can even use them for making annotations!
Boosting Your Efficiency: Workflow Optimization
A stylus can streamline your workflow. Try using it for document signing. Make quick edits directly on the screen. This is a very great way to save time. These simple changes can drastically improve efficiency. You'll soon wonder how you ever lived without it.
Troubleshooting Common Issues: Making it Work Perfectly
Encountering issues? First, double-check your stylus's compatibility. Ensure it’s paired correctly. Sometimes, the battery might be dead. Restarting your laptop can help too. Also, update your drivers often. This helps resolve any performance problems.
The Big Reveal: Is it Truly AMAZING?
So, can a tiny device make your laptop amazing? The answer is a resounding yes. A stylus enhances productivity. It unlocks hidden potential. It opens up a whole new world of possibilities. Indeed, it transforms your laptop experience.
Final Thoughts: Embracing the Future of Laptop Interaction
Consider giving this little device a chance. It’s a small investment with big rewards. Explore the world of stylus technology. It’s a gateway to a more efficient and creative workflow. So, what are you waiting for? Begin exploring today!
Laptop Transcription Jobs: Work From Home & Earn BIG!Here's a shot at crafting a compelling and optimized blog post about styluses and laptop compatibility:
Can This Tiny Device Make YOUR Laptop AMAZING? (Stylus Compatibility SHOCKER!)
We've all been there, staring at our laptops, wishing for a more intuitive way to interact with the digital world. Clicking a mouse is fine, but sometimes you crave that direct, tactile connection. That's where the humble stylus comes in. But can this tiny pen-like device really transform your laptop experience? Buckle up, because the answer is a resounding… maybe! And the "maybe" is where things get really interesting, especially when we delve into the shocking world of compatibility.
1. Ditching the Mouse: Why a Stylus Could Be Your Digital Best Friend
Let's be honest, the mouse, while a trusty companion, can feel a bit…clunky. Imagine sketching, taking notes, or even just navigating intricate design software with the precision of a pen. That’s the promise a stylus holds. It's like trading in your trusty, but somewhat slow, bicycle for a sleek, responsive sports car. Think about the creative possibilities: digital painting that feels natural, handwritten notes that are instantly searchable, and precise photo editing that wouldn’t be possible with a mouse alone. If you're a creative professional, a student, or just someone who likes to tinker, a stylus can be a game-changer. It’s like adding a superpower to your laptop.
2. The Compatibility Conundrum: Not All Laptops Play Nice
Here’s the rub: not every laptop is stylus-friendly. This is where the shocker part comes in. Just because you want a stylus to work with your laptop doesn't mean it will. It's like trying to fit a square peg into a round hole. The primary culprit? The underlying technology. Some laptops are designed with active digitizers (like Wacom EMR or MPP), meaning they're specifically built to work with a stylus that communicates with the screen. Others rely on capacitive touchscreens, which are more common but often only work with basic styluses (think rubber-tipped pens) or with specifically designed capacitive pens.
3. Active vs. Passive: Decoding the Stylus Alphabet Soup
We need to understand two main types of styluses. It's like the difference between a walkie-talkie and a telephone, one's simple, the other's sophisticated.
Active Styluses: These are the powerhouses, packed with features and generally offering a more premium experience. They often have:
- Pressure sensitivity, allowing for varied line thickness and shading, just like a real pen.
- Tilt recognition, which mimics the angle of your pen for more natural drawing.
- Palm rejection, so you can rest your hand on the screen without accidentally making marks.
- Bluetooth connectivity for features like button shortcuts and pairing with the laptop.
- This kind of stylus usually requires a matching laptop with an active digitizer built-in.
Passive Styluses: These are the simpler, more affordable option. They're basically fancy sticks that act like your finger.
- They rely on the capacitive touchscreen of your laptop.
- They generally don't offer pressure sensitivity or advanced features.
- They're a good option if you just want basic note-taking or navigation.
- However, are often less precise and have a noticeable lag.
4. Finding Your Match: Checking Your Laptop's Specs
So, how do you know if your laptop and stylus are a match made in digital heaven? The answer lies in your laptop's specifications. Think of it like dating apps: you need to check the profile to see if there’s a potential connection. Here’s how:
- Check the Manufacturer's Website or Manual: This is the best place to find official information about your laptop's touchscreen capabilities and whether it supports any specific stylus technologies. Look for terms like like MPP (Microsoft Pen Protocol), Wacom, or "stylus support."
- Look at the Product Page: If you're still in the shopping phase for a stylus, check the product page for your laptop.
- Search Online: There are also plenty of online resources where you can search for your laptop model and find compatibility details.
5. The Right Tool For The Job: Choosing Your Stylus
Once you know your laptop’s capabilities, the fun begins: choosing the right stylus.
- Consider Your Needs: Are you a digital artist, a note-taker, or just looking for enhanced navigation? This will influence the features you need.
- Budget: Stylus prices can range from budget-friendly to premium. Set a budget to narrow down your options.
- Features: As mentioned above, think about whether you need pressure sensitivity, tilt recognition, and other advanced features.
- Ergonomics: A stylus should feel comfortable in your hand. Consider the weight, grip, and overall design.
6. Stylus Features That Will Blow Your Mind!
Beyond the basics, modern styluses are packed with features.
- Customizable Buttons: Many styluses come with buttons that let you quickly access things.
- Tilt Sensitivity: This feature allows for a more natural drawing experience.
- Pressure Sensitivity: This will enable you to have different line weights.
- Palm Rejection: Write and sketch without annoying accidental marks.
7. Note-Taking Nirvana: Transforming Your Laptop Into a Digital Notebook
Imagine ditching paper notebooks and organizing your notes digitally, all accessible on your laptop. A stylus makes this a reality.
- Apps Like OneNote or Evernote: These applications are great for both note-taking and handwriting.
- Annotation: No more printing out pages! You can annotate documents and PDFs directly on your laptop.
8. Art Attack: Unleashing Your Inner Artist
For creatives, a stylus unlocks a whole new world of possibilities. Digital art becomes more intuitive.
- Digital Painting and Illustration: Create stunning artwork on your laptop with drawing and painting software.
- Photo Editing: Precisely edit photos with a stylus which makes it easier to get those intricate edits.
9. Beyond Productivity: Fun and Games With a Stylus
It's not all work and no play, the stylus can also be used for fun.
- Playing Games: Some games support stylus input, providing a new level of interaction.
- Creative Expression: Digital art, doodling, and sketching can be a fun way to relax and unwind.
10. The "Almost" Universal Solution: Capacitive Styluses
These are like the "universal remote" of the stylus world, compatible with most touchscreens.
- Simplicity: They're easy to use; there's no pairing.
- Limitations: They lack the advanced features of active styluses.
11. Software Support: The Apps That Make Your Stylus Shine
The best stylus in the world is useless without the right software.
- Drawing and Painting Apps: Procreate, Adobe Fresco, and Clip Studio Paint
- Note-Taking Apps: OneNote, Evernote, and GoodNotes.
- Other Productivity Apps: PDF editors, design software.
12. Bluetooth Pairing: Unlocking Extra Features
Many active styluses connect to your laptop via Bluetooth.
- Customizable Button Functions: Set up shortcuts for those actions you perform the most like deleting a word.
- Latency: Pay attention to any lag issues.
13. Battery Life and Charging: Powering Your Digital Pen
Keep your stylus juiced and ready to go.
- Battery Life: Consider the battery life of the stylus, especially if you plan on long creative sessions.
- Charging Methods: Some styluses use batteries, while others charge via USB-C.
14. Troubleshooting Common Stylus Issues
Things don't always go smoothly.
- Lag: Is your stylus slow to respond?
- Calibration: Is the stylus accurately aligned?
- Compatibility Issues: Go back to the specs.
15. The Future is Now: Advancements in Stylus Technology
The stylus is constantly improving.
- Haptic Feedback: Feel the pen on the screen.
- More Precise Tracking, Tilt, and Pressure Sensitivity: Improvements are ongoing.
- Better Software Integration: Expect even better app compatibility in the future.
Final Thoughts: Is the Stylus Right For You?
So, can a tiny device transform your laptop? Absolutely, if you have the right laptop and the right stylus. The key is understanding compatibility, considering your needs, and choosing a stylus that fits your creative style. It’s like choosing the right paintbrush for a painting – it can make all the difference! We encourage you to see if a stylus is right for you and if your laptop is ready for the ultimate upgrade!
FAQs
1. My laptop doesn't seem to support a stylus. Are there any workarounds?
Yes, there are a couple of workarounds. Firstly, a USB graphics tablet can be attached to your laptop. Secondly, some laptops can be used with a passive stylus.
2. What's the difference between palm rejection and tilt recognition?
Palm rejection prevents your hand from accidentally making marks
HDMI Disaster! Fix Your Laptop's Dead Connection NOW!Different Types of Touchscreens & Stylus' Explained

By URTechDotCa Different Types of Touchscreens & Stylus' Explained by URTechDotCa
3 digital pens for Chromebooks great for teachers & students
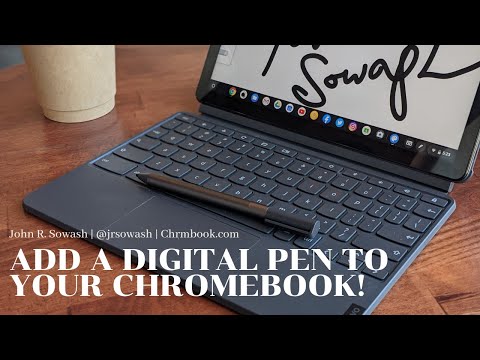
By John R. Sowash 3 digital pens for Chromebooks great for teachers & students by John R. Sowash
How Does the S Pen Work - Galaxy Note 7
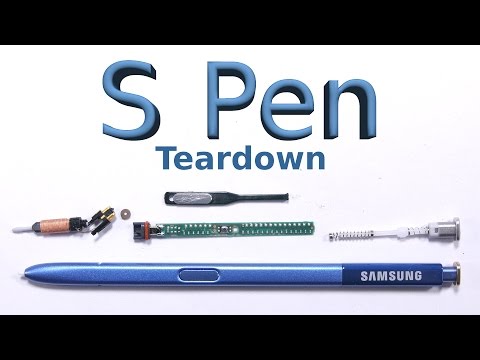
By JerryRigEverything How Does the S Pen Work - Galaxy Note 7 by JerryRigEverything
Title: How To Make Any Laptop Touch Screen
Channel: Unbox Therapy
How To Make Any Laptop Touch Screen by Unbox Therapy
My Laptop Work
Here is the title of the article: The Ultimate Guide to Brewing the Perfect Cold Brew Coffee
The Ultimate Guide to Brewing the Perfect Cold Brew Coffee
For those who appreciate the nuanced flavors and sustained energy a superior coffee experience provides, cold brew has emerged as a cornerstone. This article serves as your comprehensive guide, meticulously detailing the steps and considerations necessary to craft cold brew that consistently surpasses expectations. We'll navigate the essentials, from selecting the ideal beans to the crucial brewing period and the final, fulfilling sip. Prepare to elevate your morning routine and discover the art of truly exceptional cold brew coffee.
Selecting the Supreme Source: The Importance of Coffee Bean Choice
The foundation of any remarkable cold brew lies in the quality of the coffee beans. While personal preferences vary, some crucial factors will significantly impact the final product. Avoid stale beans at all costs; opt for freshly roasted beans within a week or two of the roasting date. The roasting process heavily influences the flavor profile, and the fresher the bean, the more vibrant and complex the flavors will be.
Consider the origin of the beans. Single-origin coffees, sourced from a specific region, often offer distinct flavor profiles, showcasing the unique characteristics of the terroir – the environmental factors that influence the bean's taste. Ethiopian Yirgacheffe beans, for example, are celebrated for their bright acidity and floral notes, creating a lighter, more refreshing cold brew. Conversely, Sumatran beans tend to be bolder and earthier, producing a cold brew with a heavier body and a deeper, richer flavor.
A well-balanced blend can also deliver exceptional results. Blends are carefully crafted combinations of beans from different origins, designed to balance the flavor notes. Experimentation is key; the ideal blend will depend on your personal preferences. Seek out roasters known for their expertise in blending, and don't hesitate to ask for recommendations based on your desired flavor profile (chocolatey, fruity, nutty, etc.).
The grind is another critical consideration. For cold brew, a coarse grind is essential. The water’s slow steeping time necessitates a coarser grind to prevent over-extraction and bitterness. A grind too fine will result in a muddy, over-extracted brew. Aim for a consistency similar to coarse sea salt. Most coffee grinders will have a setting specifically designed for cold brew.
Essential Equipment: Gathering Your Cold Brew Arsenal
Brewing the perfect cold brew requires minimal yet essential equipment. Fortunately, this specialty coffee doesn't demand elaborate setups.
- A Large Container: A glass jar or pitcher with a wide mouth is ideal. The size should accommodate your desired batch size, typically a quart or half-gallon. Ensure the container is thoroughly cleaned before each use. Consider a container with a built-in filter, or a dedicated cold brew maker.
- A Filter: There are several options:
- Cheesecloth: An economical and readily available option. Fold several layers of cheesecloth to create a robust filter.
- Reusable Coffee Filters: These are typically made of stainless steel or nylon mesh. They are environmentally friendly and durable.
- Cold Brew Specific Filters: Designed to fit your specific brewing container, these often include a mesh bag suspended within the container.
- A Scale: A kitchen scale is invaluable for accurately measuring coffee beans. Consistency in the coffee-to-water ratio is paramount for consistently delicious results.
- Filtered Water: The quality of your water directly impacts the taste of your cold brew. Use filtered water to eliminate impurities and unwanted flavors.
- A Grinder (Optional, but Recommended): If you purchase whole bean coffee, a burr grinder is essential for a consistent and uniform grind. Blade grinders work, but a burr grinder offers superior control and a more even result.
- Something to Stir With: A spoon or whisk will be used to agitate the coffee grounds and water mixture.
The Precise Process: Mastering the Cold Brew Technique
With your equipment assembled, the process is straightforward, yet precision is key to extracting the richest flavor.
- Measure the Coffee: A standard ratio is 1:4, meaning one part coffee to four parts water, by weight. For example, use 100 grams of coffee beans and 400 grams of water. Adjust this ratio to your taste preference. Some people prefer a more concentrated brew, using less water, and others like a lighter brew, using more water.
- Grind the Beans: Grind your beans to a coarse consistency, as described above.
- Combine Coffee and Water: Place the ground coffee in your chosen brewing container. Slowly pour the filtered water over the grounds, ensuring that all the grounds are fully saturated. Thoroughly stir the mixture to eliminate any clumps.
- The Steep Time: This is the heart of the process. Cover your container and let it steep in the refrigerator. Anywhere from 12 to 24 hours. The duration of the steep time influences the strength and flavor profile of the cold brew. Experiment to determine your optimal steeping time. A shorter steep (12 hours) will yield a slightly less intense brew, while a longer steep (24 hours) will create a bolder, richer flavor.
- Filter the Coffee: Once the steeping period is complete, carefully strain the coffee through your chosen filter. If using a cheesecloth, line a separate container with several layers and slowly pour the coffee mixture through. If using a reusable filter, simply lift the filter out of the container. Be patient during the filtering process; forcing the solution through the filter can lead to a cloudy brew.
- Dilute (Optional): Your cold brew concentrate is now finished. It's incredibly intense. Most coffee drinkers dilute cold brew with water or milk to reach their desired strength. Add water or milk to taste.
- Storage: Store the cold brew concentrate in an airtight container in the refrigerator. Properly stored, it will last for up to two weeks, though for the best flavor, consume it within a week.
Fine-Tuning Your Brew: Flavor Enhancements and Adjustments
While the basic recipe is simple, several factors can be adjusted to refine your cold brew and tailor it to your preferences.
- Coffee-to-Water Ratio: As mentioned previously, this ratio is a key factor in determining the brew's strength. Experiment with varying ratios to create a brew that aligns with your taste. If you prefer a stronger coffee, increase the amount of coffee beans used. Consider using a ratio of 1:3 (coffee to water by weight) or even a 1:2 for an intense concentrate. For a less intense brew, use more water or dilute the concentrate further after brewing.
- Steep Time: Adjusting the steeping time is the most effective way to fine-tune the flavor profile. A shorter steep (12-16 hours) will yield a less bitter and less concentrated brew, suitable for users who prefer a lighter flavor. A longer steep (20-24 hours) creates a more robust and flavorful concentrate. Be mindful that steeping for longer periods can introduce bitterness, so taste and adjust accordingly.
- Water Temperature: While cold brew is made with cold water, the water temperature can influence the extraction. Some brewers will gently warm the water before pouring it over the grounds; however, most will use water straight from the tap. Experiment to see what works for you.
- Bean Type: As discussed earlier, the type of bean will have a significant impact on the flavor. Experiment with different origins and blends to discover your favourite flavors.
- Adding Flavors: The beauty of cold brew lies in its versatility allowing for some creative experimentation. Consider infusing the cold brew with spices, such as cinnamon sticks or cardamom pods, during the steeping process. Or, during the brew, incorporate citrus peels such as orange or lemon to provide a hint of zest. Once brewed, add sweeteners, such as simple syrup or honey, to your taste.
Serving Your Cold Brew: Presentation and Pairing
The final stage of creating exceptional cold brew involves presentation and pairing. There are seemingly endless serving options.
- The Basic Cold Brew: Serve your diluted cold brew over ice. Use high-quality ice made from filtered water to avoid diluting the flavor.
- Cold Brew with Milk or Cream: Add milk or cream to the cold brew to create a creamy texture. Use dairy or non-dairy alternatives, such as oat milk, almond milk, or soy milk.
- Flavored Cold Brew: Add syrups, such as vanilla or caramel, to enhance the flavor. Experiment with different flavors to create your own signature cold brew recipes.
- Cold Brew Cocktails: Cold brew makes an excellent base for cocktails. Mix the cold brew with spirits, such as vodka, rum, or bourbon, and add mixers, such as coffee liqueur, or simple syrup.
- Pairing: Cold brew pairs perfectly with various foods. The subtle sweetness and low acidity complement pastries, breakfast items, and desserts. Try pairing your cold brew with chocolate, fruits, or pastries such as croissants.
Troubleshooting and Troubleshooting Tips: Common Cold Brew Challenges
Even with the best practices in place, occasional issues may arise. Here's how to address the most common cold brew challenges.
- Cloudy Brew: Cloudiness often results from using a filter that's not fine enough, or by accidentally agitating the grounds during the filtering process. Filter the coffee slowly and carefully. Multiple filtrations may be required using finer filters.
- Bitter Taste: Bitterness stems from a combination of factors, but is most typically related to
