keys stop working on laptop

Title: SOLUTION Some Keys Not Working on Laptop Keyboard
Channel: Tech Express
SOLUTION Some Keys Not Working on Laptop Keyboard by Tech Express
keys stop working on laptop, keys not working on laptop lenovo, keys not working on laptop hp, keys not working on laptop after spill, keys not working on laptop dell, keys not working on laptop mac, keys not working on laptop reddit, keys not working on laptop asus, keys not working on laptop windows, keys randomly stop working on laptop
Laptop Keys DEAD? This SHOCKING Trick Will FIX Them!
Revive Your Dead Laptop Keys: The Unexpected Fix You NEED to Know!
Have you ever stared in disbelief at a keyboard where some keys refuse to cooperate? It's frustrating, infuriating, and frankly, a productivity killer. But before you resign yourself to an expensive repair or a brand-new laptop, consider this: you might be able to fix the problem yourself. The solution is surprisingly simple, often overlooked, and could save you a significant amount of money and time.
The Silent Saboteurs: Dust, Debris, and the Occasional Crumbs
Firstly, understand the enemy. Laptop keys, despite their seemingly robust nature, are vulnerable. The primary culprits behind key malfunctions are usually commonplace: dust, debris, and the occasional rogue crumb. These invaders sneak their way under the keys. Consequently, they disrupt the delicate mechanisms responsible for registering your every keystroke. The consequence? Keys that stick, keys that don't register, and a general feeling of technological woe.
Unveiling the Secret Weapon: Compressed Air and Prevention
So, how do we combat these silent saboteurs? The answer, in many cases, is surprisingly simple. You'll need a can of compressed air. This is readily available at most electronics stores or online retailers. Before we start, though, let’s be prepared. Power down your laptop completely. Then, unplug it from any power source. This is an important safety precaution.
Secondly, angle the nozzle of the compressed air can at a 45-degree angle. Now, direct short bursts of air under each malfunctioning key. Don't hold the can too close. Moreover, avoid spraying excessively. Instead, focus on careful and controlled bursts to dislodge any obstructing particles. Besides, consider the keyboard's layout. Concentrate on areas with known issues. For instance, keys frequently used - like letters, spacebar, and Enter - are prime targets.
Then, after each short burst of air, try pressing the key to see if it functions correctly. If not, repeat the process a few times. Sometimes, persistence pays off. However, don’t overdo it.
Beyond the Air: Deep Cleaning and Key Removal (Proceed with Caution!)
However, sometimes compressed air isn't enough. In such instances, a more thorough cleaning might be necessary. This involves a bit more risk, but the potential reward is a fully functional keyboard. And after, consider gently removing the key caps. Locate a small, flat tool, like the edge of a thin plastic card. Carefully insert it beneath the edge of the key cap. Gently lever it upwards until it pops off.
Keep in mind the key caps are often held in place by delicate clips. Subsequently, exercise extreme caution to avoid breaking them. Once removed, you'll have direct access to the key's switch mechanism. Now, you can use the compressed air to thoroughly clean the area. You could also use a cotton swab dampened with isopropyl alcohol. Proceed very carefully here, and with minimal liquid.
After cleaning, carefully reattach the key cap. Ensure it clicks securely back into place. If you're unsure of the key's placement or how it fits, consider taking a photo before removing the cap.
Problem Solving: What if the Trick Doesn't Work?
So you've tried the magic trick, but still no luck? This doesn't necessarily mean the end. Perhaps the issue goes deeper. Now, evaluate other potential causes. Furthermore, consider a software conflict. Sometimes, a driver issue or a conflict with another program can interfere with keyboard functionality. Try restarting your laptop. Then, check for any pending software updates. Also, you should uninstall any recently installed programs that might be causing issues.
Also, consider the possibility of water damage. Even a small spill can wreak havoc on the internal workings of a laptop. If liquid has entered the keyboard, immediate action is critical. Turn the laptop off immediately. Then, disconnect it from power. Next, take it to a professional repair technician. Time is of the essence here.
Protecting Your Investment: Proactive Keyboard Hygiene
Finally, prevention is always better than cure. Therefore, develop good keyboard hygiene habits. Regularly clean your keyboard. Wipe it down with a microfiber cloth to remove dust and fingerprints. Avoid eating or drinking near your laptop. These precautions can significantly extend the lifespan of your keyboard. Additionally, they lessen the likelihood of future key malfunctions.
The Bottom Line: Don't Despair, There's Hope!
So, before you rush out to buy a new keyboard or laptop, remember the power of the fix. In many cases, a simple cleaning, combined with a little patience, can resurrect those dead laptop keys. Don't underestimate the impact of regular keyboard maintenance. Now, armed with these simple tricks, you can take control of your keyboard woes. Get ready to type with confidence again!
Laptop Camera Secrets: The Ultimate Guide to Crystal-Clear Video!Laptop Keys DEAD? This SHOCKING Trick Will FIX Them!
Hey everyone, ever felt that gut-wrenching moment? You’re in the zone, fingers flying across the keyboard, crafting a masterpiece of a message, finishing that crucial report, or maybe just trying to beat your high score in your favorite game… and then BAM! A key, or worse, a bunch of keys, just… dies. It’s like your laptop is suddenly speaking in a garbled, missing-letter language, and your productivity, your creativity, your sanity, is hanging by a thread. Don't worry, we've all been there. I remember the frustration when my 'E' completely gave up the ghost mid-essay, and the scrambling I had to do to get it working again! But before you start panicking and considering a whole new laptop (trust me, I've been tempted!), let’s dive into some solutions. The good news? There’s a shockingly effective trick that might just resurrect those dead keys and save you a whole lot of time, money, and stress. Let’s get digital, shall we?
1. The Perilous Phantom: Understanding Why Your Laptop Keys Go AWOL
Before we unleash the life-giving trick, let's get to the root of the problem. Why do laptop keys decide to stage a digital walkout? Well, it's a mix of things, like a technological cocktail gone wrong. We're talking about dust bunnies, crumbs from that late-night snack you devoured (hey, no judgment!), and general wear and tear. Think of your keyboard like a tiny, complex ecosystem. Each key has a spring, a switch, and all sorts of tiny parts, constantly being battered by our typing. The more we use it, the more likely we are to encounter issues, be it sticky residue, or an internal short. Sometimes, it's a software glitch – a rogue driver, a corrupted operating system file – causing the problem. Other times, it’s something far more mechanical. Whatever the cause, the feeling is the same: utter frustration.
2. The Usual Suspects: Common Culprits Behind Dead Keys
Let's get specific. Here are some usual suspects behind the death of your keys, the keyboard underworld that you need to be aware of:
- Dust, Debris, and the Dreaded Crumbs: This is the most common issue. Think of all the stuff that floats around and finds its way into your keyboard. Even a tiny speck can jam a key's mechanism.
- Spills and Splashes: Coffee, water, soda… the bane of laptop keyboards. Liquids create sticky residues and the potential for short circuits. This requires immediate action, like unplugging your laptop ASAP!
- Wear and Tear: Repeated use grinds down the physical components. Keys lose their responsiveness, and eventually, they may fail entirely.
- Software Glitches: As mentioned, software can cause problems. Outdated drivers, or corrupt files can interfere with keyboard functionality.
3. Before You Panic: Quick First Aid for Your Keyboard
Before we execute the big trick, let's test the waters with some easy fixes. It's like checking if a band-aid will do the trick before calling in the surgeon.
- Restart Your Laptop: It’s the IT equivalent of "Have you tried turning it off and on again?" Sometimes, a simple restart can clear up temporary software glitches.
- External Keyboard Test: Connect an external keyboard to see if the issue persists. If the external keyboard works, the problem is likely with your laptop’s keyboard.
- Driver Check: Make sure your keyboard drivers are up to date. You can usually check this in your Device Manager.
- Clean the Keyboard: Use compressed air to blow out any visible debris. Turn the laptop upside down and gently shake it to dislodge loose particles.
4. The SHOCKING Trick: The Magic Behind the Key!
Alright, here it is, the big reveal! The SHOCKING trick to revive your dead laptop keys: the power of the physical disconnect and reconnect!
Now, hear me out: You're essentially doing some "keyboard surgery". I know it sounds a little daunting, but it's often the best solution, without involving the costly assistance of a technician.
5. Step-by-Step: Deconstructing and Reconstructing Your Keyboard (Carefully!)
Here’s the game plan. Grab a small screwdriver set, a clean cloth, and a healthy dose of patience. This is not rocket science, but it's delicate.
- Power Down and Unplug: This is non-negotiable. Safety first, always! Remove the battery if possible, too.
- Locate the Keyboard Screws: They’re usually on the bottom of the laptop. Consult your laptop's manual (or a quick online search) to find them. Often, there are small icons next to screws indicating the keyboard.
- Carefully Remove Keyboard: Gently pry the keyboard out. Avoid forcing anything. You’ll likely find a ribbon cable connecting the keyboard to the motherboard. This is the lifeline!
- Disconnect the Ribbon Cable: Usually, it's held in place by a small latch. Unclip it very carefully. This is the moment of disconnection of your keyboard to the laptop.
- Clean the Connectors: Use the cloth to gently clean the metal contacts on both the ribbon cable and the connector on the motherboard. Dust and debris here can cause issues.
- Reconnect and Secure: Reattach the ribbon cable, ensuring the latch is firmly in place.
- Reassemble and Test: Put the keyboard back in its place, screw it back in, and power up your laptop. Test the keys!
6. The Deep Clean: When a Simple Dust-Off Isn't Enough
Sometimes, the damage is deeper, and the usual cleaning methods aren't enough. This is where you might need to consider a more comprehensive cleaning session.
- Keycap Removal: Using a small tool (often a thin flathead screwdriver or something similar), you can carefully remove the keycaps. You'll see the mechanical mechanism underneath.
- Cleaning the Mechanism: Use Q-tips or cotton swabs dipped in isopropyl alcohol to gently clean the switch mechanism.
- Keycap Cleaning: Soak the keycaps in warm, soapy water and let them dry completely before reattaching. Don't use excessively hot temperatures.
7. Preventing Future Keyboard Calamities
Now that you've potentially resurrected your keys, let's keep them alive and kicking! Prevention is always better than cure.
- Regular Cleaning: Make it a routine. Every week, give your keyboard a quick once-over.
- Protective Measures: Consider a keyboard cover. These are inexpensive and offer great protection against spills and debris.
- Eat Away from Your Laptop: I know it’s tempting to have a mini-feast while you work, but the keyboard will suffer.
- Gentle Typing: Don't hammer the keys. A lighter touch extends their lifespan.
- Liquid Enemy: Avoid liquids near your laptop. Position drinks away from your keyboard.
8. Troubleshooting Time: When the Trick Doesn't Work
What if the "SHOCKING" trick doesn't work? Don't despair! It might be a more significant issue.
- Check for Liquid Damage: If you spilled something, you might have caused internal damage.
- Hardware Failure: Some keys might have physical damage beyond repair.
- Professional Help: It’s time to take your laptop to a professional repair shop. They have the tools and expertise to diagnose and fix complex issues.
9. The Software Angle: Don't Forget Your Keyboard Settings
It's not always about the hardware. Sometimes, the problem lies in the software, in these situations, here's what you should consider:
- Sticky Keys (Accessibility Settings): Sometimes, the "Sticky Keys" feature (designed to assist users who have difficulty holding down multiple keys) can trigger unforeseen issues.
- Filter Keys: Similar to Sticky Keys, the "Filter Keys" feature can sometimes interfere with keyboard functionality.
- Keyboard Layout: Make sure your keyboard layout matches your physical keyboard.
10. The Importance of Keyboard Maintenance: Your Keyboard's Secret Weapon
Think of your keyboard as your personal command center. Regular maintenance is essential for peak performance.
- Establish a Routine: Make cleaning and maintenance part of your routine.
- Invest in the Right Tools: Compressed air, a cleaning cloth, and isopropyl alcohol are your best friends.
- Know Your Limits: Don’t try to fix something beyond your skillset.
- Be Patient: Keyboard maintenance takes time and care.
11. Alternative Solutions: Software-Based Fixes and Workarounds
While the physical fix is often the most effective, software-based workarounds can provide a temporary solution.
- On-Screen Keyboard: Windows and macOS have built-in on-screen keyboards that you can use.
- External Keyboard: As mentioned, this is a quick and easy fix.
- Key Remapping Software: You can remap keys to different functions using third-party software.
12. Is it Time to Say Goodbye?: When to Replace Your Keyboard
Sometimes, the damage
HP Laptop Screen Black? (But Your Data's Safe!)How to Fix Some Keys Not Working on Laptop Keyboard Keyboard Not Working

By Tech White How to Fix Some Keys Not Working on Laptop Keyboard Keyboard Not Working by Tech White
How to Individual Laptop Keyboard Keys Fix Repair Installation Guide HP Compaq Pavilion HD
By Tech Profis How to Individual Laptop Keyboard Keys Fix Repair Installation Guide HP Compaq Pavilion HD by Tech Profis
Fix Some keys on Laptop Keyboard Not Working in Windows 10 Solve keyboard keys Won't typing

By Victor Explains Fix Some keys on Laptop Keyboard Not Working in Windows 10 Solve keyboard keys Won't typing by Victor Explains

Title: How to Solve Keyboard Keys Not Working shorts keyboard pc
Channel: TonaziTube
How to Solve Keyboard Keys Not Working shorts keyboard pc by TonaziTube
Working With Laptop
Laptop Keys DEAD? This SHOCKING Trick Will FIX Them!
Have you found yourself staring at a laptop screen, fingers poised, ready to type, only to be met with frustrating silence? That sinking feeling when a key – or, heaven forbid, multiple keys – decides to stage a digital rebellion? We’ve all been there. The modern world thrives on keystrokes; our laptops are our digital lifelines. Their keyboards are our bridges to communication, creation, and connection. When a key fails, a small but significant part of our world seems to crumble. But before you resign yourself to the expense of a replacement keyboard or, worse, a completely new laptop, take heart. Often, the solution is far simpler – and less costly – than you might imagine. We're going to delve into a series of proven techniques, a troubleshooting arsenal designed to breathe new life into your unresponsive laptop keys. Prepare to be amazed; the answer might just be a few keystrokes away.
Initial Diagnosis: Pinpointing the Problem
Before we launch into repair strategies, we need to establish what we’re dealing with. Is it a single, stubborn key? A cluster of keys? Or perhaps the entire keyboard? The scope of the problem will inform our approach. Start by systematically testing the affected keys. Open a simple text editor – Notepad (Windows) or TextEdit (Mac) are reliable choices. Then, methodically press each unresponsive key. Note which ones fail to register. This initial assessment is crucial. It helps determine whether the issue stems from hardware, software, or a combination of both. Also, consider the context of the failure. Did the keys suddenly stop working, or did the problem develop gradually? Were there any recent spills, impacts, or software installations? These clues can significantly narrow down the likely cause. A spilled beverage, for instance, can quickly lead to sticky keys, whereas a recent software update might introduce driver conflicts.
Software Solutions: The Digital Detective
Sometimes, the keyboard itself isn't the culprit; the problem might reside within the digital ether of your operating system. Let's explore a few software-related fixes.
Driver Reinstallation: A Digital Refresh
Keyboard drivers are the software intermediaries that allow your operating system to communicate with your keyboard. Occasionally, these drivers can become corrupted or outdated, leading to malfunctions. Reinstalling the keyboard driver can often resolve this issue.
- Windows:
- Press the Windows key, type "Device Manager," and open the application.
- Expand the "Keyboards" section. You should see your laptop's keyboard listed.
- Right-click on your keyboard and select "Uninstall device."
- Restart your laptop. Windows will typically reinstall the keyboard driver automatically.
- macOS:
- Go to the Apple menu (the Apple logo in the top-left corner) and select "System Preferences."
- Click on "Keyboard."
- Here, you can adjust keyboard settings, but driver reinstallations happen automatically in the background. If you suspect a driver issue, restarting your Mac is often a good starting point. Consider checking for macOS updates; these updates often include updated drivers.
Sticky Keys and Filter Keys: Bypassing Accessibility Settings
Both Windows and macOS offer accessibility features that, while designed to aid users, can sometimes interfere with keyboard functionality. These features include Sticky Keys and Filter Keys. Sticky Keys is meant to allow users to press modifier keys (Shift, Ctrl, Alt) one at a time instead of simultaneously. Filter Keys is meant to ignore brief or repeated keystrokes, which can be helpful for users with hand tremors. However, if these settings are incorrectly configured, they might make it seem like your keys are dead.
- Windows:
- Press the Shift key five times in rapid succession. This should trigger a prompt asking if you want to enable Sticky Keys.
- Select "No" or "Cancel" on any Sticky Keys prompts if you do not want these settings enabled.
- In the Settings app (search for “Ease of Access”), find and disable Sticky Keys and Filter Keys. Then, disable "Turn on Sticky Keys when the SHIFT key is pressed five times" and "Turn on Filter Keys when SHIFT is held down for 8 seconds."
- macOS:
- Go to "System Preferences" -> "Accessibility."
- Under "Keyboard," uncheck "Sticky Keys" and "Slow Keys" if they are enabled. Also, disable "Press the Shift key five times in succession to turn Sticky Keys on or off" and "Ignore brief or repeated keystrokes."
Software Conflicts: The Rogue Program
Certain software programs can, on rare occasions, interfere with keyboard input. This is particularly true of third-party keyboard utilities, macro programs, or accessibility software. If the key issues started after installing new software, consider uninstalling the recently added programs.
- Troubleshooting Tip: Try booting your laptop in Safe Mode (Windows) or Safe Boot (macOS). In Safe Mode, your operating system loads with a minimal set of drivers and programs. If your keyboard works in Safe Mode, you can be reasonably confident that a software conflict is the root of the problem. From there, you can uninstall recently installed programs.
Hardware Interventions: The Mechanical Musings
If software solutions fail, it's time to delve into the physical realm, where dust, debris, and the occasional sticky substance can wreak havoc on keyboard functionality.
The Air Blast Treatment: Blowing Away the Bad Guys
Dust, crumbs, and other microscopic invaders are the keyboard's natural enemies. They can infiltrate the key switches, disrupting electrical contact and causing keys to malfunction. A can of compressed air is your first line of defense.
- Procedure:
- Turn off your laptop and disconnect it from the power source.
- Hold the can of compressed air upright.
- Insert the nozzle into the gaps between the keys.
- Spray short bursts of air, aiming at the base of each unresponsive key, and then at the key switches.
- Work systematically across the keyboard, from left to right and top to bottom.
- After each pass, turn your laptop to a different angle to allow the expelled dust and debris to fall out.
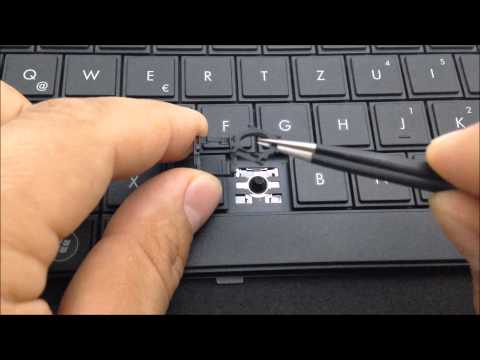
The Key Cap Capers: A Closer Look
Sometimes, the issue lies not within the switch itself but beneath a keycap. These individual plastic pieces can become dislodged, misaligned, or simply clogged with debris.
- Procedure:
- Turn off and unplug your laptop.
- Carefully pry off the keycap of the malfunctioning key using a specialized keycap puller (highly recommended) or, in a pinch, a thin, flat tool like a small screwdriver.
- Inspect the key switch beneath the keycap. Look for any visible obstructions – dust bunnies, pet hair, or sticky residue.
- Clean the key switch gently with a cotton swab dipped in isopropyl alcohol (90% or higher concentration). Avoid using excessive liquid.
- Allow the alcohol to dry completely.
- Carefully reattach the keycap, ensuring it clicks securely into place.
The Keyboard Cable Conundrum: Internal Connections
Laptop keyboards connect to the motherboard via a small, often fragile, ribbon cable. This cable can sometimes become partially disconnected, leading to key failures. This requires more advanced technical skills, so proceed with caution.
- Procedure (Advanced users only – research your laptop’s disassembly guide beforehand):
- Turn off your laptop, disconnect the power, and remove the battery (if possible).
- Carefully remove the laptop's bottom panel. Consult your laptop’s service manual or online disassembly videos to identify the keyboard’s location and mounting.
- Locate the keyboard ribbon cable, which connects the keyboard to the motherboard.
- Gently disconnect the cable from the motherboard connector.
- Inspect the cable for any damage.
- Carefully reinsert the cable and secure it in place.
- Reassemble the laptop and test the keys.
The Replacement Reality: When All Else Fails
If you’ve exhausted all the above methods, and your keys remain defiant, it might be time to consider a replacement keyboard. Fortunately, laptop keyboards are often relatively inexpensive parts, and replacement is usually a straightforward process.
Finding the Right Keyboard:
- Identify your laptop's make and model. This information is typically found on a sticker on the bottom of your laptop or in your laptop's documentation.
- Search online for a replacement keyboard compatible with your laptop model, using the model number to ensure compatibility.
- Many online retailers specialize in laptop parts. Check eBay and Amazon as well.
Replacing the Keyboard:
- Consult your laptop's service manual or online disassembly videos for detailed instructions.
- The replacement process usually involves removing screws, disconnecting the old keyboard’s ribbon cable, and installing the new keyboard in reverse order.
Prevention is Key: Maintaining a Healthy Keyboard
Once you've restored your keyboard to full functionality, prevent future problems with a few simple preventative measures.
- Regular Cleaning: Develop a regular cleaning routine. Use compressed air to remove dust and debris regularly, every week or two.
