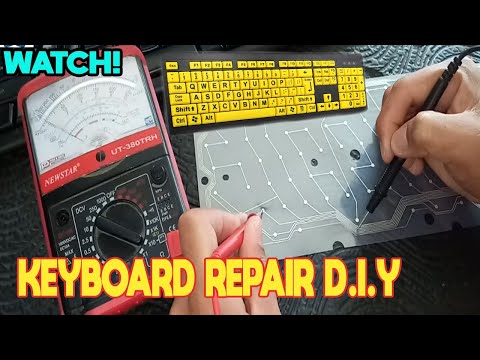
one of my keys is not working laptop

Title: How to Do When PC Laptop Keyboard Not Working - Problem O Key keyboard shorts
Channel: TonaziTube
How to Do When PC Laptop Keyboard Not Working - Problem O Key keyboard shorts by TonaziTube
one of my keys is not working laptop, one of my laptop keys stopped working, one of my computer keys is not working
Laptop Key Mysteriously DEAD?! (This ONE Trick Fixes It!)
Laptop Key Calamity: Don't Panic! This Secret Weapon Resurrects Your Keyboard
Have you ever experienced that heart-stopping moment? You're typing away furiously, lost in the zone, when suddenly… a key goes silent. It stares back at you, mocking your efforts. The dreaded dead key! It’s a common laptop woe. But before you start drafting an obituary for your keyboard, take a deep breath. Because, believe it or not, there's a simple fix. Yes, there is an effective solution.
Diagnosing the Digital Dilemma: Is It Really Dead?
First things first: confirmation. Is the key truly deceased? Because sometimes, a temporary glitch can cause a key to misbehave. So, before you get too far into troubleshooting, run a quick test. Therefore, open a simple text editor. Consequently, repeatedly press the offending key. Does absolutely nothing happen? If so, it’s likely dead. However, sometimes, the key might register the wrong character. That is another clue. It could be a software issue. Similarly, there could be a hardware issue involved.
Dust Bunnies and Debris: The Culprits Behind the Curtain
Often, a dead key isn't actually dead. It's just stubbornly clinging to life. Why? Because of dust, crumbs, and other insidious invaders. These tiny particles find their way beneath the keys. Then, they create havoc. As a result, they block the electrical contact. Before you grab the soldering iron, try a little detective work.
The Air Assault: Unleashing the Power of Compressed Air
Here's our secret weapon: compressed air. This is your first line of defense. Further, it’s incredibly effective. You can find cans of compressed air at most electronics stores. Most importantly, turn off your laptop. Then, unplug it. Holding the can, position the nozzle near the affected key. Now, give it several short bursts. Angle the nozzle at different angles. This helps dislodge any trapped debris. Next, repeat the process for other keys.
Keyboard Cap Crackdown: A Deeper Clean
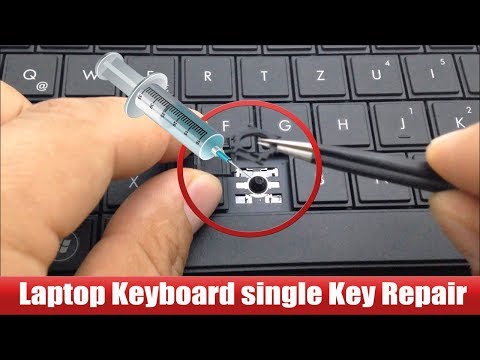
Still no luck? It is time for a more involved approach. Carefully remove the keycap. Most laptop keys are designed to pop off. Using a thin, non-metallic tool, like a guitar pick. You can gently pry the keycap upwards. Be careful not to break any of the delicate plastic clips. Then, get a closer look. You’ll want to inspect the switch underneath the keycap. Now, take another blast of compressed air directly into the switch mechanism. Clean the surrounding area with a soft brush.
Beyond the Blast: Advanced Cleaning Strategies
If the compressed air alone doesn't work, consider something more. Dip a cotton swab in isopropyl alcohol. Gently clean around the switch mechanism. Be frugal with the alcohol. You want the swab damp, not soaked. Avoid getting excessive moisture on the keyboard components. When done cleaning with the swab, wait for everything to dry. Reattach the keycap. Test to see if the key now works.
Software Solutions: The Digital Dance
Sometimes, the issue is not hardware. Instead, it’s a software glitch. Therefore, try a simple restart of your laptop. Otherwise, ensure that your operating system is up to date. A driver update may fix the problem. You can re-install keyboard drivers. You can usually do this in your device manager. Check the manufacturer’s website for the latest drivers.
The Ultimate Test: Assessing the Aftermath
After implementing the cleaning and software solutions, it's time to test. Turn your laptop back on. Open your text editor again. Now, press the previously dead key. Did it come back to life? If so, you've won. If not, it may be hardware related.
Hardware Hiccups: When to Seek Professional Help
If the key remains stubbornly unresponsive, it could be a hardware problem. In certain situations, you might need to replace the switch. This is more of a complex repair. Consider taking your laptop to a repair shop. They have the expertise to diagnose and fix more serious hardware issues.
Prevention is Key: Maintaining Your Keyboard's Vitality
Once your key is working again, take preventative action. Regularly clean your keyboard. Avoid eating or drinking near your laptop. These simple precautions can help extend your keyboard’s life. These steps can prevent future dead key incidents.
Conclusion: Typing Triumph!
Facing a dead key can be frustrating. But, it doesn't mean the end of your laptop. In most cases, you can revive that key with a little bit of know-how. Now you know some tricks to get your keyboard clicking again. So, try these solutions. You'll be back to typing in no time.
Laptop Mouse Nightmare? This FIX Will SHOCK You!Laptop Key Mysteriously DEAD?! (This ONE Trick Fixes It!)
Ever stared blankly at your laptop screen, frantically jabbing at a key that refuses to cooperate? The frustration, the panic – we've all been there! It's like having a vital organ suddenly shut down. Your perfectly crafted email about to be sent, your epic gaming session on the precipice of glory, all held hostage by a single, stubborn, DEAD key. But relax, take a deep breath. We're going to navigate this together. And trust me, the solution might be simpler than you think.
1. The Panic Sets In: When Your Keyboard Goes Silent
That feeling of dread that washes over you? It’s the digital equivalent of your car refusing to start right before a crucial meeting. Your heart rate spikes, your palms sweat, and you start furiously mashing the offending key, hoping for a miracle. Is your laptop doomed? Is it time to shell out for a new one? Before you head down that expensive (and potentially unnecessary) path, hold on. Let's assess the situation.
2. Recognizing the Culprit: Identifying the Dead Key
First things first: pinpoint the problem. Is it just one key that’s gone AWOL, or is it a whole section of your keyboard? If it's a single key, you're in luck – the solution is almost certainly within reach. If multiple keys are inactive, it might indicate a more significant issue. But even then, don't jump to conclusions. Let's systematically troubleshoot.
3. The Usual Suspects: Common Causes of Key Failure
Before we dive into the "ONE Trick," let’s understand why keys go dark. Think of your laptop keyboard like a tiny, complex city. There are several things that can shut down a key's functionality:
- Dust and Debris: The most common enemy! Tiny crumbs, pet hair, and general grime can sneak under the keys and jam the mechanisms.
- Spilled Liquids: A rogue coffee spill? A sudden downpour of juice? These liquids are a keyboard's kryptonite, causing short circuits and corrosion.
- Software Glitches: Sometimes, the problem isn't physical at all. A software conflict or driver issue can make a key unresponsive.
- Hardware Malfunctions: In rare cases, a key's switch itself might fail, or the connection to the motherboard could be compromised.
- The "Sticky" Situation: A key can get “stuck” by a build-up of materials.
- Outdated Drivers: Your keyboard's software might be outdated or incompatible with your system.
4. The "ONE Trick": The Keyboard Cleaning Solution
Okay, here it is! The one trick, the secret sauce, the silver bullet: cleaning your keyboard! I know, it sounds almost too simple, right? But trust me, this is often the fix. It’s like giving your keyboard a good spring cleaning. Here’s how:
- Turn It Off (and Unplug It!): Safety first! Make sure your laptop is powered down and unplugged from any power source.
- The Air Blaster: Get yourself a can of compressed air. These are readily available at most electronics stores. Point the nozzle at the base of the affected key (and any keys around it, just for good measure) and give it a good blast. Angle the can at different directions to dislodge any hidden debris.
- Isopropyl Alcohol & Cotton Swabs: For a more thorough clean, you can lightly dampen a cotton swab with isopropyl alcohol (rubbing alcohol). Gently wipe around the key's edges. Don’t soak the swab! The goal is to loosen stubborn dirt.
- The Soft Brush: Sometimes, a soft-bristled brush (like a toothbrush) can help to sweep away debris.
- Reboot & Test: Once you're finished cleaning, plug your laptop back in (if it's a desktop, make sure it's connected to the monitor/keyboard). Turn it back on and test the key. Did it work? If yes, congratulations! You just saved yourself a headache (and potentially money).
5. Deeper Dive: Further Cleaning Methods
If the compressed air didn't do the trick, it's time for some advanced cleaning. This involves removing the keycap itself.
- The Fine Tool: Use a thin, flat object (like a butter knife or a keycap puller, if you have one) to gently pry off the keycap. Be very careful not to break any of the tiny plastic clips that hold the keycap in place.
- The Innards Inspection: Once the keycap is off, you’ll see the switch mechanism underneath. Use compressed air to clean around the edges of the switch.
- Reassembly: Carefully align the keycap back on top of the switch and press down firmly until it clicks back in place.
6. Software Solutions: Troubleshooting Software Conflicts
Sometimes, the issue isn't hardware; It’s software! Let's explore a few steps you can take:
- Restart Your Laptop: Sounds cliché, but a simple restart can resolve minor software glitches. This forces the computer to reset services and drivers.
- Check Your Keyboard Drivers: Go to your device manager (search for it in the Windows search bar) and look for your keyboard. Right-click and select "Update driver."
- Roll Back Driver Updates: If the problem started after a driver update, try rolling back to a previous version.
- Run a Troubleshooter: Windows has built-in troubleshooters that can often detect and fix keyboard issues.
- Malware Scan: While rare, malware can interfere with keyboard functionality. Run a scan with your antivirus software.
7. External Keyboard Test: A Quick Experiment
If, after all this, the key still doesn't work, try plugging in an external keyboard. This is a great way to determine if the problem lies with your laptop's internal keyboard or with your operating system/software. If the external keyboard works fine, it's highly likely the issue is with your laptop's keyboard.
8. When to Call in the Professionals: Serious Key Issues
If you've exhausted all these steps and the key remains stubbornly silent, it might be time to consult a professional. This is especially true if:
- Multiple keys are dead.
- You suspect liquid damage.
- You're not comfortable disassembling your laptop.
A technician can diagnose the problem and replace the keyboard (or a key) as needed.
9. Preventative Measures: Keeping Your Keyboard Healthy
Prevention is always better than cure! To keep your keyboard in tip-top shape, consider these tips:
- Regular Cleaning: Make cleaning your keyboard a part of your routine (say, once a month).
- Eat Away From Your Laptop: Avoid snacking directly over your keyboard.
- Liquid Vigilance: Be extra careful around liquids. Keep drinks away from your workspace.
- Invest in a Keyboard Cover: A keyboard cover can protect your keys from dust, spills, and other debris.
- Gentle Typing: Avoid pounding on the keys.
10. The Psychological Angle: Managing the Frustration
Let's be honest, dealing with a dead key can be incredibly frustrating! Remember to stay calm. Don't let it ruin your day. Take a break, breathe deeply, and approach the problem systematically.
11. Advanced Troubleshooting: Inspecting the Keyboard's Circuitry (If You're Tech-Savvy)
I'd recommend you stick to the cleaning methods mentioned above. However, if you are tech-savvy, and comfortable with electronics, carefully inspect the keyboard's internal circuitry.
- The Logic Board: First, unplug the laptop's power adapter and remove the battery.
- Physical Inspection: Look for obvious signs of damage, such as burnt components or corrosion.
- Check the Cable: The keyboard connects to the laptop's motherboard via a ribbon cable; ensure this cable is fully seated and there's no damage to the cable or the port.
12. Dealing with the Dead Key: What To Do In The Short Term
While you're fixing the key, you'll still need to use your laptop. Here are some temporary solutions:
- On-Screen Keyboard: Use the on-screen keyboard feature in Windows.
- Keyboard Remapping: Utilize keyboard remapping software.
- External Keyboard (Again!): A reliable temporary fix.
13. Laptop Key Survival: The Futureproofing Approach
- Consider Ruggedized Keyboards: If you work in harsh environments, look for a laptop with a ruggedized keyboard.
- Backup & Recovery: Regularly back up your important files.
- Upgrade If Necessary: If your laptop is old, it might be time for an upgrade.
14. The Ultimate Verdict: Does the One Trick Really Work?
Absolutely! Cleaning your keyboard is usually the first and often the most effective solution. It's a simple, accessible fix that can save you time, money, and a whole lot of frustration.
15. The Path Forward: Embrace the Digital Resilience
Remember, even the best laptops can encounter problems. A little understanding of how your keyboard works, combined with some basic troubleshooting
HP Laptop HDMI Port Dead? FIX This NOW!Fix Some keys on Laptop Keyboard Not Working in Windows 10 Solve keyboard keys Won't typing

By Victor Explains Fix Some keys on Laptop Keyboard Not Working in Windows 10 Solve keyboard keys Won't typing by Victor Explains
SOME KEYS NOT WORKINGFUNCTIONING KEYBOARD REPAIR
By Botatoyz Idea SOME KEYS NOT WORKINGFUNCTIONING KEYBOARD REPAIR by Botatoyz Idea
Laptop Keyboard key repair very easy way.
By Hit Short Films Laptop Keyboard key repair very easy way. by Hit Short Films

Title: SOLUTION Some Keys Not Working on Laptop Keyboard
Channel: Tech Express
SOLUTION Some Keys Not Working on Laptop Keyboard by Tech Express
Laptop Wifi Hotspot
Laptop Key Mysteriously DEAD?! (This ONE Trick Fixes It!)
Have you ever been in the middle of composing an email, finishing a vital document, or simply browsing the web when suddenly, a crucial key on your laptop keyboard refuses to respond? The frustration is palpable, the interruption jarring. That single, unresponsive key can feel like a monumental obstacle, halting your productivity and injecting a dose of unexpected stress into your day. But before you resign yourself to the inconvenience of an external keyboard or the expense of a repair, know this: often, the solution is far simpler than you might imagine. We're here to guide you through the most common causes of dead keys and, most importantly, to equip you with the one trick that frequently brings those rebellious keys back to life.
Understanding the Culprits Behind the Keyboard Crisis
Before diving into the fix, let's explore the typical reasons why a laptop key might cease functioning. This knowledge empowers you to better understand the problem and, consequently, address it effectively.
- Dust and Debris: The Silent Saboteurs. The enemy of any keyboard is dust, crumbs, and other microscopic detritus that inevitably finds its way beneath the keys. Over time, this buildup can obstruct the key's mechanism, preventing it from making proper contact when pressed. This is especially prevalent in laptops, where the keys are positioned closer together and offer less protection from the outside world.
- Liquid Damage: The Unforgiving Adversary. Spilled liquids, whether it’s a rogue drop of coffee or a generous splash of water, are a laptop keyboard's nemesis. Liquids can seep into the internal components, corroding the electrical connections and causing keys to misbehave or become completely unresponsive. Even a tiny amount of liquid can wreak havoc, so immediate action is crucial if a spill occurs.
- Software Glitches: The Digital Demons. Sometimes, the problem isn't physical; it's digital. Software conflicts, driver issues, or corrupted system files can interfere with the keyboard's functionality. These glitches are often temporary, but they can be just as disruptive as a hardware failure and require careful troubleshooting.
- Hardware Malfunctions: The Unavoidable Reality. In some cases, the issue is indeed hardware-related. Key switches can wear out over time, particularly with heavy usage. Furthermore, manufacturing defects or physical damage, such as dropping your laptop, can also lead to key failures.
The ONE Trick: A Deep Dive into the Keyboard Reset
Now for the crucial step, the “one trick” that often resolves a dead-key dilemma. This method is a combination of a physical cleaning, a keyboard reset and the removal of any software interference. To implement this, follow these steps:
- Power Down Completely: The first and most important step is to shut down your laptop entirely. This ensures that you're working in a safe environment and prevents any accidental commands from being executed during the cleaning process. Do not simply close the lid or put the laptop to sleep; a full shutdown is essential.
- The Air Blast: The Primary Weapon. Obtain a can of compressed air, specifically designed for cleaning electronics. These cans provide a concentrated burst of air that can dislodge dust, debris, and other particles trapped under the keys. Hold the can upright and direct the nozzle towards the affected key and the surrounding keys. Apply short, controlled bursts of air at a slight angle, moving the nozzle across the keyboard systematically. Focus on the problematic key, but make sure to address the adjacent keys as well, as the buildup might affect multiple keys.
- The Key Detachment (Proceed with CAUTION!). If the air blast does not produce the desired results, proceed with caution and consider safely detaching the key (if possible; this may not be feasible with all laptop models). Use a thin, non-metallic tool, such as a plastic spudger or the edge of a credit card, to gently pry the keycap off. Use extreme care to avoid breaking the keycap or damaging the underlying mechanism. Once the keycap is removed, you will have direct access to the switch underneath.
- The Cleaning Ritual (Under the Key). Once the keycap is removed, carefully clean the switch and the surrounding area using compressed air. You can also use a cotton swab dampened (NOT soaked) with isopropyl alcohol to gently wipe away any persistent debris. Be very careful not to get alcohol onto other components. Allow the area to dry completely before reattaching the keycap.
- Software Reboot and Update: Restart your laptop and verify if the keyboard is working. If it is not working, then consider updating the existing driver. For example, when using Windows, you can go to the Device Manager and find the keyboard drivers. The first step in the Device Manager is to uninstall the keyboard driver and restart the device. The laptop automatically reinstall drivers upon restart. The second step is to check for driver updates. The third step is to reinstall the driver using the manufacturers website.
Troubleshooting Beyond the Keyboard: Exploring External Factors
If the "one trick" doesn't immediately resurrect the key, don't despair. Further investigation may be required to pinpoint the root cause and ensure a complete resolution.
- External Keyboard Test: Connect an external USB keyboard to your laptop. If the keys on the external keyboard function correctly, it strongly suggests a hardware issue with the built-in laptop keyboard. This test helps isolate the source of the problem.
- System Diagnostics: Run system diagnostics that come with your laptop. Many brands provide built-in tools for hardware testing, including keyboard assessments. Refer to your laptop's manual or manufacturer's website for instructions on how to access and run these diagnostics.
- Driver Reinstallation and Updates: Though we performed this as a section of the initial "one trick", it deserves a further examination. Even if your keyboard seems to be functioning, outdated, outdated or corrupt drivers can sometimes cause unexpected behavior. Visit your laptop manufacturer's website and download the latest keyboard drivers.
- Software Conflicts: In rare cases, certain software applications can interfere with keyboard functionality. Try starting your laptop in safe mode to see if the key works. Safe mode loads only essential drivers and helps determine whether a third-party program is causing the issue.
- Check for Sticky Keys or Filter Keys: Windows and other operating systems have accessibility features, such as Sticky Keys and Filter Keys, designed to assist users with disabilities. If these features are enabled accidentally, they can cause erratic keyboard behavior. Go to your operating system's settings and disable these features.
When to Seek Professional Help
While the "one trick" and the troubleshooting methods described above frequently resolve dead-key issues, it's important to recognize the limitations. If you've exhausted these options and the key remains unresponsive, it's time to seek the assistance of a qualified laptop repair technician.
- Severe Liquid Damage: If your laptop has suffered significant liquid damage, professional intervention is almost always necessary. Corrosion can spread quickly, and a technician can assess the extent of the damage and perform the necessary repairs.
- Hardware Failure: If you suspect a hardware failure, such as a damaged key switch or internal circuitry, a technician has the specialized tools and expertise to diagnose and repair the issue. Attempting to perform complex repairs yourself can easily make the problem worse.
- Persistent Problems: If the key problems persist after trying the recommended steps, it's time to consult a professional. They can accurately diagnose the problem and provide the best course of action.
Preventative Measures: Safeguarding Your Keyboard
Prevention is always the best medicine. Here are some proactive steps you can take to protect your laptop's keyboard from future problems:
- Regular Cleaning: Make it a habit to regularly clean your keyboard using compressed air. This removes dust and debris buildup before it becomes a problem.
- Avoid Eating and Drinking Near Your Laptop: This simple precaution minimizes the risk of spills and crumbs.
- Use a Keyboard Cover: A keyboard cover provides an extra layer of protection against spills, dust, and general wear and tear.
- Handle Your Laptop Carefully: Avoid dropping your laptop or subjecting it to extreme temperatures or humidity.
By understanding the common culprits behind dead keys, mastering the "one trick" fix, troubleshooting effectively, and taking preventative measures, you can significantly increase your chances of keeping your laptop keyboard functioning smoothly and efficiently. Don't let a single unresponsive key disrupt your workflow. Employ these strategies, and reclaim your productivity.
