keyboard not working on surface laptop 3

Title: How To Fix Windows Surface Laptop Keyboard How To Easy Fix Surface Keyboard Trackpad Touchpad Mouse
Channel: How To Tech
How To Fix Windows Surface Laptop Keyboard How To Easy Fix Surface Keyboard Trackpad Touchpad Mouse by How To Tech
keyboard not working on surface laptop 3, why is my surface laptop keyboard not working, why is my microsoft surface laptop keyboard not working
Surface Laptop 3 Keyboard Nightmare: FIXED! (Easy Steps)
Surface Laptop 3 Keyboard Troubles? Breathe Easy, It's Solved!
Feeling the frustration of a sticky or unresponsive Surface Laptop 3 keyboard? You're not alone. Many users have encountered this annoying issue. But guess what? There’s a solution, and it's likely simpler than you think. Let's dive into how to get your typing experience back on track. You’ll quickly be back to smooth typing.
Understanding the Culprit: The Surface Laptop 3 Keyboard's Achilles Heel
What causes these keyboard problems? Dust, debris, and even tiny crumbs are often the villains. These particles find their way under the keys. These then disrupt the delicate mechanisms. Furthermore, liquid spills can also cause significant damage. Therefore, a proactive approach is best. Sometimes it’s a software glitch. But don’t worry, there are several easy fixes. You should inspect your keyboard.
Step-by-Step Guide: Bringing Your Keyboard Back to Life
First, let's start with the easiest solutions. Try these first. This may be all you need.
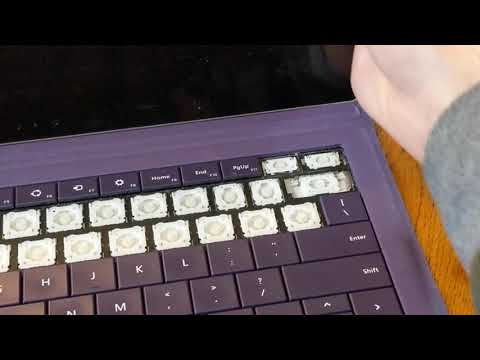
The Gentle Cleanse: This is usually the first thing to try. Begin by powering down your Surface Laptop 3. In fact, completely shut it down, not just sleep mode. Next, gently tilt the laptop. This will help loosen any debris. Using a can of compressed air, carefully spray between the keys. Focus on the problem areas. Be sure to hold the can upright. Also, keep the nozzle a few inches away. This prevents any liquid from escaping. If you don’t have compressed air, a soft-bristled brush can work. Gently brush around the keys.
The Software Shuffle: Sometimes, the issue isn’t hardware-related. It might be due to a software glitch. Restarting your Surface Laptop 3 can often resolve minor software hiccups. Also, try updating your drivers. Go to Device Manager in your Windows settings. Then, search for "Keyboard" and update the driver. This can refresh keyboard functionality.
The Deep Dive (If Needed): If the above hasn’t helped, consider a more thorough cleaning. You can use a cotton swab to gently clean around the keycaps. Make sure your cotton swab is slightly damp, but not dripping wet. Also, consider a specialized keyboard cleaner. Always read the instructions first.
Troubleshooting Tactics: Beyond the Basics
If the initial steps don't work, let's explore other avenues.
External Keyboard Test: Connect an external keyboard to your laptop. This will quickly help determine if the issue lies with the Surface Laptop 3 keyboard itself. If the external keyboard functions flawlessly, then the problem is with your laptop keyboard. This will help you pinpoint the source of the issue.
System Restore (A Last Resort): Have you recently installed any new software? Did you update your operating system? Roll back your system to a previous restore point. This could eradicate any software conflicts hindering your keyboard. However, this means you will lose any changes from the restore point.
Check for Hardware Damage: Be very meticulous. Inspect the keyboard for any visible damage. Is there any liquid damage? Have you noticed any cracked or loose keys? If damage is found, it might require professional repair.
Preventative Measures: Keeping Your Keyboard Pristine
Now that we've fixed it, let's keep it clean. Here are some preventative measures.
Regular Cleaning Routine: Make it a habit to clean your keyboard weekly. This involves a simple dusting. Also, use compressed air to prevent buildup.
Mindful Eating and Drinking: Try to avoid eating or drinking near your laptop. Spills are the enemy. Also, crumbs are a nuisance.
Consider a Keyboard Cover: A keyboard cover can offer an extra layer of protection. These are generally inexpensive. They can prevent spills and dust from reaching your keyboard.
When to Seek Professional Help: Knowing Your Limits
Sometimes, the problem exceeds DIY solutions. If all your attempts fail, don't hesitate to seek professional help. Specifically, contact Microsoft support, or visit a reputable repair shop. This is especially true if you suspect hardware damage. They have expertise and specialized tools. They can diagnose and repair complex issues.
Conclusion: Typing Bliss, Reclaimed!
Keyboard issues on the Surface Laptop 3 can be frustrating. But now you have a clear roadmap. You know how to troubleshoot effectively. By following these steps, you can often restore your keyboard. Furthermore, you can enjoy smooth, uninterrupted typing. So, don't let a sticky key slow you down. Get back to work or play! You are equipped with knowledge.
Sonicmaster Touchpad Nightmare! (Asus Laptop Fix Inside)Surface Laptop 3 Keyboard Nightmare: FIXED! (Easy Steps)
Alright, let's be honest, fellow Surface Laptop 3 users: that keyboard. It could be the bane of your existence, right? You're typing away, lost in the creative zone, and BAM! Key repeats, sticky keys, or worse – complete and utter unresponsive chaos. Frustrating doesn't even begin to cover it. We've all been there. The good news? You're not alone, and more importantly, there's a good chance the problem is fixable! Forget throwing your laptop across the room (tempting, I know), and let’s dive into how we can tame that keyboard beast. Think of this as your ultimate survival guide in the face of the dreaded Surface Laptop 3 keyboard malfunction.
1. The Surface Laptop 3 Keyboard Calamity: Why Is This Happening?!
Before we jump into solutions, let’s understand the enemy. What exactly is going wrong with your keyboard? Often, the issues boil down to a few core problems. Maybe it's a hardware issue – some keys are simply failing to respond, no matter how hard you mash them. Or perhaps it's a software glitch, a mischievous gremlin hiding in the code, causing erratic behavior. Dust, debris, and the occasional rogue crumb can also wreak havoc, making keys sticky or unresponsive (guilty as charged in my case!). The layout of the keys on the Surface Laptop 3 is quite low-profile, which, while aesthetically pleasing, can also make it more susceptible to these kinds of issues. It's like a delicate flower – beautiful but requiring extra care. Understanding the potential culprits is half the battle won.
2. Is It Hardware or Software? A Crucial First Step
Before you start wielding screwdrivers (unless you're exceptionally tech-savvy, I'd advise against it!), you need to figure out if you're dealing with a hardware or software problem. This initial diagnostic step can save you a lot of unnecessary frustration and potential damage. Think of it like a doctor diagnosing an illness – we need to know what’s ailing our patient (the keyboard!).
- The Simple Test: Restart your laptop. This is the digital equivalent of taking a deep breath. Sometimes, a simple reboot clears up temporary glitches. Did it work? Awesome! If not, keep reading.
- External Keyboard Check: Connect an external USB or Bluetooth keyboard. If the external keyboard works flawlessly, the problem is likely with the Surface Laptop 3's built-in keyboard.
- BIOS/UEFI Check: Access your laptop’s BIOS/UEFI settings (usually by pressing a key during startup). This environment uses basic functions, so if the keyboard doesn't work here, it's a strong indicator of a hardware malfunction.
3. Software Solutions: Your Digital First Aid Kit
If the problem appears software-related (yay!), we have a few tricks up our sleeves. Consider these your first line of defense.
- Driver Updates: Outdated or corrupt keyboard drivers can be the silent saboteurs. Go to Device Manager (search for it in the Windows search bar), expand the “Keyboards” section, right-click on your keyboard, and select “Update driver.” Let Windows do its thing.
- Run the Keyboard Troubleshooter: Windows has built-in troubleshooters designed to diagnose and fix common problems. Search for "Troubleshoot settings" in the Windows search bar and look for keyboard-related options.
- Check for Windows Updates: Ensure your operating system is up-to-date. Software updates often include bug fixes and performance improvements that can address keyboard issues. Think of it as giving your laptop a regular check-up.
4. Cleaning Crew Assemble! Dust and Debris Removal
Sometimes, the solution is as simple as a good cleaning. Dust, crumbs, and other debris can get lodged under the keys, causing all sorts of problems.
- Compressed Air: This is your best friend. Gently blow compressed air between the keys to dislodge any trapped particles.
- Isopropyl Alcohol (Carefully!): If you have some stubborn residue, you can lightly dampen a cotton swab with isopropyl alcohol (70% or higher) and gently wipe around the affected keys. Important: Don't soak the keyboard, and let it dry completely before using it.
- Gentle Brush: A soft-bristled brush can also help dislodge stubborn debris without causing damage.
5. Advanced Software Fixes: Digging Deeper
If the basic software solutions didn't do the trick, it's time to get a little more advanced.
- System File Checker (SFC): This tool scans for and repairs corrupted system files. Open Command Prompt as an administrator (search for it in the Windows search bar, right-click, and choose "Run as administrator") and type
sfc /scannow. Let it run its course – it may take a while. - DISM (Deployment Image Servicing and Management): If SFC doesn't find any issues, DISM is your next line of defense. In the same Command Prompt window, try running the following commands, one at a time:
DISM /Online /Cleanup-Image /CheckHealthDISM /Online /Cleanup-Image /ScanHealthDISM /Online /Cleanup-Image /RestoreHealth
- Reinstalling the Keyboard Driver: In Device Manager, uninstall your keyboard driver, then restart your laptop. Windows will usually reinstall the driver automatically.
6. The Perilous Possibility: Hardware Issues
If you've tried all the software solutions and the keyboard is still acting up, it's unfortunately likely that you have a hardware problem. This can manifest in various ways, from individual keys that don't work to the entire keyboard being unresponsive. It’s like a broken engine in a car; you can't fix it with software alone.
7. Hardware Solutions & Potential Fixes (Proceed with Caution!)
- Visual Inspection: Carefully examine the keyboard for any obvious signs of damage, such as loose keys or physical wear and tear.
- The "Isolate the Problem" Technique: If some keys work and others don't, you might be able to identify a pattern. For example, are adjacent keys failing? This could indicate a problem with a specific circuit or connector.
- DIY Replacement (Extreme Measures): Only consider this if you are comfortable working with electronics and have the necessary tools. Replacing the keyboard on a Surface Laptop 3 can be tricky, and you risk damaging your device if you're not careful. Watch videos and do your research thoroughly before attempting this.
8. When to Seek Professional Help
Knowing when to throw in the towel and call in the experts is crucial. If you’ve exhausted all software solutions and suspect a hardware issue, or if you’re uncomfortable attempting any hardware repairs, it's time to seek professional help.
- Microsoft Support: Start with Microsoft support. They may be able to diagnose the problem and offer repair options or warranty coverage (fingers crossed!).
- Authorized Repair Centers: These centers are equipped with the tools and expertise to repair Surface devices.
- Local Computer Repair Shops: Choose a reputable shop with experience repairing laptops.
9. Preventing Future Keyboard Nightmares: Proactive Maintenance
Wouldn't it be great if we could prevent these issues in the first place? Absolutely! Here’s how:
- Regular Cleaning: Make cleaning your keyboard a habit, like brushing your teeth. Every week or so, give it a quick once-over with compressed air.
- Protective Covers: Consider using a keyboard cover, especially if you tend to eat or drink near your laptop. They’re not a perfect solution, but they can help prevent crumbs and spills from getting into the keys.
- Gentle Usage: Be mindful of your typing pressure. Mashing the keys repeatedly can lead to premature wear and tear.
10. Keyboard Covers: A Double-Edged Sword?
Keyboard covers can provide great protection, but there are trade-offs.
- Pros: Protection from spills and debris, can extend keyboard lifespan.
- Cons: Can affect typing feel and responsiveness, may reduce heat dissipation.
Choose a cover that fits your typing style and preferences.
11. Typing Ergonomics: Reducing Strain and Damage
Proper ergonomics can prevent a lot of issues, not just with your keyboard, but with your overall health as well.
- Posture: Sit upright with your back straight and your feet flat on the floor or a footrest.
- Keyboard Placement: Position the keyboard so that your elbows are bent at a 90-degree angle.
- Wrist Support: Consider using a wrist rest to reduce strain.
12. Troubleshooting Common Keyboard Problems
Let's address some specific keyboard glitches.
- Sticky Keys: Clean the affected keys with compressed air and isopropyl alcohol. If that doesn't work, the key mechanism might be damaged.
- Key Repeating: This can be caused by a software glitch or a malfunctioning key. Try updating your drivers and cleaning the keyboard.
- Unresponsive Keys: First, reboot. Then, check for driver issues and external keyboard functionality.
13. The Importance of Backing Up Your Data
Before you start any troubleshooting steps, it’s crucial
Laptop's Down? Google's GONE! (Here's the Fix!)How to Fix Surface Pro 3, 4, 5, 6, 7, or 7 keyboard not working

By Aldo James How to Fix Surface Pro 3, 4, 5, 6, 7, or 7 keyboard not working by Aldo James
Surface Go 3 Keyboard Unresponsive or Not Working 3 Easy Fixes

By WorldofTech Surface Go 3 Keyboard Unresponsive or Not Working 3 Easy Fixes by WorldofTech
Troubleshooting Microsoft Surface Laptop 3 Keyboard and Trackpad Issues Resolved

By SureCanDo Computer Services Troubleshooting Microsoft Surface Laptop 3 Keyboard and Trackpad Issues Resolved by SureCanDo Computer Services
Title: Surface Pro 3 keyboard key removal
Channel: Stacy
Surface Pro 3 keyboard key removal by Stacy
Change Wifi Settings
Here's the title for your article: The Ultimate Guide to Choosing the Right Hiking Boots for Every Adventure
The Ultimate Guide to Choosing the Right Hiking Boots for Every Adventure
Venturing into the wilderness, whether it's a gentle meander through a local park or a challenging ascent of a majestic peak, begins with the right foundation: a pair of exceptional hiking boots. These aren't just footwear; they're your partners, your protectors, and the key to unlocking unforgettable experiences. Selecting the ideal boots, however, can feel daunting. The sheer variety of options, technical jargon, and conflicting advice can easily overwhelm even the most seasoned outdoor enthusiast. This comprehensive guide cuts through the noise, providing a clear, concise, and definitive roadmap to finding the perfect hiking boots for your individual needs and aspirations.
Understanding the Anatomy of a Hiking Boot
Before diving into the specifics, understanding the fundamental components of a hiking boot is crucial. This knowledge empowers you to make informed decisions, recognizing the advantages and disadvantages of different features. We'll break down the key elements:
The Upper: This is the external portion of the boot, the part that cradles your foot and ankles. Uppers are crafted from various materials, each possessing unique characteristics. Leather offers superior durability and moldability, conforming to your foot over time. Synthetic materials, such as nylon and polyester, are lighter, dry faster, and often more affordable. Hybrid uppers, combining both leather and synthetic components, offer a balanced approach, combining ruggedness with breathability. The height of the upper, whether low-cut, mid-cut, or high-cut, dictates the level of ankle support and protection.
The Midsole: This is the cushioning layer, nestled between the upper and the outsole. The midsole absorbs shock, providing comfort and stability. Common midsole materials include EVA (Ethylene Vinyl Acetate), known for its lightness and cushioning properties, and PU (Polyurethane), which offers greater durability and support, but is often heavier. The density of the midsole will influence its firmness – a denser midsole provides more stability, ideal for carrying heavier loads, while a softer midsole offers greater comfort.
The Outsole: The outsole is the bottom of the boot, the part that makes contact with the ground. It's primarily responsible for traction and durability. Outsoles are made of rubber compounds, each with varying degrees of grip. Vibram outsoles are widely recognized for their exceptional performance, offering superior traction on a variety of terrains. The lug pattern (the design of the tread) influences the boot's grip, with deeper, more widely spaced lugs providing better traction in mud and loose terrain.
The Insole: This is the removable footbed inside the boot. Insoles provide additional cushioning and support, and often feature arch support to enhance comfort and stability. Many hikers choose to replace the stock insoles with custom or aftermarket options for improved fit and performance.
Matching Boot Types to Your Hiking Style
The ideal hiking boot is intrinsically linked to the type of hiking you intend to do. Choosing the right boot based on your anticipated activities is paramount; selecting the wrong type can lead to discomfort, blisters, and a compromised hiking experience.
Hiking Shoes: These are low-cut, lightweight options, ideally suited for day hikes on well-maintained trails. They offer excellent freedom of movement and breathability, but provide less ankle support and protection than boots. Choose hiking shoes for fastpacking, trail running, or shorter hikes where weight is a primary concern.
Day Hiking Boots: These mid-cut boots offer increased ankle support and protection compared to hiking shoes, making them suitable for more challenging day hikes and backpacking trips with lighter loads. They often feature more robust outsoles for improved traction on varied terrain. Look for day hiking boots if your adventures include moderate inclines, rocky paths, or carrying a daypack.
Backpacking Boots: Designed for multi-day backpacking trips and carrying heavier loads, backpacking boots are typically high-cut, offering maximum ankle support and stability. They are constructed with durable materials, rugged outsoles, and often feature stiffer midsoles to distribute weight evenly. These boots are essential for extended treks, off-trail adventures, and carrying significant gear.
Mountaineering Boots: These are specialized boots designed for technical mountaineering and climbing in challenging conditions, including glaciers and icy terrain. They are often compatible with crampons and feature rigid soles for optimal performance on steep slopes. These boots are typically overkill for casual hiking but vital for serious mountaineering endeavors.
Key Considerations: Fit, Features, and Materials
Beyond the boot type, several other factors will significantly influence your selection process.
Fit is Paramount: The most expensive, technically advanced boot is useless if it doesn't fit properly. Proper fit is arguably the most important factor in preventing blisters and ensuring comfort. Visit a reputable outdoor gear store and have your feet professionally measured. Try on boots with the socks you intend to wear while hiking. Allow ample room in the toe box to prevent your toes from jamming during descents. The heel should be snug, with minimal slippage. Walk around the store, simulating uphill and downhill inclines, to assess the fit under various conditions.
Waterproof Membranes: Waterproof membranes, such as Gore-Tex, are designed to keep your feet dry in wet conditions. While these membranes can be effective, they also reduce breathability, potentially leading to sweaty feet in warm weather. Consider the climate and conditions you anticipate hiking in when choosing a boot with a waterproof membrane.
Breathability and Ventilation: Adequate ventilation is crucial for preventing overheating and reducing the risk of blisters. Some boots feature breathable uppers and linings, while others incorporate ventilation ports. In warmer climates, prioritize breathability over waterproofing.
Durability: Hiking boots are an investment; choose boots constructed with durable materials and reinforced stitching to withstand the rigors of the trail. Leather boots are typically more durable than synthetic options, but they require more maintenance.
Weight: The weight of a boot directly impacts your energy expenditure. Lighter boots are generally preferred for shorter hikes and fastpacking, while heavier boots offer increased stability and protection for backpacking trips.
Consider Insulation: If you plan on hiking in cold weather conditions, choose boots with adequate insulation to keep your feet warm. Look for boots with Thinsulate or other insulating materials.
Maintaining Your Hiking Boots: Extending Their Lifespan
Proper care and maintenance are essential for extending the lifespan of your hiking boots and ensuring their continued performance.
Cleaning: After each hike, remove any dirt, mud, or debris from your boots. Use a soft brush and lukewarm water. Avoid harsh chemicals or abrasive cleaners.
Drying: Allow your boots to dry naturally, away from direct heat or sunlight, which can damage the materials. Remove the insoles and laces to expedite the drying process. Stuff the boots with newspaper to absorb moisture.
Cleaning and Conditioning Leather: Leather boots require regular cleaning and conditioning to maintain their suppleness and prevent cracking. Apply a leather conditioner or balm periodically, following the manufacturer's instructions.
Resurfacing the Outsole: Over time, the outsole will wear down. Consider having your boots resoled by a professional cobbler if they offer significant wear.
Storage: Store your boots in a cool, dry place, away from direct sunlight and extreme temperatures.
Troubleshooting Common Hiking Boot Issues
Even with the best boots, problems can arise. Here's how to address some common issues:
Blisters: Blisters are the bane of any hiker's existence. Proper fit, moisture-wicking socks, and preventative taping can help minimize the risk. If a blister develops, treat it promptly with the appropriate padding and dressings.
Sore Feet: Soreness can result from improper fit, inadequate support, or overuse. Experiment with different insoles and lacing techniques to find the optimal fit. Pace yourself and take regular breaks.
Water Leaks: If your boots leak, check the seams and waterproof membrane for damage. Apply a waterproofing sealant to the seams if necessary.
Laces Breaking: Carry extra laces on your treks. Replace worn laces promptly; the original laces are often not durable enough for challenging usage.
Making Your Final Decision: A Step-by-Step Approach
Choosing the ideal hiking boots is a journey in itself. To facilitate this process, adhere to the following steps:
Define Your Needs: Determine the type of hiking you'll be doing, the terrain you'll be traversing, the weather conditions you'll encounter, and, most importantly, the weight of the gear you'll be carrying.
Set Your Budget: Hiking boots range in price; determine your budget before you begin shopping.
Research Your Options: Read reviews, compare models, and familiarize yourself with the features and benefits of different boots.
Visit a Retailer: Go to a reputable outdoor gear store. Have your feet measured and try on multiple pairs of boots.
Test the Fit: Walk around the store, simulating your hiking style. Pay attention to the fit in the heel, toe box, and midfoot.
Make Your Decision: Select the boots that best meet your needs and budget.
Break Them In: Before embarking on a major hike, wear your new boots on shorter walks to break them in and prevent blisters.
By following these guidelines, you'll be well-equipped to choose the perfect hiking boots, setting the stage for countless adventures on the trails. Remember, your boots
