few keys are not working in laptop keyboard

Title: How to Fix Some Keys Not Working on Laptop Keyboard Keyboard Not Working
Channel: Tech White
How to Fix Some Keys Not Working on Laptop Keyboard Keyboard Not Working by Tech White
few keys are not working in laptop keyboard, some keys not working on laptop keyboard lenovo, why some keys are not working in laptop, why keys on laptop keyboard not working
Laptop Keyboard FAILING? 😱 FIX IT NOW!
Laptop Keyboard Blues: Conquer Those Sticky Keys!
Is your laptop keyboard suddenly deciding to misbehave? Are you staring at stubborn keys that refuse to cooperate? Don't panic! Instead of despairing, take a deep breath. Because we're diving headfirst into the world of keyboard troubleshooting. We’ll explore all the steps to get those keys clicking again.
Spotting the Culprit: Diagnosing Your Keyboard's Meltdown
First things first, let's figure out what’s going on. Is your keyboard completely dead? Or are certain keys acting up and sticking? Maybe you’re experiencing phantom key presses? These issues stem from different origins. And, therefore, the fixes vary. Start by simply restarting your laptop. This can surprisingly resolve many minor software glitches. Then, check your keyboard settings. Ensure no accidental settings are messing with your input.
The Dust Bunny Dilemma: Cleaning Your Way to Redemption
Now, let’s tackle the most common keyboard villain: dust and debris. Over time, crumbs, dust, and maybe even tiny pet hairs find their way under your keys. Consequently, they cause all sorts of problems. Grab a can of compressed air. Carefully direct the air between the keys. Because this blasts away the offending particles. If you have a keyboard key puller, remove the keys. After doing so, you can clean beneath them more thoroughly. Be gentle when pulling keys off. You also don’t want to damage the delicate mechanisms underneath.
Liquid Mishaps: The Aftermath and Recovery
Uh oh! Did you spill something on your keyboard? Liquids are keyboard’s arch-nemesis. Act fast! Initially, shut down and disconnect your laptop immediately. Then, flip it upside down (at a 45-degree angle) to drain out the excess liquid. Use soft, absorbent cloths to mop up any spills. Allow the keyboard to dry completely. This step is crucial. You can also use a hairdryer on a low heat. But ensure you don’t overheat the components. If it’s a sticky substance, cleaning might be necessary.
Software Shenanigans: When the Driver's to Blame
Sometimes, your keyboard issues are not physical. They could be software-related. Outdated or corrupted drivers can cause problems. Visit your laptop manufacturer’s website. Then download and install the latest keyboard drivers compatible with your operating system. Alternatively, you can update them through Device Manager. Navigate to your keyboard, right-click, and select "Update driver."
The Sticky Key Syndrome: Addressing the Annoying Offenders
Are certain keys sticking or repeating? A simple cleaning might not always suffice. You may need to lubricate the key mechanisms. First, try using a specialized keyboard lubricant. However, avoid using ordinary oils, as they can attract more debris. Apply a tiny amount to the key's edges. Gently press the key to distribute the lubricant. If this doesn't work, the key may be physically damaged.
External Keyboard Solutions: Bypassing the Built-in Woes
In the short term, using an external USB keyboard is a viable workaround. This lets you keep working while you troubleshoot the laptop keyboard. It’s a handy backup plan. Also, it can prevent any further frustration. Before deciding to replace your laptop’s keyboard, explore this option.
Internal Examination: Deep-Diving into the Keyboard's Anatomy
If the above steps don't resolve the problem, consider opening your laptop. Be warned, this can void your warranty. Consult your laptop's manual. Then, follow its instructions for disassembling the keyboard. Examine the keyboard ribbon cable connection. Ensure it's securely seated. Be cautious when reconnecting the cable. If the cable seems damaged, you might need to replace it.
When to Seek Professional Help: Recognizing the Limits
There are times you should not attempt repairs yourself. If you’ve tried everything, and your keyboard is still malfunctioning, seek professional help. If you're uncomfortable disassembling your laptop, don't hesitate to consult an expert. A technician specializes in repairing laptop keyboards. Moreover, they have the tools and expertise needed.
Preventive Measures: Shielding Your Keyboard from Future Troubles
Prevention is always better than cure. Invest in a keyboard cover to prevent debris from entering. Clean your keyboard regularly. Avoid eating or drinking near your laptop. Finally, handle your laptop carefully. These habits protect your keyboard from future issues. Follow these steps, and your keyboard will stay in tip-top shape.
The Final Click: Reclaiming Your Keyboard's Glory
Fixing a malfunctioning laptop keyboard isn’t always easy. But, it’s often achievable. Following these steps can restore your keyboard to its full functionality. Now, go forth and conquer those sticky keys! Your happy typing experience is just a few steps away.
Laptop Ignoring Your Earphones? This SHOCKING Fix Works!Laptop Keyboard FAILING? 😱 FIX IT NOW!
Hey there, tech warriors! Ever felt that gut-wrenching moment when you’re mid-sentence, the creative juices are flowing, or you're desperately trying to meet a deadline, and BAM! Your laptop keyboard decides to stage a rebellion? We've all been there. It’s like your trusty sidekick suddenly developing a bad case of selective hearing. Fear not, fellow digital navigators! We're diving deep into the murky waters of malfunctioning keyboards and emerging victorious. This isn't just a fix-it guide; it's a rescue mission, a digital intervention, and a commitment to keeping your workflow flowing smoothly – or at least, as smoothly as possible!
1. The Dreaded Keyboard Catastrophe: Recognizing the Signs
Before we rush into solutions, let's identify the enemy. A failing keyboard doesn't always scream its problems. Sometimes, it whispers. Think of it like a leaky faucet; you don't appreciate the drip until you're knee-deep in water. Common symptoms include:
- Sticky Keys: They linger longer than they should, like unwelcome guests at a party.
- Unresponsive Keys: The silent treatment – you press, but nothing happens.
- Double Typing: That "t" that magically turns into "tt" – a frustrating digital echo.
- Typing the Wrong Characters: The letters morphing into something… else. It’s like your keyboard has developed its own secret language.
- Intermittent Failure: Working one minute, failing the next. A digital tease!
If any of these ring a bell, you've likely encountered a keyboard catastrophe. Let's move on!
2. Elementary, My Dear Watson: The Usual Suspects
Before we grab the digital defibrillator, let's consider the usual suspects. Sometimes, the solution is simpler than you think. Think of it like detective work; we need to eliminate the obvious.
- The Sticky Situation (Dust and Debris): Crumbs, dust bunnies, and the remnants of countless late-night snacks are your keyboard's archenemies. They sneak in, causing havoc.
- Liquid Damage: A spilled coffee or a rogue splash of water can wreak unimaginable damage. It's like a digital drowning.
- Software Glitches: Sometimes, it's not the hardware but the software. Drivers can be corrupted, or settings can go haywire.
- External Keyboard Interference: If you've recently plugged in an external keyboard, it might be causing a conflict.
3. First Aid for Your Keyboard: The Gentle Touch
Before we start dismantling anything, let's try some gentle fixes. Think of these as the equivalent of applying a bandage.
- The Great Keyboard Clean-Up: Turn off your laptop, unplug it, and carefully flip it upside down. Gently shake to dislodge any loose debris. Use canned air to blow out the remaining crumbs and dust. Be mindful!
- The Sticky Key SOS: Use a cotton swab lightly dampened with isopropyl alcohol (rubbing alcohol) to clean around sticky keys. Be extremely careful – too much liquid can cause bigger problems.
- Restart and Reboot: A classic for a reason. Often, a simple restart can resolve software glitches. It's the digital equivalent of "have you tried turning it off and on again?"
- Check and Update Drivers: Go to your device manager and ensure your keyboard drivers are up-to-date. Outdated drivers are like old, rusty tools; they just don't work as well.
4. Diving Deeper: Uncovering the Software Culprit
If the simple fixes haven't worked, let's suspect the software, as it is often the reason for chaos.
- Run a Keyboard Troubleshooter: Windows and macOS have built-in troubleshooters. They're like little digital detectives that identify and fix common problems.
- Check Your Keyboard Layout Settings: Ensure your keyboard layout matches your physical keyboard. A mismatched layout can lead to all sorts of typing errors. This is often overlooked, but crucial!
- Scan for Malware: Malware can sometimes interfere with keyboard functionality. Run a thorough scan with your antivirus software.
5. The Hardware Hurdles: When Things Get Tricky
If all else fails, it's time to address the hardware. This is where things get a bit more complicated.
- External Keyboard Test Drive: Plug in an external keyboard. Does it work? If yes, it strongly suggests a problem with your laptop's keyboard.
- Keyboard Replacement: The Ultimate Solution: Depending on the model, replacing a laptop keyboard can be a DIY project or require professional assistance. YouTube, and the right tools, is your friend!
- Professional Intervention: If you're not comfortable with hardware repairs, don't hesitate to seek professional help. A damaged motherboard is a costly fix.
6. The Laptop's Liquid Nemesis: Water Damage Recovery
Water damage demands immediate action. Time is of the essence, as you want to avoid corrosion.
- Immediate Response: Quickly turn off your laptop and unplug it immediately. Do not try to turn it back on.
- Drying Out the Machine: Open the laptop as much as possible to allow for maximum air exposure. Let it sit for at least 24-48 hours.
- Professional Deep Clean: Even after drying, there may be residue. A professional cleaning is essential to remove corrosion.
7. Prevention Is Key: How to Protect Your Precious Keyboard
Let's talk about preventative measures. We want to minimize the chances of a repeat performance of this keyboard drama.
- Keyboard Covers: The Protective Shield: Use a keyboard cover to protect against spills and dust. It's a simple, cost-effective shield.
- Strategic Snacking: Keep food and drinks away from your keyboard. Even a small spill can cause significant damage.
- Regular Cleaning: Make cleaning your keyboard a regular habit. A quick wipe-down can keep the dust and debris at bay.
8. Beyond the Keyboard: Alternative Input Methods
Sometimes, the keyboard may simply be beyond the point of repair. We shall explore alternative methods to avoid this keyboard crisis.
- External Keyboard: Your Backup Plan: A USB or Bluetooth external keyboard gives you an alternative.
- On-Screen Keyboard: The Digital Savior: Windows and macOS offer on-screen keyboards you can use with a mouse.
- Voice Typing: The Future of Input: Voice typing software is becoming increasingly accurate.
9. Diagnose and Isolate: Ruling Out Internal Problems
Often the keyboard is not the issue.
- Test the Function Keys: See if those work. If they do, the keyboard's logic board isn't the problem.
- Boot From a Different Drive: Test your machine using another operating system.
10. When DIY Isn't Enough: Finding Qualified Help
It's crucial to know your limits. Sometimes, calling in the professionals is the best option.
- Where to Find Technicians: Opt for local repair shops, as they tend to be honest and efficient.
- Preparing for the Repair: Provide complete details about your issue, and bring all of your documentation, if applicable.
11. Keyboard Maintenance Checklist: Stay Ahead of the Game
Let's recap the information above, so that you can be ready.
- Monthly Cleanup: Regularly clean your keyboard with canned air or a soft cloth.
- Quarterly Inspections: Inspect your keyboard for any visible signs of wear or damage.
- Annual Software Updates: Ensure your operating system and drivers are up-to-date.
12. The Cost of Neglect vs. Proactive Care
Consider the costs of ignoring your keyboard. A small fix might save a lot of money.
- The Cost of Repair: A basic cleaning takes just minutes, while a replacement could cost more.
- The Cost of Downtime: Lost time means a loss of productivity, and money.
- The Value of Prevention: Prevention is always cheaper than cure.
13. Keyboard Quirks and Workarounds: Quick Tips
Simple tricks to get you going, when the going gets tough.
- Sticky Key Fixes: Often rubbing alcohol can work.
- Double Typing Trick: This is simply a driver issue, as it may need to be reinstalled.
14. The Evolution of Keyboards: A Brief History
Let's go back, before you press the modern keys.
- From Typewriters to Modern Keyboards: Go deep into the history, and marvel.
- The Future of Input: Touch screens, voice control, and other methods of input.
15. Keyboard Success Stories: Inspiring Tales
Keyboard repairs don't have to be nightmares. Many succeed.
- Simple Problem Solved: The easiest to fix.
- DIY Triumph: Inspiring success stories, from the trenches.
Wrapping Up: Keyboard Victory!
And there you have it! We've navigated the treacherous terrain of failing laptop keyboards, armed with knowledge and a healthy dose of digital resilience. Remember, a malfunctioning keyboard doesn't have to be a disaster. With the right approach, from simple fixes to professional help, you can reclaim control and get back to doing what you do best. So, the
Laptop Headphones: The Ultimate Guide to Crystal-Clear AudioDell Alienware M17 some keyboard keys not working. Motherboard Repair. Not a keyboard issue.

By NorthridgeFix Dell Alienware M17 some keyboard keys not working. Motherboard Repair. Not a keyboard issue. by NorthridgeFix
How To Repair Computer Keyboard With Some Keys Not Working

By RJ The Bike Guy How To Repair Computer Keyboard With Some Keys Not Working by RJ The Bike Guy
SOLUTION Some Keys Not Working on Laptop Keyboard

By Tech Express SOLUTION Some Keys Not Working on Laptop Keyboard by Tech Express
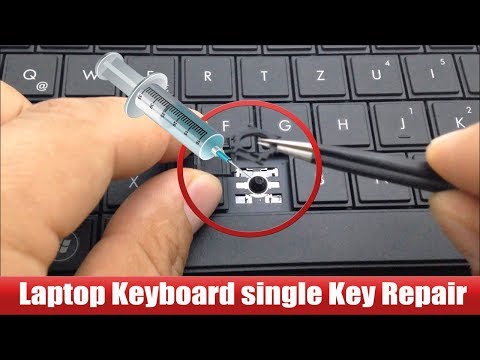
Title: Laptop Keyboard key repair very easy way.
Channel: Hit Short Films
Laptop Keyboard key repair very easy way. by Hit Short Films
Laptop Working
Laptop Keyboard FAILING? 😱 FIX IT NOW!
It's a modern-day nightmare: you're immersed in a crucial task, the deadline looms, and bam – your laptop keyboard starts acting up. Keys stick, repeat themselves, or simply refuse to respond. Panic sets in. But breathe deep; before you reach for the nearest brick to hurl at your technology, know this: you are not alone, and often, the solution is simpler than you think. This comprehensive guide offers practical, tested solutions to get your laptop keyboard back to its perfect, responsive self.
Identifying the Culprit: Pinpointing the Keyboard Problem
Before diving into fixes, a bit of detective work is essential. Precisely what is going wrong? Is it a single key, or a collection? Does the problem occur consistently, or sporadically? The answers will dictate the best troubleshooting path.
Sticky Keys: These are the most common culprits. They feel sluggish when pressed and may require a firmer press to register. Sometimes, a sticky key will feel damp or tacky to the touch.
Unresponsive Keys: These keys simply won’t register any input. Pressing them results in zero action, regardless of how hard you press.
Repeating Keys: You're typing a single letter, and it appears multiple times, as if the key is permanently pressed down.
Incorrect Characters: You hit "a," and "q" appears. This indicates a deeper configuration issue, possibly related to the keyboard layout or software.
Keyboard Not Recognized: The keyboard doesn’t function at all, as if it isn’t even connected. This can be hardware related or, far more frequently, due to a driver issue.
Partial Failure: Some keys work, while others don’t. This often points to a specific physical problem.
Understanding the exact nature of the malfunction will save precious time and effort.
Software Solutions: Quick Fixes Before Hardware Hacking
Often, the solution lies not in dismantling your laptop but in a few quick software adjustments.
Restart Your Laptop: This seemingly simple step often works wonders. A reboot clears temporary glitches and allows the operating system to refresh its settings, including the keyboard drivers.
Run the Keyboard Troubleshooter: Windows and macOS both offer built-in troubleshooters designed to detect and fix common keyboard issues. In Windows, search for 'troubleshoot' in the search bar and then select 'Keyboard.' macOS users can access the diagnostic tools via the System Preferences.
Check Your Keyboard Layout Settings: Ensuring your keyboard layout matches your physical keyboard is critical. Windows users can find this in the 'Time & Language' settings, under 'Language.' macOS users can adjust settings in 'System Preferences' under 'Keyboard' and then 'Input Sources.' An improperly configured layout will cause many typing errors.
Update Your Keyboard Drivers: Outdated drivers can cause erratic keyboard behavior. In Windows, access the Device Manager (search for it in the search bar), expand the 'Keyboards' section, right-click on your keyboard, and select 'Update driver.' macOS users typically don't need to manually update drivers, but a system update can sometimes resolve driver issues.
Disable Filter Keys, Sticky Keys, and Toggle Keys: These accessibility features, while useful for some, may, inadvertently, interfere with normal keyboard function. In Windows, search for 'Ease of Access keyboard settings' to disable. In macOS, find these settings in 'System Preferences' under 'Accessibility' and then 'Keyboard.'
Check for Malware: A virus or malware program can, in rare instances, interfere with keyboard functionality. Run a full system scan using your antivirus software as a precaution.
Hardware Troubleshooting: Getting Physical with Your Keyboard
If software solutions fail, it's time to investigate your hardware. Proceed with caution and, if you're uncomfortable, consider consulting a professional.
External Keyboard Test: Connect an external USB keyboard to your laptop. Does the external keyboard work perfectly? If so, the internal keyboard's hardware is the likely culprit. If the external keyboard exhibits the same issues, the problem is likely software related.
Cleaning the Keyboard: The First Line of Defense
- Unplug the laptop, or shut it down and remove the battery: Safety first!
- Invert and Shake: Turn your laptop upside down and gently tap the bottom. This might dislodge loose debris.
- Compressed Air: Use a can of compressed air to blow out dust, crumbs, and other particles lodged between the keys. Direct the air at a 45-degree angle to blast away debris.
- Gentle Cleaning: If dust or grime persists, use a soft, lint-free cloth, slightly dampened with isopropyl alcohol (90% or higher concentration) to clean the keys. Avoid excessive moisture. Do not spray directly onto the keyboard; dampen the cloth instead. Be meticulous in getting between the keys with the cloth.
- Consider using a keyboard cleaner: There are many devices which can perform the task to clean the laptop smoothly.
Key Removal and Inspection: If specific keys are the problem, you might consider removing them. Research online for instructions specific to your laptop model, and proceed slowly.
- Use a keycap puller: These inexpensive tools make key removal much easier.
- Carefully remove the key: Note the key's attachment method (scissor mechanism, etc.) to ensure you can replace it correctly.
- Inspect for obstructions: Look for debris or physical damage under the keycap. Clean as needed with compressed air or isopropyl alcohol.
- Reassemble the key: Make sure the keycap snaps back in place securely.
Assess for Water Damage: Spilled liquid can wreak havoc on laptop keyboards. If you suspect water damage, immediately shut down the laptop, unplug it, and remove the battery (if possible). Let it dry out completely for several days. If the damage appears significant, seek professional repair.
Examine the Keyboard Cable: Some laptops have a ribbon cable that connects the keyboard to the motherboard. Sometimes, this cable comes loose.
- Consult your laptop's service manual (online): Search online for your laptop's make and model and "service manual" to find detailed disassembly instructions.
- Carefully open the laptop (if you are comfortable): If you're not comfortable, skip this step and consult a professional.
- Locate the keyboard cable: It's usually a thin, flat ribbon cable.
- Check the connection: Ensure the cable is securely seated in its connector on both the keyboard and the motherboard.
- Reassemble the laptop.
When to Call in the Professionals: Knowing Your Limits
There are situations when DIY repair isn't the best option.
- Extensive Liquid Damage: Water or other liquids have penetrated the keyboard and spread through the laptop.
- Physical Damage that Requires Component Replacement: Keys are broken, the keyboard is cracked, or other parts are physically damaged.
- You're Uncomfortable Opening the Laptop: Laptop repair can be tricky, and doing the wrong thing can cause further damage.
- Recurring Issues Despite Troubleshooting: If you've tried multiple fixes, and the keyboard still malfunctions, a deeper problem might exist.
Taking your laptop to a qualified repair technician is the best course of action in these situations. They have the tools, expertise, and replacement parts necessary to diagnose and fix complex keyboard problems.
Prevention: Maintaining a Healthy Keyboard
Preventing problems is always preferable to fixing them. Here's how to keep your laptop keyboard in tip-top shape:
- Regular Cleaning: Make cleaning the keyboard part of your regular computer maintenance routine.
- Avoid Eating or Drinking Near Your Laptop: Crumbs and spills are keyboard killers.
- Use a Keyboard Cover: Invest in a keyboard cover to protect against dust, spills, and wear and tear.
- Handle Your Laptop with Care: Avoid dropping your laptop or subjecting it to excessive pressure.
- Consider an External Keyboard for Desktop Use: This significantly reduces wear and tear.
By following these steps, you can significantly improve your chances of solving your laptop keyboard problems and keep your device working flawlessly. Don't despair; start with the simple solutions, and work your way through the list. With a bit of patience and persistence, you can bring your keyboard back to life. Your typing fingers will thank you.
