button not working on laptop

Title: If Function keys do not work on the Laptop F1 - F12
Channel: Simple Tech
If Function keys do not work on the Laptop F1 - F12 by Simple Tech
button not working on laptop keyboard, volume button not working on laptop, power button not working on laptop, sound button not working on laptop, delete button not working on laptop keyboard, enter button not working on laptop, wifi button not working on laptop, backspace button not working on laptop, mute button not working on laptop, shift button not working on laptop
Laptop Button Broken? FIX IT NOW! (Easy Guide)
Laptop Button Blues? Don't Panic, We've Got This!
Let's be honest; a malfunctioning laptop button is a major headache. That irritating click that doesn't register can bring your workflow screeching to a halt. Luckily, you don't necessarily need to rush to a repair shop. Instead, you can often fix the problem yourself. Therefore, this comprehensive guide provides you with the tools to bring that button back to life.
Troubleshooting Your Troublesome Button: A Preliminary Check
Before diving into repairs, you should do a bit of detective work. For instance, is the problem isolated to a single button, or are multiple keys unresponsive? Consequently, the root cause might be different. However, start with the simplest solutions first. First, reboot your laptop. Often, a simple restart resolves minor software glitches. After a restart, check your sticky keys settings. A stuck key can sometimes mimic a broken button. Also, ensure your laptop's connected peripherals, like an external keyboard, aren’t interfering. In addition, try using a different user profile. This helps determine if the issue is account-specific.
Step 1: Power Down and Prepare for Button Surgery
Safety first! Furthermore, unplug your laptop from any power source. Then, remove the battery if possible. Your laptop's internal components are sensitive. So, do not begin any repair without the proper precautions. After this, you will need some basic tools. These will include a small Phillips head screwdriver, a plastic opening tool, and possibly some tweezers. In other words, gather everything you need before you start.
Step 2: The Art of Disassembly: Accessing the Button's Soul
Carefully examine your laptop's design. The approach varies depending on your laptop model. Thus, consult your laptop's service manual or search online for specific disassembly instructions. Most laptops usually have screws on the bottom. Furthermore, gently remove these screws. Next, grab your plastic opening tool. Then, gingerly pry open the laptop's casing. Start at a corner or edge, carefully working your way around. Be patient, and do not force anything. With that in mind, slow and steady wins the race.
Step 3: Button Inspection and Cleaning: The Dust Bunny Debacle
Once you have access to the keyboard, locate the problematic key. Often, dust, debris, or even sticky residue can cause button malfunctions. For example, use compressed air to blow away any dust or debris. Then, carefully inspect the button mechanism. Are the plastic parts intact? Furthermore, is the button physically damaged? If the keycap is removable, gently detach it. Clean the keycap and the underlying area. After which, use a cotton swab dipped in isopropyl alcohol for stubborn grime.
Step 4: The Membrane's Mystery: Checking the Contact
Many laptop keys utilize a membrane system. This is a thin layer of plastic with conductive traces. In addition, the membrane makes contact to register key presses. Sometimes, the membrane can become worn or damaged. After removing the keycap, examine the membrane beneath. Look for any signs of wear and tear. If the membrane is visibly damaged, replacement might be necessary. However, before resorting to replacement, gently clean the contact points on the membrane. A small amount of isopropyl alcohol can work wonders.
Step 5: Reassembly and Testing: Bringing the Button Back
After cleaning and inspecting, carefully reassemble the key. Ensure all parts align correctly. Then, carefully snap the keycap back into place. Next, close the laptop casing. Secure the screws you removed earlier. After the assembly, plug in the power cord. Then, restart your laptop and test the button. Does it work now? Fantastic!
Step 6: The Software Sidekick: Software Solutions
At times, the problem isn't hardware-related. Instead, it might be a software glitch. So, you should try updating your keyboard drivers. Go to the Device Manager in your operating system. Then, locate your keyboard and right-click. Choose "Update driver." After this, if you're comfortable, consider using the on-screen keyboard for temporary usability.
Step 7: When to Seek Professional Help: Knowing Your Limits
While some button fixes are straightforward, others require expertise. Therefore, if you are uncomfortable disassembling your laptop, don’t do it. In the event of complex damage, it's best to consult a professional repair technician. Also, if you are still under warranty, contact the manufacturer.
Conclusion: You've Got This!
Repairing a broken laptop button can be satisfying. By following these steps, you can often fix the problem yourself. However, take your time. Be patient, and don't be afraid to seek help when necessary. With some effort, you can save money and get back to work. Now, go forth and conquer that broken button!
Laptop Audio DEAD? 😱 FIX It NOW! (Easy Steps)Laptop Button Broken? FIX IT NOW! (Easy Guide)
Hey there, tech enthusiasts! Ever felt that sinking feeling when your trusty laptop button decides to stage a rebellion? That little clicker, the key to your digital kingdom, suddenly goes silent? Don't panic! We've all been there. That's why we're diving headfirst into the world of laptop button woes and, more importantly, how to conquer them. This isn't just some generic troubleshooting guide – think of it as your friendly neighborhood tech support, ready to walk you through the fix, step-by-step, with a dash of humor and a whole lot of "we can do this together!"
1. The Dreaded Click: Why Did My Laptop Button Betray Me?
First things first, let's figure out what's going on. Is it a hardware hiccup, a software glitch, or something else entirely? Think of your laptop button as a tiny soldier, constantly battling the digital battlefield. Over time, wear and tear can take their toll. Dust and debris can sneak in, and sometimes, age just catches up. But don't despair! We'll explore common culprits and how to identify the root cause.
2. Identifying the Culprit: Is It the Button or Something Else?
Before we start ripping things apart (though, let's be honest, that's sometimes satisfying), let's perform a digital autopsy. Is it really the button? Sometimes, the problem lies elsewhere.
- Software Glitches: Have you noticed the button acting up after a recent update or a new application install? Software conflicts can sometimes mimic button problems.
- Driver Issues: Outdated or corrupted drivers can wreak havoc on your input devices. It's like having a faulty gear in a perfectly good machine.
- External Mouse Interference: Are you using an external mouse? Try unplugging it to see if that solves the issue. Sometimes, an external mouse can override the laptop's trackpad.
3. Software Solutions: Reboot, Reset, Revive!
Let's start with the low-hanging fruit, the easy fixes that often work like a charm. Think of these as the equivalent of a digital "restart".
- The Reboot Ritual: This is the tried-and-true method. A simple restart can often clear out temporary glitches and refresh your system. It's akin to hitting the reset button on your brain after a long, stressful day.
- Driver Checkup: Head over to your device manager (search for it in your Windows search bar or your system preferences on a Mac) and check your touchpad or mouse drivers. Look for any yellow exclamation marks indicating problems. Right-click on the touchpad driver and select "Update driver."
- Update Your Operating System: Make sure your operating system is up to date. Software updates often include bug fixes and performance improvements that can resolve button-related issues.
- System Restore (Windows): If the problem started recently, you might be able to revert your system to a previous state using System Restore. This is like going back in time to a point before the button decided to go rogue.
4. Hardware Heroes: Cleaning, Calibration, and Clicking On!
If the software solutions didn't do the trick, it's time to get our hands a little dirty. Don't worry; we'll keep it simple.
- The Dust Buster: Grab a can of compressed air and gently blow out any dust or debris that might be lurking around the button or the trackpad. Think of it as a digital spring cleaning!
- Trackpad Sensitivity Adjustment: Access your trackpad settings (search in your settings for "mouse settings" or "trackpad settings"). Adjust the sensitivity; sometimes, a lower setting helps.
- Button Calibration: In your trackpad settings, look for options that address button calibration or tap-to-click settings. Adjust these to see if they improve responsiveness.
5. Delving Deeper: The Internal Inspection (Proceed with Caution!)
Okay, this is where things get a little more advanced. Before you proceed, make sure your laptop is powered off and unplugged. Doing this prevents any accidental shorting that could damage the internal components.
- Battery Removal (If Applicable): If your laptop's battery is removable, take it out for added safety before you start.
- The Screwdriver's Song: Carefully unscrew the bottom panel of your laptop. Consult your laptop's model manual (search online for "your laptop model disassembly").
- Locate the Trackpad/Button Mechanism: Depending on your laptop's design, you might be able to see the button's interior. If you're comfortable, you can remove the trackpad/button cable, reseat it and check for dirt or debris
- Reassembly Revival: Once you've confirmed everything is as it should be, carefully reassemble your laptop.
6. The Ultimate Test: Click, Click, Hooray!
After each step, test your laptop button. See if it's responding. If the problem persists, return to previous steps or consult a specialist.
7. When to Call in the Cavalry: Knowing When to Seek Professional Help
We've walked through some common fixes, but sometimes, the problem is beyond our DIY capabilities.
- Physical Damage: If your button is physically broken (e.g., cracked, completely unresponsive, or the internal components are damaged) it's time to seek help from a professional.
- Advanced Repairs: If you're not comfortable with opening up your laptop or working with delicate components, don't hesitate to take it to a repair shop.
- Warranties and Insurance: Check your laptop's warranty or any extended insurance coverage. Repair costs can add up, so you might be able to get it fixed for free.
8. Preventing Future Button Blues: Proactive Protection
Now that we've wrestled with the problem, let's think about prevention. How do we keep our laptop buttons happy and healthy for the long haul?
- Gentle Handling: Avoid pressing the button with excessive force. Treat your equipment with care.
- Protective Gear: Consider using a screen protector and keyboard cover to prevent debris from entering your laptop.
- Regular Cleaning: Wipe down your trackpad and buttons regularly with a soft, slightly damp cloth to remove dust and grime.
- Software Hygiene: Keep your software up-to-date to prevent conflicts.
9. The World of External Alternatives: Embracing the Mouse Life
Sometimes, the simplest solution is the best. If your laptop button is causing constant headaches, consider using an external mouse.
- Benefits: External mice are often more ergonomic and offer greater precision and a clear alternative to the laptop button.
- Types: Opt for a wired or wireless mouse, depending on your preference.
10. Troubleshooting Checklist: Your Go-To Guide
Here's a handy checklist to keep you on track:
- Reboot your laptop.
- Update your drivers.
- Clean the trackpad/button area.
- Adjust trackpad sensitivity and other settings.
- Consider the use of an external mouse.
- Ensure that no programs are interfering with the button's functionality.
11. Understanding Warranty Specifics: What Your Coverage Entails
Before you start any DIY repairs, take a quick look at your laptop's warranty. This information can prevent unnecessary expenses and safeguard your device.
12. The Art of Disassembly: Essential Tools and Techniques
If you are inclined to the hardware solutions, it's essential to possess some vital tools and grasp basic techniques.
- Essential Tools: Screwdrivers (especially the right size for your laptop), compressed air, a soft cloth and a reliable pair of tweezers.
- Techniques: Take your time, work in a place with a good light and always consult your laptop's manual. Patience and care will ensure your success.
13. Cost Analysis: DIY vs. Professional Repair
Deciding on the correct approach can be challenging. Weighing costs vs. effort is key to making the right choice.
- DIY: This route typically involves little to no cost.
- Professional Repair: Costs vary. However, they typically range from 50 to 200 USD but might increase depending on the severity of the problem and the type of laptop.
14. Future-Proofing Your Laptop: Tips for Longevity
Here are a few extra tips for ensuring that your laptop thrives over the years:
- Prevent Dropping: Always be careful when carrying your laptop.
- Proper Storage: Store your laptop safely when not in use.
- Maintain an Optimum Temperature: Do not expose your laptop to extreme temperatures.
15. The Final Click: A Laptop Button Triumph!
And there you have it! You're now armed with the knowledge to tackle those frustrating laptop button problems. Remember, every problem has a solution. Whether it’s a quick software fix or a deeper dive into the hardware, a little effort usually goes a long way. So go forth, troubleshoot with confidence, and keep those clicks coming!
Closing Segment:
We hope this guide has empowered you to conquer your laptop button woes! Remember, you're not alone in this digital journey. We're all here to navigate the tech challenges together. Don't be afraid to
Verizon Hotspot Laptop Magic: The Secret's Revealed!How To Start A Laptop If Power button is not workingshorts laptopsolution

By Spider's Tech How To Start A Laptop If Power button is not workingshorts laptopsolution by Spider's Tech
Fix Some keys on Laptop Keyboard Not Working in Windows 10 Solve keyboard keys Won't typing

By Victor Explains Fix Some keys on Laptop Keyboard Not Working in Windows 10 Solve keyboard keys Won't typing by Victor Explains
How to Individual Laptop Keyboard Keys Fix Repair Installation Guide HP Compaq Pavilion HD
By Tech Profis How to Individual Laptop Keyboard Keys Fix Repair Installation Guide HP Compaq Pavilion HD by Tech Profis

Title: How to Fix Some Keys Not Working on Laptop Keyboard Keyboard Not Working
Channel: Tech White
How to Fix Some Keys Not Working on Laptop Keyboard Keyboard Not Working by Tech White
My Laptop Work
Laptop Button Broken? FIX IT NOW! (Easy Guide)
It’s a familiar scenario, isn’t it? You’re in the flow – typing a crucial email, crafting a report, or maybe just enjoying some downtime – and suddenly, disaster strikes. A key on your laptop's keyboard gives up the ghost. Whether it's the spacebar refusing to spring back, the Enter key becoming stubbornly unresponsive, or a letter or number that simply won't register, a broken laptop button can bring your productivity to a screeching halt. But before you resign yourself to a costly repair or, worse, a complete laptop replacement, take a deep breath. In many instances, a broken button is a problem you can solve yourself, swiftly and effectively. This comprehensive guide will walk you through the most common causes of button failure and provide you with step-by-step solutions to get you typing again.
Identifying the Culprit: Diagnosing the Button Breakdown
Before diving into fixes, it's crucial to pinpoint the nature of the problem. Is it a mechanical issue, a software glitch, or something else entirely? Accurate diagnosis is the first, crucial step.
The Sticky Situation: Mechanical Obstruction. The most frequent culprit? Debris. Dust, crumbs, pet hair, or even dropped liquids can work their way under and around the keys, impeding their movement. This is often the easiest issue to resolve. Look closely at the affected button. Is there visible gunk around the edges? Does the key feel sluggish or stuck?
The Ghost in the Machine: Software Interference. Occasionally, a button might appear broken due to software conflicts. A misconfigured driver, a faulty program, or even a simple system glitch can cause button behavior that won't respond as expected. Consider whether the problem started after a recent software installation or update.
The Keycap Casualty: Physical Damage. While less common, a broken keycap or the underlying mechanism can also halt functionality. A keycap might become detached or, as a result of forceful impacts, the internal scissor switch underneath can break.
Your Toolkit: Essential Supplies for Button Repair
You don't need a workshop full of specialized equipment. A few basic tools will equip you to handle most button issues:
- Canned Air: A must-have for dislodging debris. Ensure you purchase it from a trusted manufacturer and always hold the can upright when spraying to prevent liquid expulsion.
- Microfiber Cloth: For gentle cleaning, use a lint-free microfiber cloth to wipe down your keyboard and prevent dust particles from spreading.
- Small, Flathead Screwdriver: Useful for carefully prying off keycaps if necessary.
- Tweezers: For grabbing stubborn debris or manipulating small components.
- Isopropyl Alcohol (90% or higher): For cleaning if there's residue.
- Keycap Puller (Optional): A specialized tool designed to remove keycaps without causing damage.
- Replacement keycaps (Optional): If your keycap is broken or missing, you might benefit from a replacement.
Step-by-Step Solutions: Bringing Your Buttons Back to Life
Armed with your toolkit and diagnosis, let's tackle the button breakdown.
Phase 1: The Dust Buster Approach (Mechanical Solutions)
This should be the first line of defense.
- Power Down and Unplug: Always begin by completely shutting down your laptop and disconnecting it from the power source. This prevents accidental electrical issues.
- The Angle of Attack: Upright Keyboard Spray: Hold your laptop at a 45-degree angle (or higher) with the affected button(s) facing downwards. This helps gravity work in your favor by carrying away dislodged debris. Use short, controlled bursts of canned air to target the area around the malfunctioning button. Direct the air stream under and around the edges of the key.
- Repeat and Rotate: Repeat the air-blasting procedure several times, rotating the laptop slightly to ensure that different angles are covered. Try pressing the button after each round to see if the function has been restored.
- The Wet Work (Use with caution!): If the button is still sticky or if you suspect residue from a spilled liquid is the cause, you can use a slightly dampened (not soaking wet) microfiber cloth with isopropyl alcohol. Wet the cloth and then wipe it gently. Be extremely careful to prevent liquid from entering the laptop.
- Dry Run: Allow the keyboard to dry completely before powering on your laptop.
Phase 2: Keycap Removal and Deep Clean (Advanced Mechanical Solutions)
If the canned air doesn’t fix it, we need to dive deeper. Proceed with caution, as this involves removing keycaps.
- Identify the Keycap: Confirm the keycap that requires removal.
- The Keycap Puller (If You Have One): If you own a keycap puller, insert the tool under the edges of the keycap and gently pull upwards.
- The Flathead Screwdriver (If You Don't Have a Keycap Puller): Carefully insert the tip of the small, flathead screwdriver under the edges of the keycap. Use gentle leverage to pry it upwards. Be patient and avoid excessive force to prevent damage to the keycap or the underlying mechanism.
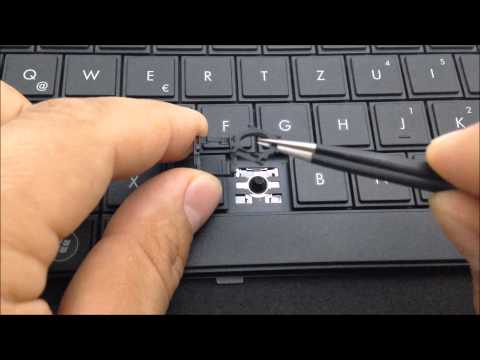
- Inspect and Clean: Once the keycap is removed, examine the area beneath. You'll see the scissor switch mechanism – the small, X-shaped structure that allows the key to depress and return. Use the canned air to carefully blast away any remaining debris from around the scissor switch and the keycap’s underside.
- Reassemble: Carefully align the keycap with the scissor switch and press down firmly until it snaps into place. Test the button by pressing it several times.
- Repeat: If the button still doesn't function, repeat the process, focusing on cleaning the scissor switch mechanism more thoroughly.
Phase 3: Software Troubleshooting (Addressing Software Glitches)
If mechanical solutions fail, the problem might be software-related.
- Restart Your Laptop: A simple restart can often resolve temporary software glitches that might be affecting button functionality.
- Driver Check: Ensure your keyboard drivers are up-to-date. Go to Device Manager (search for it in the Windows search bar or go through the control panel). Expand the "Keyboards" section. Right-click on your keyboard and select "Update driver." Follow the on-screen instructions.
- Uninstall and Reinstall Drivers: Consider uninstalling and reinstalling the keyboard drivers. In Device Manager, right-click on your keyboard, select "Uninstall device", and then restart your laptop, which will automatically reinstall the necessary drivers.
- Malware Scan: Run a full scan with your antivirus software. Malware can sometimes interfere with keyboard functionality.
- System Restore (Advanced): If the problem started recently, you could try performing a System Restore to a point before the issue began. This will revert your system to a previous state, potentially undoing any software changes that might be causing the problem.
Phase 4: Seeking Professional Help (When to Call in the Experts)
While many button issues are fixable at home, some situations require professional intervention.
Water Damage is Extensive: Never attempt to repair a laptop that has suffered significant liquid damage. Take your laptop to a qualified repair technician immediately. There’s a high probability of corrosion underneath the keys.
Hardware Failure: If the above steps don't work, and the button remains unresponsive, the underlying internal components, such as the scissor switch itself or the keyboard's internal circuitry, may be damaged. This needs professional attention.
You're Uncomfortable with Disassembly: If you feel uncomfortable with the idea of removing keycaps or working inside your laptop, don't hesitate to seek professional help. You are more likely to resolve the problem if you do not cause any additional damage.
Preventative Measures: Extending Keyboard Lifespan
Prevention is always better than cure. Implement these measures to keep your keyboard functioning smoothly:
- Regular Cleaning: Wipe down your keyboard regularly with a microfiber cloth and use canned air to remove dust and debris.
- Avoid Eating and Drinking Near Your Laptop: Spills are a keyboard's worst enemy.
- Invest in a Keyboard Cover (Optional): Consider a silicone keyboard cover for added protection against spills and debris.
- Handle Your Laptop Carefully: Avoid dropping or placing heavy objects on your laptop.
By following this comprehensive guide, you should be able to diagnose and resolve most laptop button problems. With patience and a little know-how, you can bring your keyboard back to full functionality and keep those fingers flying.
