keyboard backlight not working on laptop
Title: How To Fix Keyboard Backlight Not Working on Windows 11 10
Channel: Softbay
How To Fix Keyboard Backlight Not Working on Windows 11 10 by Softbay
keyboard backlight not working on laptop, keyboard backlight not working on asus laptop, keyboard backlight not working on dell laptop, keyboard backlight not working on hp laptop, laptop keyboard backlight not working windows 11, laptop keyboard backlight not working windows 10, laptop keyboard backlight not working lenovo, why is my keyboard backlight not working, how do i fix my keyboard backlight
Laptop Backlight DEAD? FIX This Now!
Laptop Backlight Blues: Resurrecting Your Screen from the Shadows
Have you ever stared blankly at your laptop, the screen a dark abyss? Frustrating, isn't it? You power it up, hear the familiar whir, but see nothing. The backlight is dead. Don't panic! Breathe. We'll navigate this together. This isn't a death sentence for your device.
The Silent Screen: Decoding the Symptoms
Firstly, let's confirm the diagnosis. Is the screen truly dark, or just dim? Try shining a flashlight at a shallow angle. If you can vaguely see your desktop icons, the backlight is indeed the likely culprit. Alternatively, the image may be visible but very dark. This usually points to a similar problem. Because the backlight is crucial. It illuminates the LCD panel. Without it, you’re essentially staring at an unlit canvas. Thus, understanding the symptoms is paramount. It allows us to know the next steps.
Troubleshooting Tactics: A Journey of Discovery
Okay, we've established the problem. Now, where do we begin? Before you even consider replacements, try a few simple steps. These are often overlooked. These might just resurrect your screen.
Power Cycle: Sometimes, a simple reboot works wonders. Shut down the laptop completely. Remove the battery (if removable). Hold the power button for 30 seconds. Then, reinsert the battery, power it back on. So, this can clear minor glitches.
External Monitor Test: Connect your laptop to an external monitor. Do you see the display on the external screen? If so, this strongly suggests a faulty backlight or display cable. If an image still doesn't appear, then there might be a more significant issue. However, this step is always worth trying.
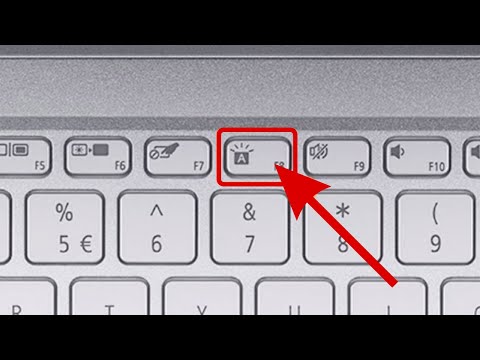
Brightness Adjustments: Consider this. Are you sure the brightness isn't turned down? This is a common mistake. Look for function keys on your keyboard associated with brightness. They often look like a small sun. Adjust the brightness upwards. This may seem simple, but it has happened to the best of us.
Delving Deeper: Internal Inspection and Potential Solutions
If the basic troubleshooting doesn’t work, time for a bit more investigation. This involves diving into the laptop's innards. But, proceed with caution. Make sure you're grounded to avoid static discharge. And, always disconnect the power adapter!
Visual Inspection: Carefully open the laptop. Locate the display cable. Inspect it for any signs of damage. Look for loose connections. Sometimes, a simple disconnection and reconnection resolves the issue. Also, be extremely patient during this inspection.
Inverter Board Inspection (If Applicable): Many laptops use an inverter board. It converts DC power to the AC needed for the backlight. The inverter board is usually a small, rectangular piece. Locate the inverter board. Check for any visible signs of damage, like burnt components. Replace it if needed.
LED Strip Replacement (For LED Backlights): Most modern laptops use LED backlights. These consist of a strip of LEDs. The strip runs along the bottom or top edge of the screen. LED strips do sometimes fail. You can replace the LED strip. However, this can be a delicate process.
The Cost of Repair: Weighing Your Options
Repair costs vary. It often comes down to the part, time, and your technical acumen. If the cause is a failed inverter board or an LED strip, the parts are relatively inexpensive. However, replacing the entire LCD is a more expensive option. You need to compare repair costs with replacement costs. It makes sense to purchase a whole new laptop as the cost of the repair might exceed the value of the laptop. Also, consider other factors.
Preventive Measures: Keeping the Light Shining Bright
You can take steps to keep your laptop backlight functioning. Some precautionary measures are useful. They can extend your screen’s lifespan.
Avoid Extreme Temperatures: Excessive heat can damage components. Don’t leave your laptop in direct sunlight. Protect your laptop from extreme temperatures.
Handle with Care: Close your laptop screen gently. Avoid placing heavy objects on top. This will save your screen.
Regular Cleaning: Use a soft cloth to clean your screen. Avoid harsh chemicals. That keeps everything nice and clean.
Final Thoughts: Reclaiming Your Digital World
A dead laptop backlight is irritating! But, with some patience and knowledge, you can fix it. Take methodical steps. You can often diagnose the problem yourself. You can troubleshoot, repair, or make informed decisions. Don't give up hope! Your screen can come back to life. With luck, you will be back in business. Good luck, and happy computing!
Windows 10 Touch Keyboard: Laptop Magic or Total Flop?Laptop Backlight DEAD? FIX This Now!
Hey there, fellow tech travelers! Ever stared, wide-eyed and frustrated, at a laptop screen that's gone stubbornly dark? You know, that sinking feeling when you realize your trusty companion, your portal to emails, movies, and… well, everything, has decided to throw a digital tantrum? We’ve all been there. The screen flickers, then fades, leaving you staring into a void. Don't panic! A dead laptop backlight can feel like a disaster, but often, it's a fixable problem. We're here to guide you through the potential culprits and, more importantly, how to resurrect that screen. Think of this as your personal tech rescue squad!
1. The Dark Screen Dilemma: Understanding the Problem
First things first: Let’s clarify. A "dead" backlight isn't always a completely blank screen. Sometimes, you can barely make out the image if you hold the screen up to a bright light. It’s like trying to read a secret message written with invisible ink. This subtle visibility is a key sign the backlight is the issue, not the whole display. This is crucial to understand to avoid unnecessary and potentially expensive repairs. Believe me, saving money is a beautiful thing.
2. Is It Really the Backlight? Ruling Out Other Issues
Before we dive into backlight repair, let’s rule out other possibilities. It’s like checking the engine before assuming your car's transmission is busted.
- External Monitor Test: Plug your laptop into an external monitor. If the external monitor displays correctly, the problem is almost certainly with your laptop’s screen, and likely the backlight or the screen itself. This is a quick, simple, and definitive test.
- Brightness Controls: Sounds silly, I know, but double-check your brightness settings. Make sure those keys aren’t accidentally dimming the screen completely. Sometimes, we overlook the obvious, right?
- Operating System Glitches: Restarting your laptop can sometimes resolve minor software conflicts that might interfere with display settings. Think of it as a digital reset button.
3. Common Culprits: What Went Wrong?
Okay, assuming it is the backlight, let's get into the nitty-gritty. The backlight is like the light bulb in your screen's display case. It can fail in a variety of ways.
- Faulty Inverter Board: The inverter board is the power supply for the backlight. Think of it as the transformer that steps up the voltage. If this board goes, the light's off.
- LED Driver Failure: Modern laptops use LEDs. If the LED driver, essentially the light control, malfunctions, so does the light.
- Loose Connections: Sometimes, a loose cable inside the laptop can disrupt the backlight. Like bad wiring in a house, the lights might not work.
- Failing Backlight Bulbs (Older Laptops): Older laptops often use fluorescent light bulbs (CCFLs). These bulbs can burn out over time, like a regular light bulb.
- Damaged Screen: Damage to the screen itself (like a crack) can impact the backlight's functionality.
4. DIY Diagnosis: Peeking Inside (Proceed With Caution!)
This step involves opening your laptop, which, let me stress, can void your warranty. If you're not tech-savvy, consider getting professional help. But if you’re feeling brave, here's a basic outline.
- Turn it off and Unplug It: Safety first!
- Gather Your Tools: You'll need a small screwdriver set (especially a Phillips head), and possibly a spudger (a plastic opening tool).
- Find a Guide: Search for a teardown guide specific to your laptop model. Websites like iFixit are fantastic for this. Each laptop is a bit like a snowflake – unique. You'll want to find the guide that's a perfect match.
- Carefully Open It: Be gentle, label screws as you remove them, and take photos at each step so you can reassemble it correctly.
- Check the Connections: Look at the cables connecting the screen to the motherboard. Ensure they're firmly plugged in.
5. The Inverter Board Tango: A Potential Fix
If you suspect a faulty inverter, here's what you can do.
- Locate the Inverter: It's usually a small, slim board near the screen.
- Test it (with Caution): Use a multimeter to check for voltage. If you’re not comfortable using a multimeter, skip this step!
- Replace, if Necessary: Inverter boards are often relatively inexpensive and readily available online. Replacing it is often the simplest solution.
6. LED Driver Drama: Another Possible Culprit
LED drivers are more integrated into the overall screen assembly.
- Assessment: If you find your laptop's LED driver at fault, it often requires replacing the screen itself.
- Screen Replacement: This is where things get interesting. You'll need your laptop's model number, then purchase a replacement screen with the correct specifications.
7. Screen Replacement: A Step-by-Step Guide
Replacing the screen is a more involved process, but completely doable.
- Disconnect the Battery: Safety first!
- Remove the Screen Bezel: This might involve removing screws or using a spudger to pop it loose.
- Unplug the Cables: Carefully detach the video cable and any other connections.
- Remove the Old Screen: Unscrew it from the hinges.
- Install the New Screen: Attach the new screen, reconnect the cables, and reassemble everything in reverse order.
8. The Cost Factor: How Much Will This Cost?
The cost varies wildly. A replacement inverter board might be $10-$50. A replacement screen can range from $50 to several hundred dollars, depending on the laptop model and screen size. Think of it as investing in a new wardrobe versus just replacing a button.
9. Professional Help: When to Call in the Cavalry
Sometimes, DIY isn't the answer.
- Beyond Your Comfort Zone: If you're not comfortable opening your laptop or doing any electrical testing, seek professional help.
- Complex Issues: If the problem remains even after checking the inverter, the screen, or the connections, it points to a deeper issue that a professional should address.
- Warranty Considerations: If your laptop is still under warranty, avoid opening it and let the manufacturer handle the repairs.
10. Maintaining Your Backlight: Prevention is Key
Prevention is always better than cure.
- Gentle Handling: Avoid dropping your laptop or putting heavy objects on it. Treat it like a fragile, expensive friend.
- Proper Shutdowns: Always shut down your laptop properly before closing the lid. This reduces stress on the screen components.
- Cleanliness: Keep your laptop clean, especially the air vents. Overheating is the enemy of all electronics.
11. The Screen and Its Brightness: An In-Depth Analysis
The brightness of your screen is determined by the backlight and other components such as the LED driver. Some things you can do to improve your experience include:
- Adjusting Brightness: Use the function keys (FN keys).
- External Lights: Ensure your office is well-lit, but not where there's excessive glare.
- Screen Settings: Check your display settings to enhance the visual experience.
12. Fixing a Flickering Backlight
A flickering backlight is a different beast than a dead one. This can sometimes be fixed with a software update, or it could indicate a loose connection.
- Driver Updates: Update your display drivers.
- Cable Connections: Check the connections inside the laptop.
- Replace the Screen: If you are experiencing flickering issues, it could mean the backlight is faulty, or your screen is worn out.
13. The Aftermath: Post-Backlight Repair Care
You've brought your screen back from the brink! Now what?
- Regular Maintenance: Dust off your laptop, keep it clean, and follow the preventive measures we discussed earlier.
- Monitor for Recurrence: Watch for any signs of the problem returning.
- Enjoy Your Revived Laptop: Celebrate your victory! You saved money, learned some new skills, and successfully brought your laptop back to life.
14. The Tech Support Alternatives
Perhaps, you can't fix the backlight on your own. The important thing is to not panic and assess the situation effectively. If all else fails, you have the following options:
- Manufacturer Support: If your laptop is under warranty, then you can contact them.
- Local Computer Repair Shops: Your local experts may have the answer. Make sure you have researched the shop on reputation and reviews.
- Online Repair Services: If you prefer remote services, online support is available for your laptop's backlight.
15. Where to Source Replacement Parts
Finding the right parts to fix your backlight is essential to bringing it back to life. There are several sources to consider when buying a replacement.
- Official Manufacturer: You can obtain the original parts through the laptop manufacturer.
- Online Marketplaces: Several platforms, such as Amazon and eBay, have
HP Elite Book Laptop Keyboard Backlight Not Working ProblemmacniteshkeyboardtricksKeybordHP2023

By Mac Nitesh HP Elite Book Laptop Keyboard Backlight Not Working ProblemmacniteshkeyboardtricksKeybordHP2023 by Mac Nitesh
How to Fix Asus Keyboard Light When Not Working
By EasyTechs How to Fix Asus Keyboard Light When Not Working by EasyTechs
How to Fix ASUS Keyboard Backlight Not Working
By Techy Druid How to Fix ASUS Keyboard Backlight Not Working by Techy Druid

Title: Lenovo IdeaPad S540 Series Laptop Keyboard Backlight Not Working Problemmacniteshkeyboardtricks
Channel: Mac Nitesh
Lenovo IdeaPad S540 Series Laptop Keyboard Backlight Not Working Problemmacniteshkeyboardtricks by Mac Nitesh
Wifi On Laptop
Laptop Backlight DEAD? FIX This Now!
Is your laptop screen plunged into an unwelcome darkness? A dead backlight can transform your once-vibrant display into a useless black void, rendering your work, entertainment, and communication utterly inaccessible. Frustration quickly mounts, but before you resign yourself to expensive repairs or a new machine, know that there are several troubleshooting steps you can take. We'll guide you through a systematic approach to pinpoint the cause and, importantly, restore the life back into your laptop's screen. Let’s begin the journey to illuminating your screen once more! Understanding the Laptop Backlight: The Gateway to a Brighter Display
Before we dive into solutions, it's crucial to understand the core components involved in your laptop's display functionality. The backlight quite literally illuminates the LCD (Liquid Crystal Display) panel, allowing you to see the images and text displayed. Without it, the LCD remains dark, even though the system is running. There are generally two primary types of backlights used in laptops:
- CCFL (Cold Cathode Fluorescent Lamp): Older laptops frequently utilize CCFL backlights. They are similar to the fluorescent tubes found in many office settings. They contain a gas that emits light when an electrical current passes through it.
- LED (Light Emitting Diode): Newer laptops overwhelmingly employ LED backlights. LED backlights are more energy-efficient and generally offer a longer lifespan than CCFLs. LED backlights can be further categorized into edge-lit and direct-lit types, differentiating the placement of the LEDs.
Knowing which type of backlight your laptop uses can be helpful for diagnosing the problem, as well as the type of replacement parts you may need. You might find this information in your laptop's manual or by researching your specific model. Preliminary Checks: Ruling Out Simple Fixes
Before venturing into more complex diagnostics, we must eliminate the easiest possibilities. These quick checks often resolve the issue without requiring technical expertise.
Brightness Adjustment: The first thing to verify is the brightness setting. Accidentally dimming the screen to its lowest setting is a common cause of a seemingly "dead" backlight. Most laptops have keyboard shortcuts (usually function keys with a sun icon) to adjust the brightness. Experiment with these keys to see if they bring the screen back to life.
External Monitor Test: Connect your laptop to an external monitor. If the external monitor displays correctly, this indicates the issue is isolated to the laptop's screen or its internal connections. This is a critical step in narrowing down the possibilities. If the external monitor also shows a blank screen, the problem might lie in the graphics card or other fundamental components.
Power Cycle: A simple power cycle can sometimes reset the system and resolve minor glitches. Turn off the laptop completely. Remove the battery (if possible). Unplug the AC adapter. Hold down the power button for 30 seconds to discharge any residual power. Reinstall the battery (if removed) and plug in the AC adapter. Then, power on the laptop.
Visual Inspection for Physical Damage: Carefully examine the laptop's screen for any visible damage, such as cracks, pressure marks, or liquid spills. These can all damage the LCD panel or the backlight. Digging Deeper: Troubleshooting the Backlight Itself
If the preliminary checks fail, the problem likely resides within the backlight system itself. Now, we will delve into specific troubleshooting steps. Keep in mind that some of these steps involve opening your laptop, which may void your warranty. Proceed with caution and consult your laptop's manual for specific disassembly instructions.
Inverter Board (for CCFL Backlights): Older laptops with CCFL backlights have an inverter board. This small circuit takes low-voltage DC power from the motherboard and converts it into the high-voltage AC power required to illuminate the CCFL. A faulty inverter board is a common cause of backlight failure in these laptops. To test the inverter board, you may need a multimeter to check for voltage output. The inverter may fail to start with a simple bad connection.
LED Driver Board (for LED Backlights): LED backlights, driven by an LED driver board, perform a very similar function to an inverter board but are optimized for LEDs. Locate and inspect the LED driver board visually.
- Check for Loose Connections: Ensure that all the cables connecting the display panel to the motherboard are securely connected. Disconnect and reconnect these cables carefully, as they can sometimes become loose over time.
- Inspect Display Cables: Open the laptop and gently inspect the cables connecting the display to the motherboard. Look for any signs of damage, crimping, or wear. These cables transmit both power and data, so a damaged cable can lead to either a blank screen or a malfunctioning display.
Screen Replacement: If you are getting no response, then it is likely you must replace either the LCD panel, the LED backlight strip, or the CCFL. This is a complex process that requires careful disassembly and reassembly. Obtain the correct replacement part for your laptop model, as LCD panels are not interchangeable.
LCD Panel Replacement: LCD panel replacement is needed if the backlight proves not to work and is unable to display an image. This is the most involved and may require professional assistance. The exact procedure varies depending on your laptop’s design.
Backlight Strip Replacement (LED): If the issue is the LED backlight strip, you'll need a new strip with the correct voltage and connections for your model. Carefully detach the old strip, noting its positioning and connections, and install the new one. Be very careful with the delicate flex cables.
CCFL Replacement: You will have to remove the screen from the laptop and replace the CCFL. This is usually a job for professionals because of the risk of damaging the LCD panel.
Software Glitches & Driver Problems
While hardware problems are the most common culprits, sometimes software glitches can also appear to cause a blank screen.
Driver Conflicts: Occasionally, problems with the graphics card drivers can interfere with display functionality. Try updating or rolling back your graphics card drivers.
- Driver Updates: Go to the manufacturer's website (Nvidia, AMD, or Intel, depending on your graphics card) and download the latest drivers for your model.
- Driver Rollback: If a recent driver update caused the problem, try rolling back to the previous version. You can usually do this through the Device Manager in Windows.
Operating System Issues: Corrupted system files or other operating system errors can sometimes affect the display.
- System Restore: Restore your system to an earlier point in time when the display was working correctly.
- Operating System Reinstall: A clean reinstall of the operating system is a more drastic measure, but it can resolve deep-seated software problems. Be sure to back up your data before doing this. Professional Assistance: When to Call for Help
Sometimes, the problem is beyond the scope of DIY repairs. If you've tried the troubleshooting steps above and still have a blank screen, it's time to consider professional help.
- Complex Diagnoses: If you are uncomfortable working with the internal components of your laptop, or if you are unsure where to start, consult a qualified laptop repair technician.
- Advanced Repairs: If the problem involves circuit board repair, replacing the LCD panel, or replacing other complex and delicate components, a professional repair service is highly recommended.
- Warranty Considerations: If your laptop is still under warranty, contacting the manufacturer's support or an authorized service center is the best course of action. Preventive Measures: Protecting Your Laptop’s Display
Even after fixing the problem, you can take steps to prevent future issues.
- Gentle Handling: Avoid applying excessive pressure to the screen. Close the lid gently and don't place heavy objects on top of your laptop.
- Cleaning: Clean the screen regularly with a soft, lint-free cloth and a screen cleaner specifically designed for LCDs. Avoid harsh chemicals.
- Temperature Control: Avoid exposing your laptop to extreme temperatures, either hot or cold.
- Power Surges: Use a surge protector to protect your laptop from electrical damage.
By systematically working through these steps, you can significantly increase your chances of diagnosing and resolving the frustrating problem of a dead laptop backlight. Remember to be patient, proceed with caution, and don’t hesitate to seek professional help when needed. With a little effort, you can bring your display back to life and continue to enjoy the full functionality of your laptop.
