my sound is not working on my toshiba laptop

Title: Toshiba Computer Has No Sound 2023
Channel: TechFixIT
Toshiba Computer Has No Sound 2023 by TechFixIT
Toshiba Laptop Sound DEAD? FIX It NOW! (Easy Steps!)
Toshiba Laptop Sound Gone Silent? Don't Panic! (Quick Fixes!)
Have you ever experienced the unsettling quiet of a lifeless Toshiba laptop? That frustrating moment when your speakers refuse to cooperate? Don't worry; it happens. And, thankfully, fixing it is often easier than you think. This guide will navigate you through potential solutions. You can get your audio back up and running. So, let's dive in and revive those sounds!
Initial Troubleshooting: The Basics First
Before you rush to drastic measures, let's start with the simple stuff. First, double-check the obvious. Is the volume muted? Look at the speaker icon in your system tray. Then, check the volume slider. Make sure it's not at zero. Moreover, ensure the volume isn't just turned down really low.
Next, verify your headphones aren't plugged in. Sometimes, we forget they are connected. If headphones are connected, sound might be directed there. Furthermore, confirm your speakers are selected as the default playback device.
Often, these basic checks resolve the issue. But, if not, further investigation is necessary. We'll move to more in-depth solutions shortly. Patience is key; don't get discouraged if the initial checks don't work immediately. We are here for you!
Checking Your Audio Drivers: The Digital Gatekeepers
Drivers are the software connecting your hardware to your operating system. Think of them as digital translators. A corrupt or outdated driver can cause audio problems. Therefore, updating your audio driver is a crucial step.
Here's how to do that: Navigate to the Device Manager. You can usually find this by searching in the Windows search bar. Inside Device Manager, expand "Sound, video and game controllers." Right-click on your audio device. Select "Update driver." Choose "Search automatically for drivers." Windows will attempt to locate and install the latest drivers.
If that doesn't work, try the following. Right-click the audio device again. Select "Uninstall device." Then, restart your laptop. Windows should automatically reinstall the driver upon reboot. This can often resolve underlying conflicts. In addition, consider visiting the Toshiba support website. Locate the driver for your specific model. Download and install it manually. This often provides the most up-to-date and compatible driver.
Software Conflicts: Identifying the Culprits
Sometimes, software conflicts can interfere with audio playback. A recently installed program might be the cause. Or, it might be a conflict within the system. Let's consider strategies to isolate the problem.
Try closing all unnecessary applications. Some programs might be hogging audio resources. Then, test your audio again. If the sound returns, you've identified the culprit! The interfering program is an issue. Consider uninstalling or updating it.
If that doesn't help, perform a system restore. This resets your computer to a previous state. That way, you can hopefully resolve the issue. Choose a restore point before the audio problem began. This can remove recently installed software causing the issue. Remember, this will also remove any programs installed after that restore point. Back up your files before proceeding, just in case!
Hardware Hurdles: Assessing the Physical Components
Sometimes, the problem lies in the hardware. Though less common, component failures are possible. We'll assess the physical aspects now.
First, check your laptop speakers' physical condition. Listen closely. Do they emit any static or crackling sounds? This could indicate a hardware issue. You can try connecting external speakers or headphones. This will help isolate the problem. Do they work? If so, the laptop's internal speakers are likely the problem.
Next, examine the audio jack. Look for any debris or damage. If the jack seems loose, there could be a hardware issue. Check the volume controls on your laptop. Are they damaged? Are they responding? These checks help determine the source of the issue.
If you suspect a hardware problem, it's time to seek professional help. Contact a qualified technician for diagnostics and repairs. Don't try to disassemble your laptop unless you're experienced with electronics. You could cause further damage.
Audio Enhancement Settings: Tweaking for Success
Windows has audio enhancements. These settings can sometimes interfere with playback. We'll explore how to adjust these settings.
Right-click on the speaker icon in your system tray. Select "Sounds." Go to the "Playback" tab. Select your audio device. Then, click "Properties." In the "Enhancements" tab, disable all enhancements. Test the sound, then, see if it improves playback.
Also, check the "Advanced" tab. Confirm the audio format is set correctly. Try different settings. Another possibility is to investigate your sound card's proprietary software. Look for any equalization or surround sound settings. Adjust these settings to find what works.
Final Thoughts: Bringing the Music Back
Dealing with silent speakers can be frustrating. However, following these steps should help you resolve the issue. Remember to be patient. Take it step by step. It's likely you can fix this yourself.
Finally, if all else fails, consult a professional technician. There are times when professional assistance is necessary. But, chances are, one of these solutions will bring your Toshiba laptop's audio back to life. Now, go forth and enjoy the sounds! Good luck, and happy listening!
HP Pavilion Keyboard & Mouse DEAD? FIX IT NOW!Toshiba Laptop Sound DEAD? FIX It NOW! (Easy Steps!)
Hey there, tech adventurers! Ever felt the gut-wrenching silence when your Toshiba laptop refuses to sing? That sinking feeling when you click play, and… crickets? We've all been there! Trust me, staring at a silent screen is like watching a silent movie – all the action, none of the oomph. But don't you worry, because we’re here to resurrect your digital audio with a series of easy, painless fixes. So, grab your favorite beverage, kick back, and let’s get this sonic symphony back on track!
1. The Sound of Silence: Why Did My Toshiba Go Silent?
Before we dive into the solutions, let's play detective for a moment. Why did the music abruptly stop? Was it a sudden digital blackout, or a gradual descent into audio oblivion? Pinpointing the cause can save us some time. It could be something as simple as a muted setting, or something a little more involved, like a driver issue. Think of it like a car – before you pop the hood, you want a general idea of where the trouble might be brewing.
2. The Obvious First: Check the Volume Controls – Your Easiest Win!
Okay, this is entry-level troubleshooting, but hey, even seasoned pros sometimes forget the basics! Let's be brutally honest: Have you checked the volume? Seriously. I've spent hours troubleshooting only to realize the mute button was accidentally engaged.
- System Tray: Look for the speaker icon in the bottom-right corner of your screen (by the clock). Click it and make sure the volume slider isn’t all the way down or muted.
- Keyboard: Many Toshiba laptops (and most laptops in general) have dedicated volume buttons. These are usually Function keys (Fn) combined with a volume up/down/mute key. Double-check those!
- Application Volume: Even if the system volume is up, individual applications (like YouTube, Spotify, your favorite game) might have their own volume settings. Double-check each one.
3. Headphones? External Speakers? The Great Audio Divide
Let's think about where the sound is supposed to be coming from. It’s possible the sound is routed to the headphones or an external speaker you forgot was plugged in.
- Headphone Jack: Unplug and re-plug your headphones. A faulty connection can sometimes trick the system. If the sound works through headphones, we likely have a problem with the laptop's internal speakers. If no sound from either, then we move into the next steps.
- External Speakers: If you're using speakers, make sure they're powered on, correctly connected, and the volume is up.
4. Welcome the Device Manager: Your Driver's Best Friend
Drivers are the software that lets your laptop talk to your hardware. Think of them as translators. If the translator is missing or corrupt, the hardware (like your sound card) can't communicate.
- Accessing the Device Manager: Type "Device Manager" in the Windows search bar (the little magnifying glass). Click to open it.
- The Sound, Video, and Game Controllers: Expand this category. You should see your sound card listed. It might be called something like "Realtek High Definition Audio" or a similar name.
- Yellow Exclamation Marks: Do you see any yellow exclamation marks next to the audio device? This is a telltale sign of a driver problem.
- Update Those Drivers: Right-click on the audio device and select "Update driver." Choose the option to search automatically for updated driver software. Windows will try to find the latest drivers for you.
- Still No Luck? Consider a Reinstall: If updating doesn't work, you might try uninstalling the driver (right-click > Uninstall device) and then restarting your laptop. Windows will usually reinstall a basic driver automatically.
5. Audio Troubleshooter: Windows' Built-in Helper
Windows comes with a built-in troubleshooter specifically designed for audio problems. It's like having a tech support person on speed dial!
- Accessing the Troubleshooter: Right-click on the speaker icon in your system tray. Select "Troubleshoot sound problems."
- Follow the Prompts: Windows will run diagnostics and attempt to fix any issues it finds. This is a surprisingly powerful tool, so don't skip this step!
6. Services, Signals, and Starting Sounds: Auditing Audio Services
Sometimes, the service that controls sound is turned off. It’s like the orchestra not tuning up before the show.
- Accessing Services: Type "Services" in the Windows search bar and open the Services app.
- Find the Audio Services: Look for "Windows Audio" and "Windows Audio Endpoint Builder."
- Check the Status: Make sure both services are running. If they are not, right-click on them, select "Properties," and change the "Startup type" to "Automatic." Then, click "Start" to get them running.
7. The Sound Card Scenario: Is It Failing?
Sometimes, components, like sound cards, may fail over time. You can use several steps to pinpoint this.
- External Device Test: Use headphones or external speakers connected to your laptop. Also, use another device's speaker and input to check the card's functionality.
- Windows Repair: Windows has extensive repair options. Go to "Settings" > "Update & Security" > "Recovery" and follow the steps to reset your PC.
8. BIOS Blues: Check Your BIOS Audio Settings
Sometimes, the BIOS (Basic Input/Output System) settings, which control hardware at the lowest level, can impact sound.
- Accessing BIOS: Power your laptop down completely. Power it back on and immediately start pressing either the Delete, F2, F10, or Esc key (the key to enter BIOS varies depending on the model).
- Audio Configuration: Once inside the BIOS, look for a section related to audio or sound. Ensure that audio is enabled.
9. Corruption Concerns: Scan for System File Corruption
Corrupted system files can wreak havoc on your audio. It's worth running a scan to check for these issues.
- Command Prompt Magic: Open Command Prompt as an administrator (search for "cmd," right-click, and select "Run as administrator").
- The SFC Scan: Type
sfc /scannowand press Enter. This will scan for and attempt to repair corrupted system files. Be patient; it can take a while.
10. Virus Vigilance: A Malware Maybe?
Malware can sometimes interfere with your audio. It's always a good idea to perform a scan to ensure there's no nasty software causing the issue.
- Run a Scan: Run a full scan with your antivirus software.
11. The Software Showdown: Conflicting Programs Could be the Culprit
Sometimes, a recently installed program might be interfering with your sound. It’s like having too many cooks in the kitchen.
- Recent Installs: Think back to any new software you installed. If it was around the time the sound stopped working, try uninstalling it to see if that fixes the problem.
- Clean Boot: Consider doing a "clean boot" of Windows. This starts Windows with a minimal set of drivers and startup programs. This can help you pinpoint if a startup program is causing the issue. Search online for instructions on how to perform a clean boot in Windows.
12. Factory Reset: A Last Resort (But Sometimes Necessary)
If all else fails, a factory reset might be the only way to get your sound back. This will erase everything on your laptop, so make sure you back up your important files beforehand!
- Access the Restore: Go to "Settings" > "Update & Security" > "Recovery." Select "Reset this PC."
- Choose the Right Option: You can choose to keep your files or remove everything.
13. Physical Inspection: Are the Speakers Broken?
While it’s unlikely, physical damage to your speakers is a possibility. If your laptop took a tumble or suffered any physical trauma, the speakers might have been damaged.
- Visual Check: Inspect the speaker grilles for damage.
- Professional Repair: If you suspect physical damage, it's best to take your laptop to a repair shop.
14. External Soundcards: A Sonic Lifesaver
If all else fails, and you don't want to completely replace the laptop, you can still get sound by buying an external USB sound card.
- Plug and Play: These are easy to use; just plug them into a USB port, install any necessary drivers, and you're good to go.
15. Preventative Measures: Keep the Music Playing!
Now that your sound is back, let's keep it that way!
- Keep Drivers Updated: Regularly update your drivers.
- Antivirus Protection: Keep your antivirus software running.
- Backups: Back up your important files regularly.
Bringing the Noise Back: Conclusion
There you have it! We’ve journeyed through the soundscape of your Toshiba laptop, troubleshooting every conceivable issue, from simple volume checks to dealing with corrupt system files. Remember to be patient and try each step systematically
Laptop Battery Meter DEAD? This SHOCKING Fix Works!Why Is There No Sound On My Toshiba Computer

By Egghead Fixers Why Is There No Sound On My Toshiba Computer by Egghead Fixers
Toshiba Laptop With No Sound Fix Repair
By Runforlife Toshiba Laptop With No Sound Fix Repair by Runforlife
FIX100 Sound Audio Problem ON Your PCLaptopmacniteshaudio2023new

By Mac Nitesh FIX100 Sound Audio Problem ON Your PCLaptopmacniteshaudio2023new by Mac Nitesh

Title: Toshiba laptop, on but nothing on screen, lets fix it
Channel: Electronics Repair School
Toshiba laptop, on but nothing on screen, lets fix it by Electronics Repair School
Change Wifi Settings
Toshiba Laptop Sound DEAD? FIX It NOW! (Easy Steps!)
The Sudden Silence: Diagnosing Your Toshiba’s Audio Ailment
The absence of sound emanating from your Toshiba laptop can be a jarring experience, instantly disrupting your workflow, entertainment, or communication. That familiar chime of a new email, the immersive soundtrack of a game, or the clarity of a video call - all abruptly vanish into an unsettling silence. This comprehensive guide will equip you with the knowledge and, more importantly, the practical steps to diagnose and, in most cases, swiftly remedy the audio issues plaguing your Toshiba machine. Forget the panic; let’s get your sound back.
Step 1: The Obvious Checks – Laying the Groundwork for Resolution
Before delving into more complex troubleshooting, let's sweep through the fundamental issues that are often the culprits. These initial checks can often lead to a quick and painless resolution, saving you valuable time and potential frustration.
Volume Verification: The most elementary fix, yet surprisingly common. Examine the volume controls. Is the master volume muted? Is the speaker icon in the system tray (bottom right of the screen) crossed out? Increase the volume using the function keys (typically Fn + a volume up key) or by clicking the speaker icon and adjusting the slider. Double-check that the volume isn’t accidentally set to zero.
Headphone/External Speaker Disconnection: Ensure no headphones or external speakers are plugged into the audio output jack. If a device is connected, your laptop might route the sound only through that device. Unplug any audio accessories and test the internal speakers.
Physical Inspection of Speaker Ports: Gently examine the audio output jack for any obstructions. Dust, debris, or bent pins can interrupt the signal. If you find anything blocking the port, carefully remove it, exercising extreme caution. A toothpick or compressed air can be helpful here.
BIOS Settings Review: On some older Toshiba models, audio settings are accessible within the BIOS. Accessing the BIOS typically involves pressing a specific key (like F2, Del, or Esc) during startup. Consult your Toshiba laptop’s manual for instructions on entering the BIOS. Check the audio settings to make sure the audio functionality is enabled.
Step 2: Driver Dilemmas – Navigating the Digital Pathways of Sound
Drivers are the critical software bridges connecting your operating system to your hardware components, and outdated or corrupted drivers are common culprits. Let's ensure your audio drivers are functioning correctly.
Device Manager Inspection: Access the Device Manager (search for “Device Manager” in the Windows search bar). Expand the “Sound, video and game controllers” section. If you see any devices with a yellow exclamation mark or a down arrow, it indicates a driver issue.
Driver Update: Right-click on the problematic audio device and select “Update driver.” Choose "Search automatically for drivers." Windows will attempt to locate and install the latest drivers.
Manual Driver Update (If Automatic Update Fails): If Windows Update cannot locate the correct drivers, you might need to manually download them from the Toshiba support website. Visit the Toshiba support website, enter your laptop’s model number, and download the audio drivers specific to your operating system. Install the downloaded driver.
Driver Rollback: If the audio issue emerged recently after a driver update, right-click on the audio device in Device Manager, select "Properties," and then the "Driver" tab. If the "Roll Back Driver" option is available, use it to revert to the previous driver version.
Driver Uninstall and Reinstallation: If other methods fail, you can uninstall the audio driver and then reinstall it. In Device Manager, right-click on the audio device and select "Uninstall device." Restart your laptop, and Windows should automatically reinstall the driver or prompt you to do so.
Step 3: Audio Playback Troubles – System-Level Configuration and Testing
Beyond the drivers, Windows itself controls audio output through various settings and utilities. Correctly configuring these settings can frequently resolve sound problems.
Playback Device Selection: Right-click on the speaker icon in the system tray and select "Open Sound settings." Verify the correct playback device (your laptop’s speakers) is selected. If multiple devices are listed, ensure your internal speakers are selected as the default device.
Volume Mixer Check: Within the Sound settings, click "App volume and device preferences." Ensure individual application volumes are not muted or set to zero. Adjust the volume for each application as necessary.
Troubleshoot Audio with Built-in Tools: Windows includes built-in troubleshooting tools that can diagnose and potentially fix audio issues. Within Sound settings, click on "Troubleshoot" under the "Output" section. Follow the on-screen prompts.
Audio Enhancements and Effects: Some Toshiba laptops include audio enhancement settings (like Dolby Audio or DTS Sound). Check the settings associated with these enhancements in sound settings. Consider disabling these to see if they are preventing your audio from functioning correctly.
Testing Audio – Internal Speakers: To isolate the problem, test the sound using a music file, a video, or the Windows test sound. This helps determine whether it's a system-wide issue or limited to specific applications.
Step 4: Hardware Hurdles – Identifying Potential Physical Faults
While software issues are more common, hardware problems can also cause sound to become dead. This is a less frequent outcome, but addressing the possibility is critical.
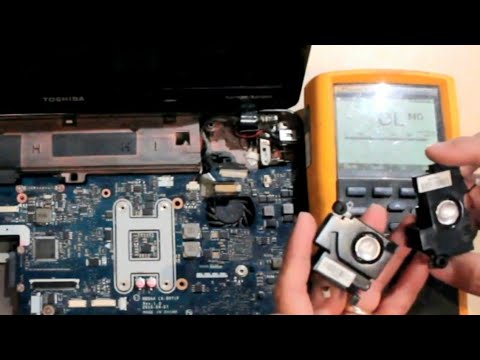
Speaker Hardware Inspection: Inspect the laptop's speakers for any visible damage. This will likely require removing the bottom panel of your laptop and this can void your warranty. Look for loose connections or physical damage to the speaker cones.
Internal Cable Integrity Check: Ensure any internal speaker cables are firmly connected to the motherboard. Disconnect and reconnect the cables.
Speaker Replacement: If you are comfortable and capable of doing so, consider replacing the internal speakers. Replacement speakers are readily available online. Consult your Toshiba laptop's service manual for your specific model.
Motherboard Assessment: In many cases, if the audio is not working after applying these steps, the motherboard itself may be the source of the problem. This will require professional repair.
Step 5: Software Conflicts – Addressing Potential Interference
Sometimes, third-party software can interfere with audio functionality. Identifying and addressing this problem requires a focused approach.
Recent Software Installations: Think about any software you installed prior to the audio issue arising. Uninstall those applications, one at a time, and test the sound after each uninstallation.
Codec Conflicts: If you mainly experience sound issues while playing specific media files, consider installing a different codec pack (like the K-Lite Codec Pack). Codecs are necessary for audio playback.
System Restore: Use the System Restore feature to revert your operating system to a point before you believe the audio issue began.
Malware Scans: Run a full system scan using your antivirus software. Malware can sometimes interfere with audio drivers and other system functions.
Step 6: The Ultimate Resort – Factory Reset and Professional Assistance
When all troubleshooting efforts fail, two final avenues remain.
Factory Reset: If all other troubleshooting methods have failed, performing a factory reset can restore your Toshiba laptop to its original state, effectively eliminating software conflicts. This will erase all your data, so back up any important files before proceeding. Consult your Toshiba's manual for detailed instructions on performing a factory reset.
Professional Repair: If a factory reset doesn’t resolve the issue, the problem is very likely hardware-related, meaning the issue is beyond your capacity for DIY repair. Contact a qualified repair technician specializing in laptop repair or contact Toshiba's customer support to inquire about repair options.
Conclusion: Reclaiming Your Audio Experience
Dealing with a sound-dead Toshiba laptop can be frustrating, but by methodically working through these steps, you can effectively diagnose and resolve the problem. Remember to be patient. By systematically checking your volume settings, updating drivers, configuring Windows audio settings, and exploring potential hardware issues, you will, more often than not, restore the vibrant audio experience your Toshiba laptop should deliver. Should you encounter difficulties, remember to consult your laptop’s manual and, when in doubt, seek professional assistance. Your sound should be back soon.
